TeamViewer, görüntülü sohbetler ve uzaktan kumanda için kullanışlı bir programdır ve oyuncular ve uzaktan BT yardımı arasında oldukça popüler bir seçimdir. Bununla birlikte, birçok kullanıcı bağlantı kuramadıklarını bildirdi. Ekranlarının altında, kırmızı ışığın yanında sorunlu hata mesajını görürler.

Sorunu çözmek için kullanabileceğiniz epeyce yöntem vardır ve bunları aşağıda kontrol etmenizi öneririz. Genellikle gerçekleştirmeleri oldukça kolaydır ve sorununuzu anında çözebilirler!
Windows'ta TeamViewer "Bağlantınızı Kontrol Edin" Hatasına Neden Olan Nedir?
Bu özel sorunun birçok farklı nedeni vardır ve listedeki her yöntemi denemek istemiyorsanız, doğru olanı belirlemek çok önemli olabilir. Bu sizi çözüme daha hızlı yönlendirecektir ve bu nedenle aşağıda bulunan tüm olası nedenlerin listesini oluşturmaya karar verdik!
- 'Hosts' dosyasında yanlış ayarlar - 'Hosts' dosyası İnternet'e bağlanan uygulamalar hakkında önemli bilgiler içerir ve TeamViewer girişi bozulmuş olabilir. Girişini silmek, Windows'un onu yeniden oluşturmasına neden olur, bu nedenle sorunu çözmek için bunu deneyin.
- Antivirüs veya güvenlik duvarı sorunları - TeamViewer'ın İnternet'e erişimi, çalıştırdığınız güvenlik duvarı veya antivirüs tarafından engelleniyorsa, ana yürütülebilir dosyası için bir istisna yapmayı denediğinizden emin olun.
- DNS ve Winsock sorunları - DNS adresleri değiştirilebilir ve Winsock sıfırlanabilir. Birçok kullanıcı için sorunu çözmek için gereken tek şey budur, bu yüzden denediğinizden emin olun!
- IPv6 bağlantısı - TeamViewer bazen IPv6 üzerinde çalışmaz, bu nedenle bu sorunu çözmek için onu devre dışı bırakmayı düşündüğünüzden emin olun. Zarar vermez ve TeamViewer'ı geri getirebilir!
- TeamViewer'ın yeni arayüzü - Kullanıcı arayüzü, bağlantı sorunları ile ilgili olması gereken bir şey değildir, ancak kesinlikle birkaç TeamViewer kullanıcısı için geçerliydi. Eski arayüze dönmek, onlar için sorunu çözmeyi başardı.
1.Çözüm: TeamViewer'ı Hosts Dosyasından Kaldırın
Bilgisayarınızdaki 'hosts' dosyasındaki TeamViewer girdisi büyük olasılıkla bozulmuştur. Tamamen yanlış olan adresleri ve verileri gösterebilir ve girişini silmenizi öneririz. Tekrar açtığınızda, giriş yeniden oluşturulacak ve umarız sorun görünmez!
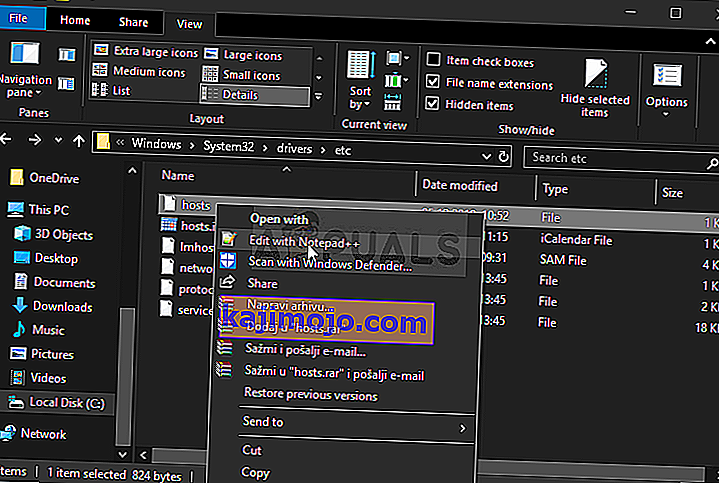
- Dosya Gezgini'ni açtıktan sonra C >> Windows >> System32 >> Sürücüler >> Vb konumuna gidin . İlk olarak, Yerel Disk C'nizi bulmak ve açmak için sol taraftaki bölmeden Bu PC veya Bilgisayarım'a tıklayın .
- Windows klasörünü göremiyorsanız, gizli dosya ve klasörleri görmenizi sağlayan seçeneği açmanız gerekebilir. Dosya Gezgini'nin üst menüsünde " Görünüm " sekmesini tıklayın ve Dosya Gezgini'ni Göster / Gizle'deki " Gizli öğeler " onay kutusunu tıklayın , gizli dosyaları gösterecek ve siz değiştirene kadar bu ayarı hatırlayacaktır.

- Hosts dosyasını Etc klasöründe bulun, üzerine sağ tıklayın ve Not Defteri ile Aç'ı seçin . Ctrl + F tuş kombinasyonunu kullanın ve Sonrakini bul'a tıklamadan önce Ne bul kutusuna 'ekip görüntüleyici' yazdığınızdan emin olun.
- Dosyadaki TeamViewer bölümünü bulun. "#Teamviewer" ile başlamalı ve kendisine ait olan her şeyi seçtiğinizden emin olmalı, seçimi sağ tıklatmalı ve içerik menüsünden Sil düğmesini seçmelidir.
- Değişiklikleri kaydetmek için Dosya >> Kaydet'i tıklayın veya Ctrl + S tuş kombinasyonunu kullanın . Not Defteri'nden çıkın ve bilgisayarınızı yeniden başlatın. TeamViewer "Hazır değil" ile ilgili sorunun devam edip etmediğini kontrol edin. Bağlantınızı kontrol edin ”hata mesajı!
2.Çözüm: DNS Adresinizi Değiştirin
Kullanıcılar, sorunu yalnızca ISS'niz (İnternet Servis Sağlayıcısı) tarafından sağlanan DNS'yi değiştirerek ve farklı bir tane kullanmaya başlayarak çözebileceklerini söylediler. Sorunun görünmediği bir bilgisayarın DNS'si olabilir, ancak birçok kullanıcı sorunu çözmek için Google'ın DNS'ini kullanır. Bilgisayarınızdaki DNS adresini değiştirmek için aşağıdaki adımları izleyin!
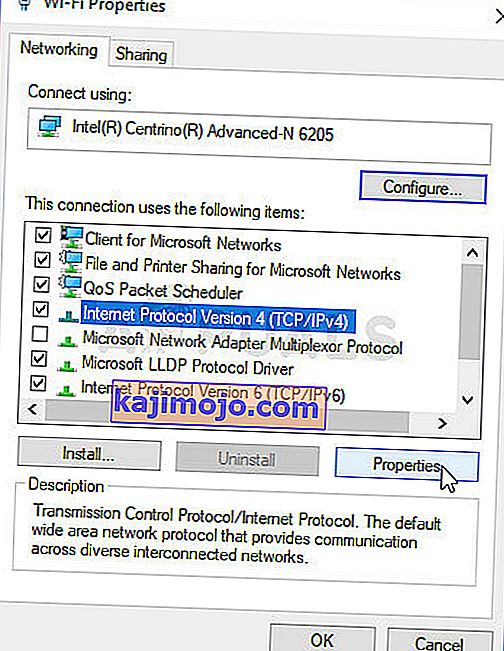
- Metin kutusuna ' ncpa.cpl ' yazmanız gereken Çalıştır yardımcı programı kutusunu açması gereken Windows + R tuş kombinasyonunu kullanın ve Denetim Masası'ndaki İnternet Bağlantı Ayarları girişini açmak için Tamam'ı tıklayın .
- Aynı şey, Kontrol Panelini manuel olarak açarak da yapılabilir . Anahtar Görüntüleme ölçütü için pencerenin sağ üst bölümündeki seçeneği Kategori ve tıklayın Ağ ve Internet üstündeki. Soldaki menüde Adaptör ayarlarını değiştir düğmesini bulup bu düğmeyi tıklamadan önce açmak için Ağ ve Paylaşım Merkezi düğmesine tıklayın.
- Artık İnternet Bağlantısı ekranı yukarıdaki herhangi bir yöntemi kullanarak açıldığına göre, aktif ağ bağdaştırıcınızı (İnternete bağlanmak için kullandığınız) çift tıklayın ve mevcut kullanıcı hesabı için yönetici izinleriniz varsa aşağıdaki Özellikler düğmesini tıklayın.
- Listeden İnternet Protokolü Sürüm 4 (TCP / IPv4) öğesini bulun . Seçmek için üzerine tıklayın ve aşağıdaki Özellikler düğmesine tıklayın.
- Diğer seçeneğe ayarlanmışsa , Genel sekmesinde kalın ve Özellikler penceresindeki radyo düğmesini " Aşağıdaki DNS sunucu adreslerini kullan " olarak değiştirin.
- Her iki durumda da, Tercih Edilen DNS sunucusunu 8.8.8.8 ve Alternatif DNS sunucusunu 8.8.4.4 olarak ayarlayın.
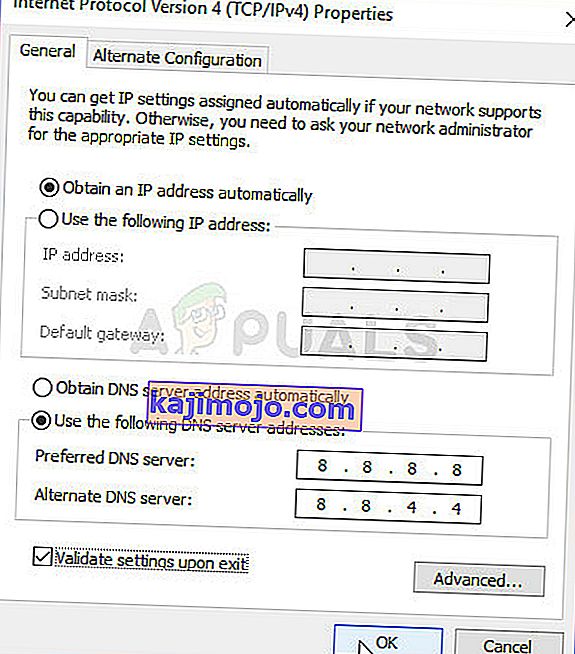
- " Çıkışta ayarları doğrula " seçeneğini işaretli tutun ve değişiklikleri hemen uygulamak için Tamam'ı tıklayın. TeamViewer'ın “Hazır değil. Bağlantınızı kontrol edin ”hata mesajı hala bilgisayarınızda görünüyor!


3. Çözüm: Winsock'u Sıfırlayın
" Netsh Winsock reset ", Winsock Kataloğunu varsayılan ayara veya temiz durumuna sıfırlamak için Komut İstemi'nde kullanabileceğiniz yararlı bir komuttur. TeamViewer'da bağlanamıyorsanız bu yöntemi deneyebilirsiniz.
- " Komut İstemi " ni doğrudan Başlat menüsüne yazarak veya hemen yanındaki ara düğmesine basarak arayın. Arama sonucu olarak açılan ilk girişi sağ tıklayın ve " Yönetici olarak çalıştır " içerik menüsü girişini seçin.
- Additionally, you can also use the Windows Logo Key + R key combination to bring up the Run dialog box. Type in “cmd” in the dialog box which appears and use the Ctrl + Shift + Enter key combination to run Command Prompt using administrator privileges.
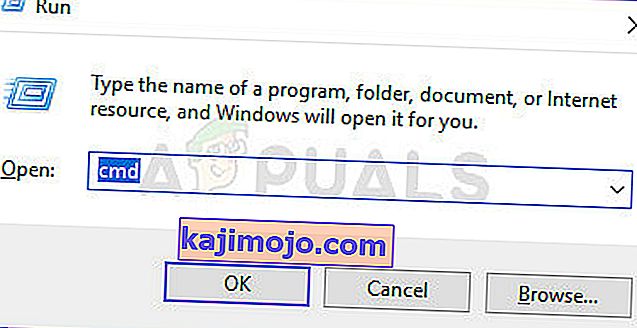
- Type in the following commands in the window and make sure you press Enter after typing each one. Wait for the “Winsock reset completed successfully” message or something similar to know that the method has worked and you haven’t made any mistakes while typing. Check to see if the issue persists.

netsh winsock reset netsh int ip reset

Solution 4: Don’t Use the New User Interface
User interface shouldn’t be in any way connected to TeamViewer’s internet connection but, weirdly enough, many users have reported that they were able to resolve this issue simply by reverting to the program’s old design. This can be done in TeamViewer’s settings so make sure you follow the steps below and try to resolve this connectivity issue.
- Open TeamViewer by double-clicking its icon from Desktop or by searching for it after opening the Start menu and left-clicking the top result.
- From the home screen, click the Extras button from the menu bar and choose the Options entry from the list which will appear.
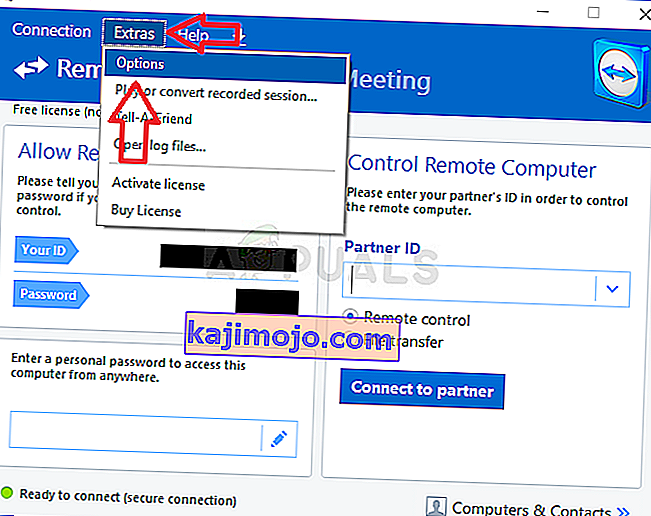
- Navigate to the Advanced tab in TeamViewer options from the left-side navigation menu and check under General Advanced Settings for the “Use new user interface” option. Make sure you uncheck the box next to it before confirming the changes you have made.

- Reopen TeamViewer and check to see if the TeamViewer “Not ready. Check your connection” error message still appears on your computer!


Solution 5: Add an Exception for the Teamviewer_Service.exe File
Sometimes antivirus tools fail to recognize the program’s efforts to connect to the Internet as harmless and TeamViewer’s features are often blocked by it. To prove to the antivirus that the program is harmless, you will have to add it to its Exceptions/Exclusions list!
- Open the antivirus user interface by double-clicking on its icon at the system tray (right part of the taskbar at the bottom of the window) or by searching for it in the Start menu.
- The Exceptions or Exclusions setting is located in different spots concerning different antivirus tools. It can often be found simply without much hassle but here are some quick guides on how to find it in the most popular antivirus tools:
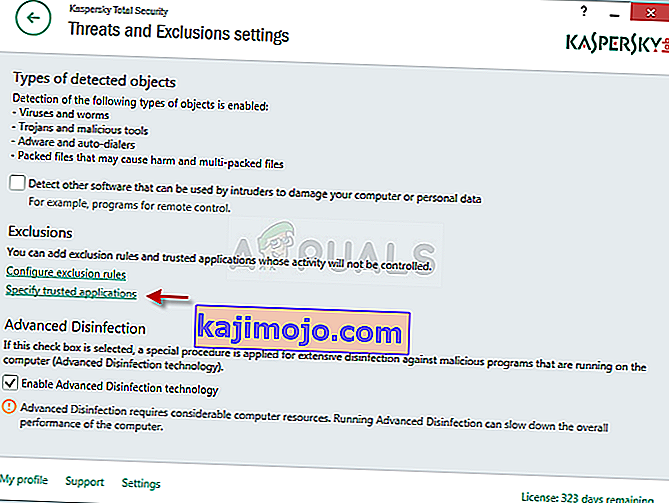
Kaspersky Internet Security: Home >> Settings >> Additional >> Threats and Exclusions >> Exclusions >> Specify Trusted Applications >> Add.
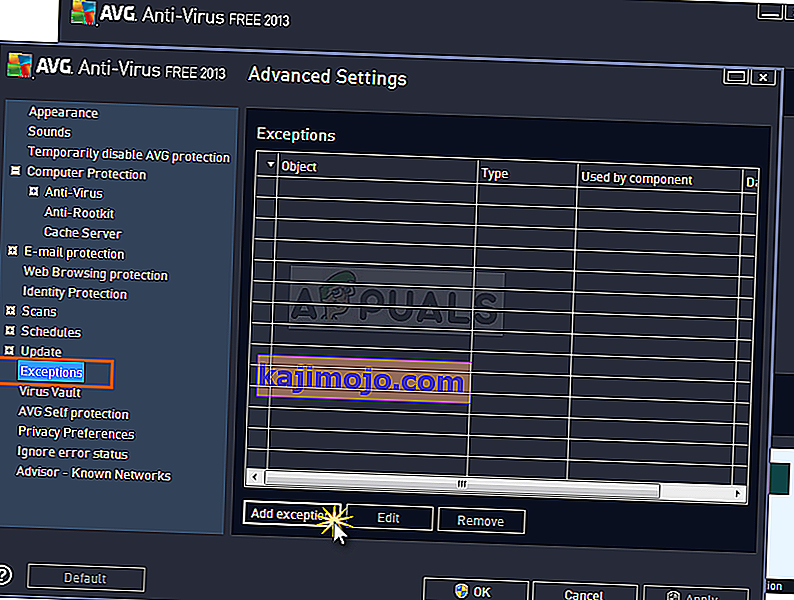
AVG: Home >> Settings >> Components >> Web Shield >> Exceptions.
Avast : Home >> Settings >> General >> Exclusions
- You will need to add the Teamviewer_Service.exe executable in the box which will appear prompting you to navigate to the folder. It should be in the same folder where you decided to install TeamViewer in. By default, it’s:
C:\Program Files (x86)\TeamViewer
- Check to see if you are now able to use TeamViewer without receiving the problematic error message. If it still won’t work, try restarting your computer and try again. The last step would be to uninstall the antivirus and try a different one if the problem persists.


Solution 6: Allow it in Windows Defender Firewall
For TeamViewer’s features to work properly, the app needs to have uninterrupted access to the Internet and its servers to work properly. Windows Defender Firewall is often to blame in such cases and we recommend you make an exception for the Teamviewer_Service.exe executable inside the Windows Defender Firewall!
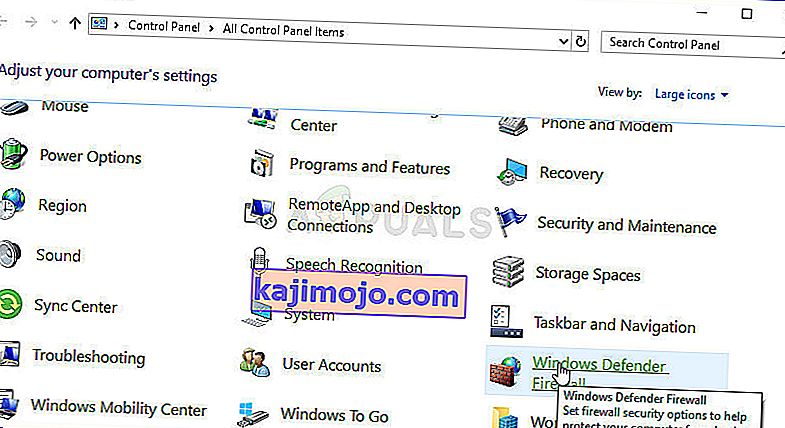
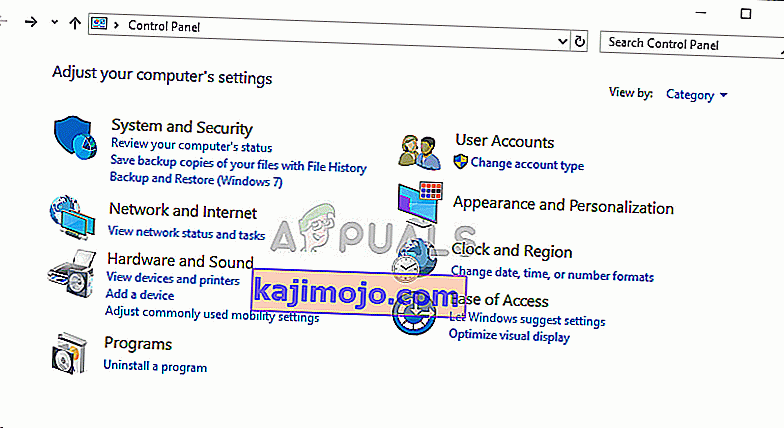
- Open up Control Panel by searching for the utility in the Start button or by clicking the Search button or the Cortana button at the left part of your taskbar (bottom left part of your screen).
- After Control Panel opens, change the view to Large or Small icons and navigate to the bottom to open the Windows Defender Firewall option.
- Click on Windows Defender Firewall and click on the Allow an app or feature through Windows Firewall option from the left side list of options. A list of installed apps should open. Click the Change settings button at the top of the screen and provide administrator permissions. Try locating the executable inside. If it’s not there, click the Allow another app button below.

- Navigate to where you installed TeamViewer (C:\Program Files (x86)\TeamViewer by default) and choose the Teamviewer_Service.exe file.
- After locating it, click the Network types button at the top and make sure you check the boxes next to both Private and Public entries before clicking OK >> Add.
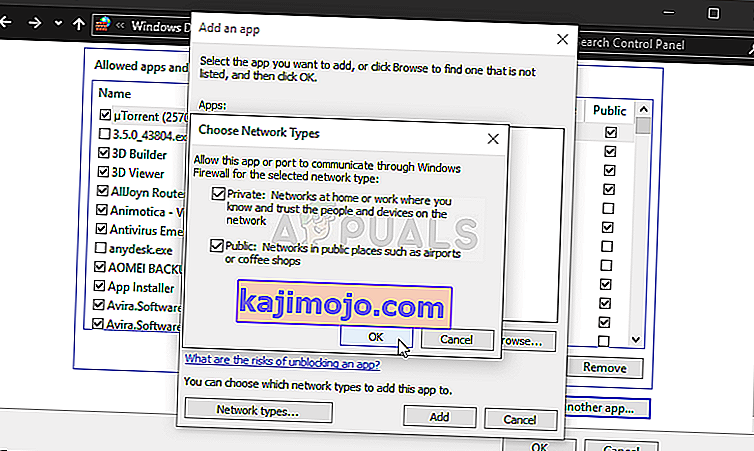
- Click OK and restart your computer before checking whether the TeamViewer “Not ready. Check your connection” error message still appears on your computer.


Solution 7: Disable IPv6
Disabling Internet Protocol version 6 connectivity on your computer managed to resolve the problem for many users and it’s an easy way to resolve the problem. This makes this method worthy and you shouldn’t skip it during your troubleshooting process.
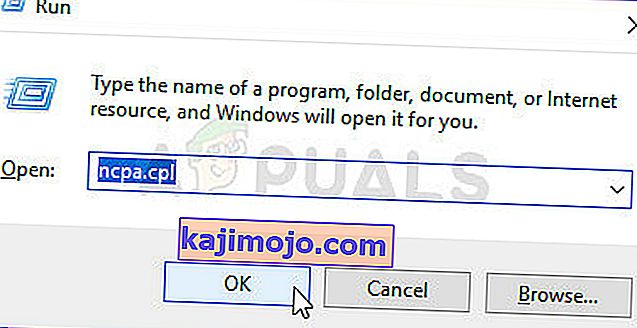
- Use the Windows + R key combo which should immediately open the Run dialog box where you should type ‘ncpa.cpl’ in the bar and click OK to open the Internet Connection settings item in Control Panel.
- The same process can also be done by manually opening the Control Panel. Switch the View by setting at the top right section of the window to Category and click on Network and Internet at the top. Click the Network and Sharing center button to open it. Try to locate the Change adapter settings button at the left menu and click on it.
- When the Internet Connection window opens, double-click on your active Network Adapter.
- Then click Properties and locate the Internet Protocol Version 6 entry on the list. Disable the checkbox next to this entry and click OK. Restart your computer to confirm the changes and check to see if the problem persists.


Solution 8: Restart the TeamViewer Service
Stopping the TeamViewer service from running will effectively restart the whole process and many users have reported that it only took them a few minutes to get TeamViewer to work again. Before starting, make sure you have closed TeamViewer completely.
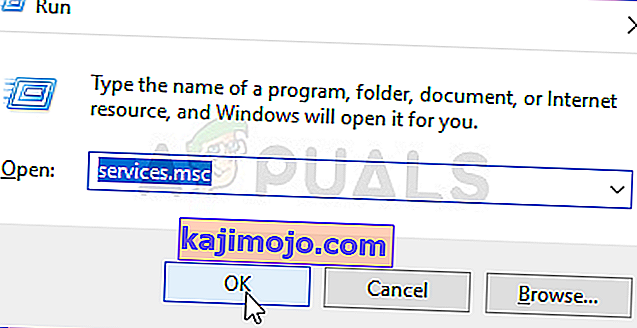
- Open the Run utility by using the Windows Key + R key combination on your keyboard (press these keys at the same time. Type “services.msc” in the newly opened box without the quotation marks and click OK to open the Services tool.
- The alternative way is to open the Control Panel by locating it in the Start menu. You can also search for it using the Start menu’s search button.
- After the Control Panel window opens, change the “View by” option at the top right part of the window to “Large Icons” and scroll down until you locate the Administrative Tools entry. Click on it and locate the Services shortcut at the bottom. Click on it to open it as well.
- Locate the TeamViewer Service on the list, right-click on it and select Properties from the context menu which appears.
- If the service is started (you can check that just next to the Service status message), you should stop it for now by clicking the Stop button in the middle of the window. If it is stopped, leave it stopped until we proceed.
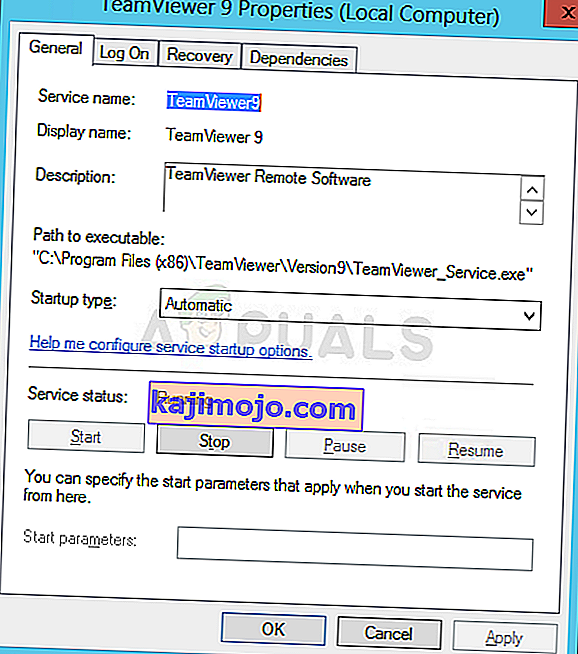
- Make sure that the option under the Startup type menu in the service’s properties window is set to Automatic before you proceed with other steps. Confirm any dialogue boxes which may appear when changing the startup type. Click on the Start button in the middle of the window before exiting.


Solution 9: Reinstall TeamViewer
If all methods above fail to work, reinstalling TeamViewer is the last method which can help you resolve the problem on your computer. It should be fast and painless if you follow all the steps properly! You will also install the latest version which contains the patch to the specific issue you are having!
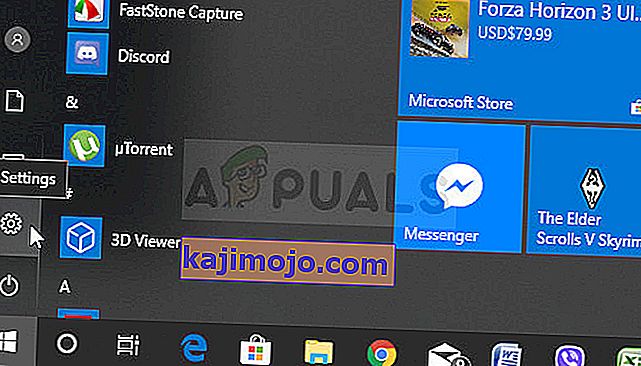
- Click the Start menu and open Control Panel by searching for it simply by typing with the Start menu window open. Alternatively, you can click the cog icon in the lower-left part of the Start menu to open the Settings app if you are using Windows 10.
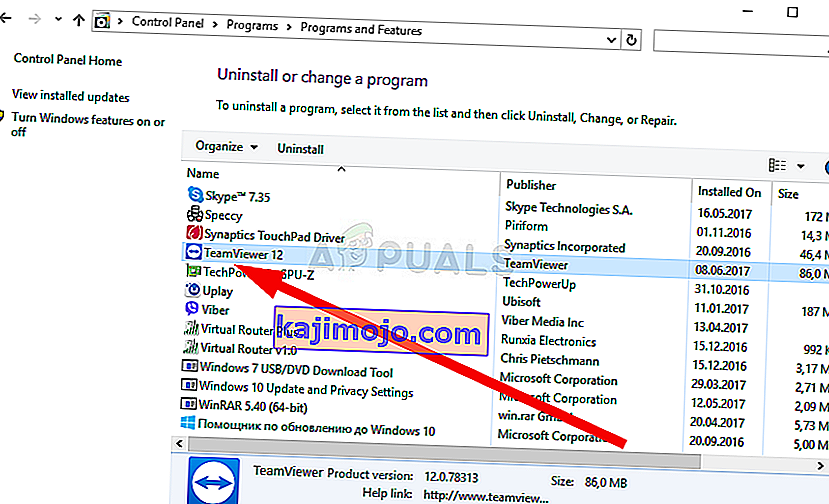
- In Control Panel, select the View as: Category option at the top right corner of the Control Panel window and click on Uninstall a Program under the Programs section.
- If you are using the Settings app, clicking on Apps should immediately open a list of all installed programs on your PC so wait for a while for it to load
- Locate TeamViewer in Control Panel or Settings and click on Uninstall/Repair. Follow any instructions which appear afterward to uninstall it completely.
- Download the latest version of TeamViewer by visiting this link. Download its setup file, run it from the Downloads folder, follow the instructions on screen, and check to see if the problem persists after reinstalling TeamViewer!

