Ethernet'in geçerli bir IP Yapılandırması olmaması , Ethernet Kablosuyla Yönlendiricinize veya Modeminize bağlandığınız NIC (Ağ Arayüz Kartı) bir GEÇERLİ IP Adresi (İnternet Protokolü) alamadığında ortaya çıkar. Bu, bilgisayarın yönlendiriciyle konuşması ve internette çalışması için gereklidir. Bu sorunun ortaya çıkmasının üç ana nedeni vardır, birincisi hatalı bir yönlendirici, ikincisi bilgisayara yanlış atanmış bir IP Adresi ve üçüncüsü hatalı NIC. Sorunu üç adımda ele alacağız ve bunlar listelenen sırayla izlenmelidir.
Ethernet'in geçerli bir IP Yapılandırması yok
Sisteminizi Yeniden Başlatın
Önyükleme ve başlatma süresini azaltmak için ayarları sistem belleğinden veya önbellekten yüklemek için tasarlanmış Hızlı Başlangıç adlı bir özellik vardır. Birçok kullanıcı, sistem yeniden başlatıldığında ve hızlı başlatma devre dışı bırakıldığında bu sorunun çözüldüğünü bildirdi.
Hızlı Başlatma özelliğini devre dışı bırakmak hiç şüphesiz bu sorunu çözebilecek en etkili çözümdür, ancak Hızlı Başlatma özelliğinin tamamen kaybolmasına neden olur . Hızlı Başlatma'yı devre dışı bırakmak için yapmanız gerekenler:
- WinX Menüsünü açmak için Başlat Menüsü düğmesine sağ tıklayın .
- Tıklayın Güç Seçenekleri içinde WinX Menüsü .
- Güç düğmelerinin ne yapacağını seçin / Sol bölmede güç düğmesinin ne yapacağını seçin seçeneğine tıklayın .
- Şu anda kullanılamayan ayarları değiştir seçeneğine tıklayın .
- Hızlı Başlatma'yı devre dışı bırakmak için , pencerenin altına yakın bir yerde , Hızlı başlatmayı aç (önerilen) yanındaki onay kutusunun işaretini kaldırın .
- Değişiklikleri kaydet'e tıklayın .
- Sistem Ayarlarını Kapatın
- Bilgisayarınızı yeniden başlatın .
NIC'nizi Kontrol Edin (Ağ Adaptörü Ayarları)
Yönlendirici genellikle IP Adresini Otomatik olarak atar ve IP Adresini manuel olarak belirlemediyseniz bu tercih edilen ayar olmalıdır. Durum buysa, bağlandıktan sonra yine de önce otomatik olarak ayarlamalısınız, doğru ayarlar için İnternet Özelliklerini kontrol edin ve manuel olarak yeniden yapılandırın.
Talimat aşağıda üzerinde çalışacak Windows Vista / XP / 7 / 8 ve 10 .
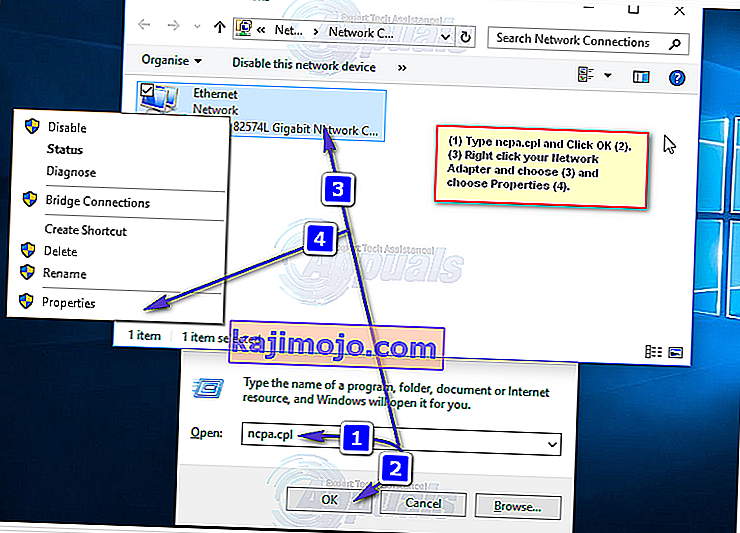
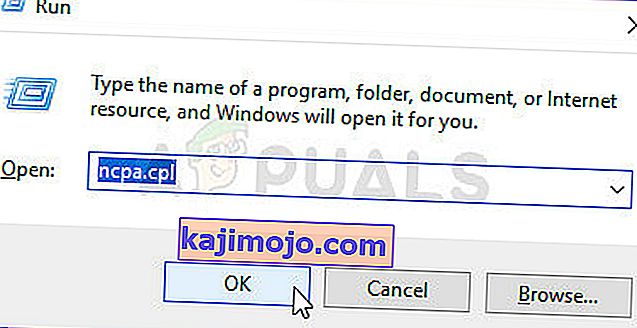
Başlamak için Windows Tuşunu basılı tutun ve R tuşuna basın . Tip Ncpa.cpl tıklayın ve OK . Ağ Bağlantıları penceresinde, Ağ Bağdaştırıcınıza sağ tıklayın ve Özellikler'i seçin .
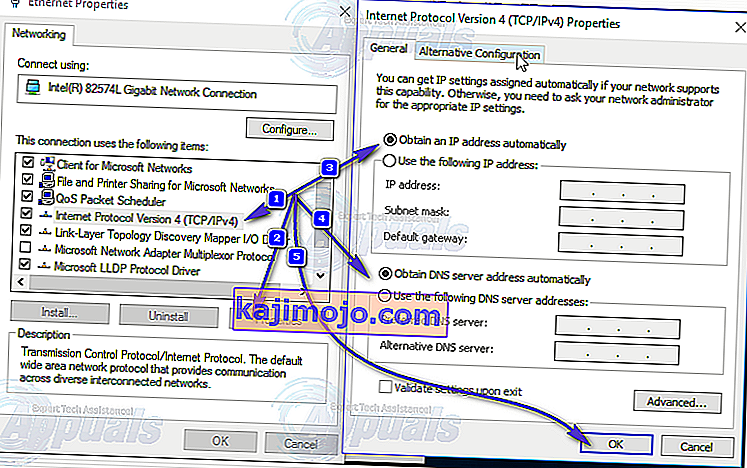
Ethernet Özellikleri penceresinden, İnternet Protokolü Sürüm 4'ü (TCP / IPv4) vurgulamak için birini tıklayın ve ardından Özellikler'i tıklayın. Bir sonraki pencere İnternet Protokolü Sürüm 4 (TCP / IPv4) Özelliklerini açacaktır , buradan aşağıdaki iki ayarın seçildiğinden emin olun.
- Otomatik olarak bir IP Adresi Alın
- DNS Sunucu Adresini Otomatik Olarak Alın
Bu, Ethernet Kartı için yapmalıdır. Yönlendiriciyi yeniden başlatmanın bir sonraki aşamasına geçin.
Yönlendiricinizi / Modeminizi Yeniden Başlatın ve Ethernet Kablosunu Kontrol Edin
Yönlendiricinizin ve modemin gücü veya yalnızca yönlendiriciyse, yönlendiriciyi kapatın, yoksa ikisini de kapatın. 5 dakika bekleyin ve ardından yönlendiriciyi yeniden açın. Açıldıktan sonra, PC'nizin şimdi geçerli yapılandırmaya sahip olup olmadığını kontrol edin, birkaç dakika beklemeniz gerekebilir. Bu yapıldıktan sonra, şimdi çalışıp çalışmadığını ve doğru yapılandırmaya sahip olup olmadığını test edin. Hala çalışmıyorsa, Yönlendiricinizden Bilgisayara farklı bir Ethernet kablosu kullanmayı deneyin. Hala çalışmazsa, bilgisayarınızı farklı bir yönlendiriciye bağlamayı deneyin, diğer yönlendiriciyle hala aynı sorunu yaşıyorsa, ağ kartının değiştirilmesi gerekir, bağlanırsa yönlendiricinin değiştirilmesi gerekir. . Değiştirmeden önce fabrika ayarlarına geri yüklemeyi deneyin (yönlendiricinizin fabrika ayarlarına sıfırlama talimatları için üretici kılavuzuna bakın).
Ağ ayarlarını sıfırlama
Deneyebileceğiniz başka bir şey de internet ayarlarınızı sıfırlamaktır. Ağ ayarlarının güncelliğini yitirdiği veya mevcut ağla çakıştığı birkaç durum vardır. DNS sunucusunu temizleyerek ve soketi sıfırlayarak, sorunun çözüleceğini umarak bağlantı prosedürünü yeniden başlatabiliriz.
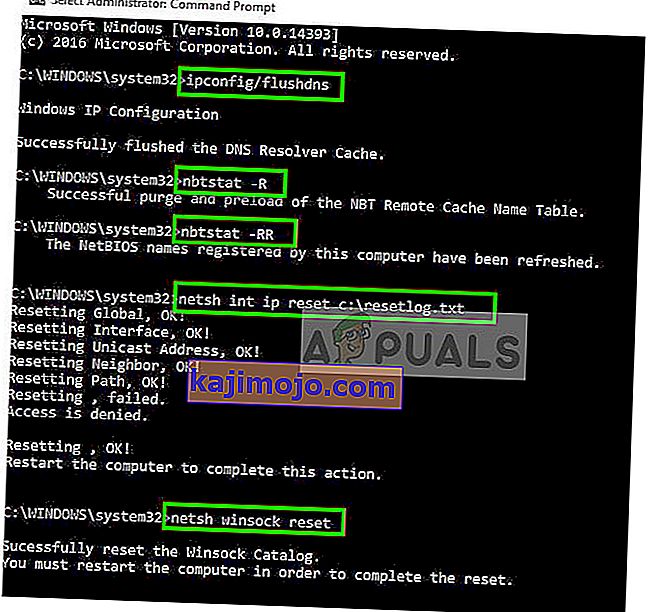
- Windows + S tuşlarına basın , iletişim kutusuna " komut istemi " yazın ve Enter tuşuna basın.
- Komut istemine girdikten sonra, aşağıdaki talimatları tek tek uygulayın:
ipconfig / flushdns ipconfig / renew nbtstat –R nbtstat –RR netsh int ip sıfırlama c: \ resetlog.txt netsh winsock sıfırlama
- Ayarlarınızı sıfırladıktan sonra bilgisayarınızı düzgün bir şekilde yeniden başlatın. Yeniden başlattıktan sonra, Windows + R tuşlarına basın , iletişim kutusuna " kontrol paneli " yazın ve Enter tuşuna basın.
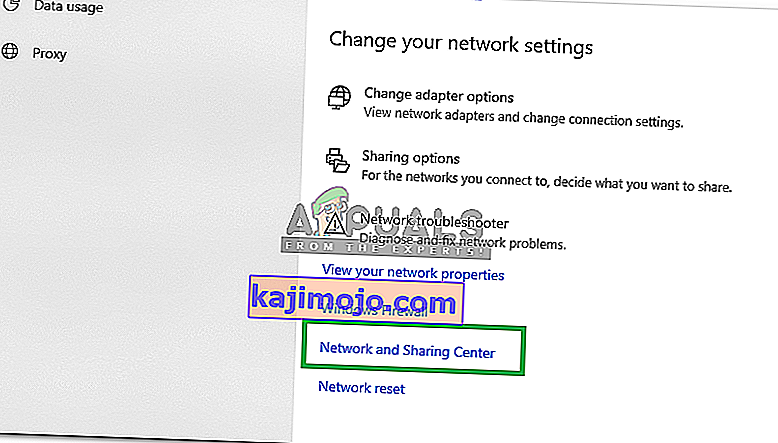
- Şimdi Ağ ve paylaşım merkezini seçin ve ekranın sol tarafında bulunan Adaptör ayarlarını değiştir seçeneğine tıklayın .
- Ethernet donanımınıza sağ tıklayın ve Devre Dışı Bırak'ı seçin . Devre dışı bıraktıktan sonra, tekrar sağ tıklayın ve Etkinleştir'e basın .
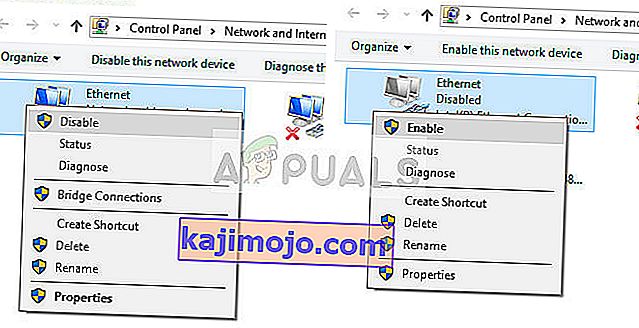
- Bilgisayarınızı yeniden başlatın ve sorunun devam edip etmediğine bakın.
Not: Yönlendiriciye bağlı TP'yi ve PA511'i bilgisayarınıza da değiştirebilirsiniz.
Bağlı kabloların kontrol edilmesi
Yukarıda belirtilen tüm adımları gerçekleştirdiyseniz, tüm kabloların yalnızca PC'nize değil aynı zamanda tüm yönlendirici / anahtar konumlarına doğru şekilde bağlandığından emin olmalısınız. Kabloların düzgün bağlanmadığını bildiren kullanıcılardan çok sayıda geri bildirim alınmıştır.
Bir Ethernet kablosunu her taktığınızda cihazınızda bir 'klik' sesi duymalısınız. Bundan sonra, cihazdaki anında yanıp sönme, kablonun doğru şekilde bağlandığını gösterecektir. Bu sadece evinizdeki kablo mimarisiyle sınırlı değil, aynı zamanda evinizi internete bağlayan ana kabloyla da (genellikle ISS tarafından kurulur) sınırlı.
Yapabileceğiniz bir diğer önemli teşhis, diğer cihazların da internete bağlanamaması, bilgisayarınızda bir sorun olmadığının daha çok göstergesidir.
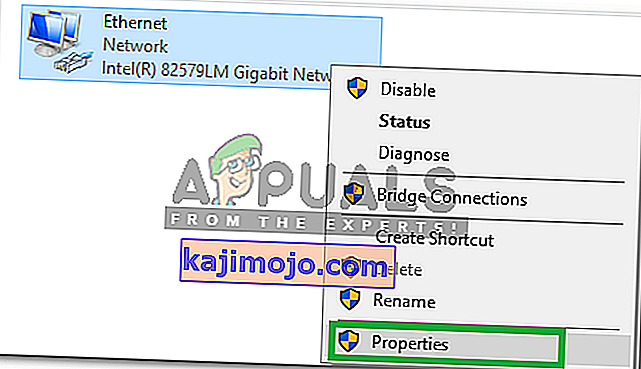
Ağ Bağdaştırıcınızı Kaldırın ve Yeniden Yükleyin
- Windows Tuşunu basılı tutun ve X'e basın . Tip hdwwiz.cpl yazın tıklayın ve OK.
- Ağ Adaptörleri genişletin . Ağ kartınızın adını not edin.
- Ethernet kartınıza (nic) sağ tıklayın ve Kaldır'ı seçin .
- Üst menüden Eylem -> Donanım değişikliklerini tara'yı tıklayın .
IPV6'yı devre dışı bırakın
Bilgisayar genellikle IPV4 bağlantı türünü kullanacak şekilde yapılandırılır. Ancak, ağ ayarlarının otomatik olarak IPV6 yapılandırmasında çalışacak şekilde yeniden yapılandırılmış olması mümkündür. Bu, bağlantıyla bir çatışmaya neden olabilir ve Ethernet bağlantısının düzgün çalışmasını engelleyebilir. Bu nedenle, bu adımda IPV6 bağlantısını devre dışı bırakacağız. Bunun için:
- Sağ - tıklayın sistem tepsisinde ağ simgesine.
- Seç “ Açık Ağ ve Internet Ayarları ” seçeneğini.

- Click “konulu Ağ ve Paylaşım Merkezi ” seçeneği ve ardından seçmek “ Değiştir Adaptör Ayarları ” düğmesini.
- Sağ - tıklayın kullandığınız ağ bağlantısı üzerinde ve tıklayın özelliklerini seçeneği.
- Listeden “ İnternet Protokolü Sürüm 6 ( TCP / IP) ” yi bulun ve işaretini kaldırın .
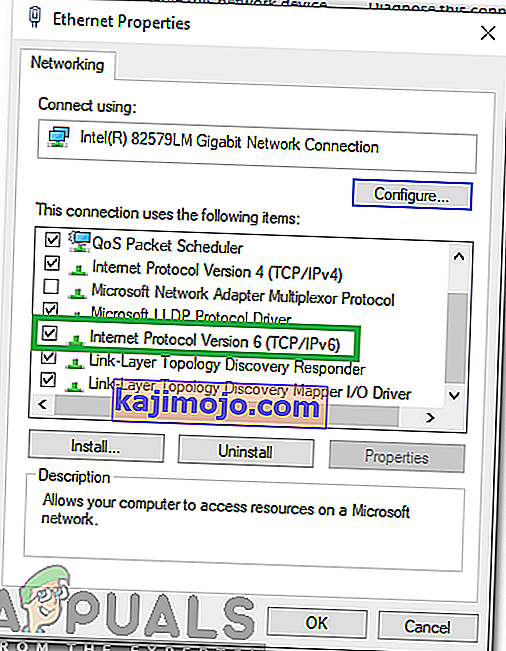
- Ayarlarınızı uygulamak ve sorunun devam edip etmediğini kontrol etmek için " Tamam " ı tıklayın .


Microsoft Çekirdek Hata Ayıklama Ağ Bağdaştırıcısını Devre Dışı Bırakma
Varsayılan ağ bağdaştırıcısına ek olarak aygıtınıza belirli bir Ağ bağdaştırıcısı takıldıysa, bunlar birbirlerini engelleyebilir ve Ethernet bağlantısının düzgün çalışmasını engelleyebilir. Bazı durumlarda, Microsoft Çekirdek Hata Ayıklama Ağ Bağdaştırıcısı kendini bilgisayarınızda gösterir ve varsayılan sürücülerin düzgün çalışmasını engeller. Bu nedenle, bu adımda Ağ Adaptörünü tamamen devre dışı bırakacağız. Bunu yapmak için:
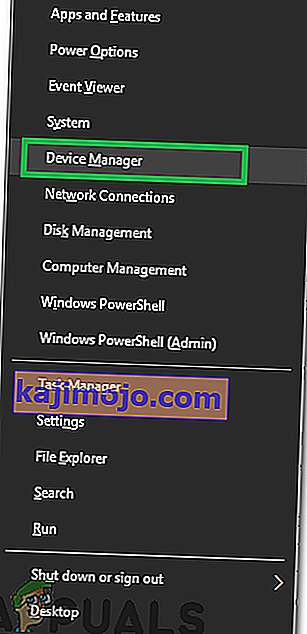
- Basın “Windows ” + “ X aynı anda” Anahtar.
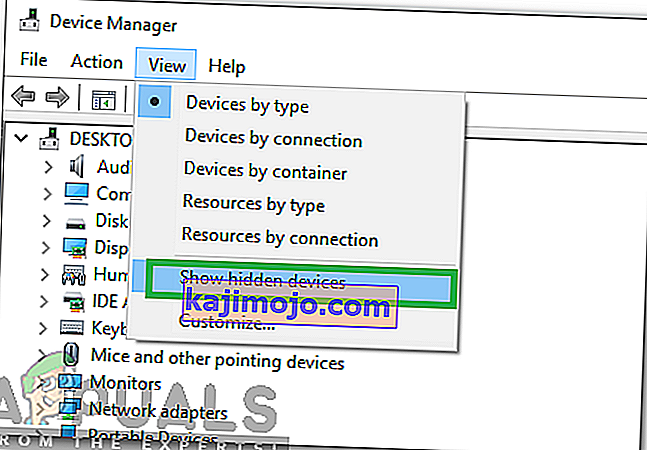
- Mevcut seçenekler listesinden " Aygıt Yöneticisi " ni seçin .
- Cihaz yöneticisi açıldığında, " Görüntüle " seçeneğini seçin ve " Gizli Cihazları Göster " seçeneğini işaretleyin.
- Sağ - tıklayın “konulu Microsoft Kernel ayıklama Ağ Adaptörü ” ve seçin “Devre Dışı” seçeneğini.
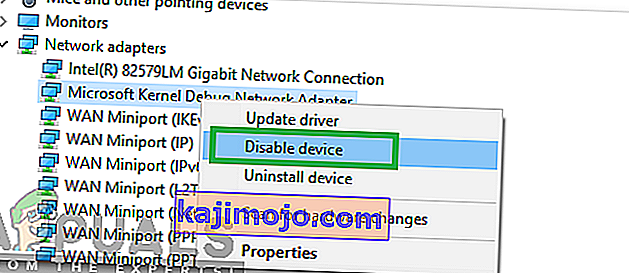
- Görünen onay seçeneğinde " evet " e tıklayın .


Ağ Kartına bir MAC Adresi Atama
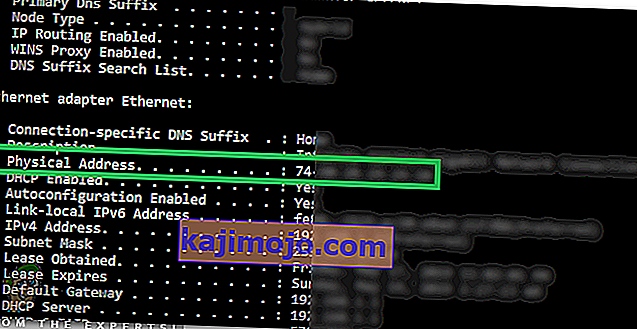
İnternet yönlendiricisiyle bağlantı kurmak için MAC Adresinin ağ kartına atanması gerekir. MAC Adresi doğru girilmezse, cihazın ethernet üzerinden bağlanmasını engelleyebilir. Bu nedenle, bu adımda, ağ kartına manuel olarak bir MAC Adresi atayacağız. Bunu yapmak için:
- Basın “Windows ” + “ R eş zamanlı” tuşları.
- Tür “in cmd diyalog kutusuna basın“içindeki” Enter “.
- Tür “in ipconfig / tüm ” ve basın “ Enter “.
- Görünen ayrıntılarda belirtilen " Fiziksel Adresi " not edin .
- Sağ - tıklayın sistem tepsisinde ağ simgesine.
- Seç “ Açık Ağ ve Internet Ayarları ” seçeneğini.
- Click “konulu Ağ ve Paylaşım Merkezi ” seçeneği ve ardından seçmek “ Değiştir Adaptör Ayarları ” düğmesini.
- Sağ - tıklayın üzerindeki ağ bağlantısı kullandığınız olduğunu ve tıklayın “konulu özellikleri” seçeneği.
- Click “konulu yapılandır ” butonuna ve tıklayın “konulu Gelişmiş ” sekmesine.
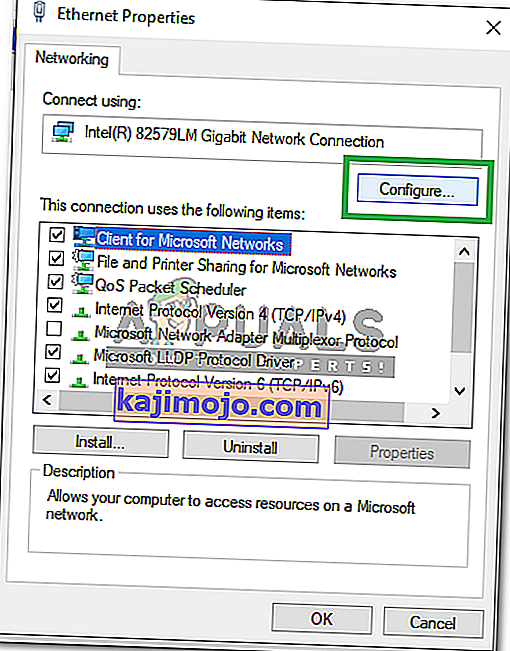
- Listeden " Ağ Adresi " seçeneğine tıklayın ve " Değer " seçeneğini işaretleyin.
- Bu çözümün " 4. " adımında not ettiğiniz adresi girin .
- Değişikliklerinizi kaydetmek ve sorunun devam edip etmediğini kontrol etmek için " Tamam " ı tıklayın .


DHCP'yi etkinleştir
DHCP Bilgisayarınızdaki ağ yapılandırma ayarlarını otomatik olarak algılar ve atar. Bu nedenle, devre dışı bırakılırsa, ağ yapılandırmaları düzgün şekilde uygulanmayabilir ve bu da hatayı tetikleyebilir. Bu adımda, bilgisayarınızda DHCP seçeneğini etkinleştireceğiz. Bunun için:
- Press the “Windows” + “R” keys simultaneously to open up the RUN prompt.
- Type in “services.msc” and press “Enter“.
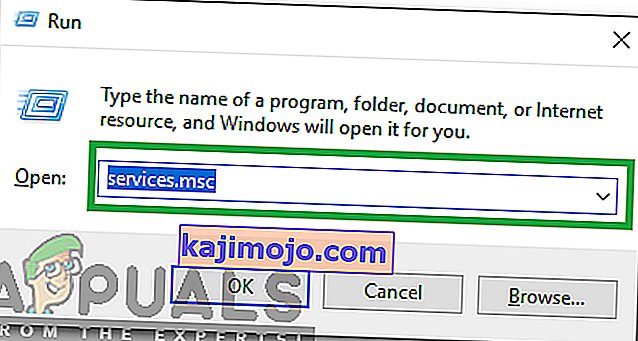
- In the Services WIndow, double-click on the “DHCPClient“.
- Click on the Startup type dropdown and select “Automatic” from the list of options.
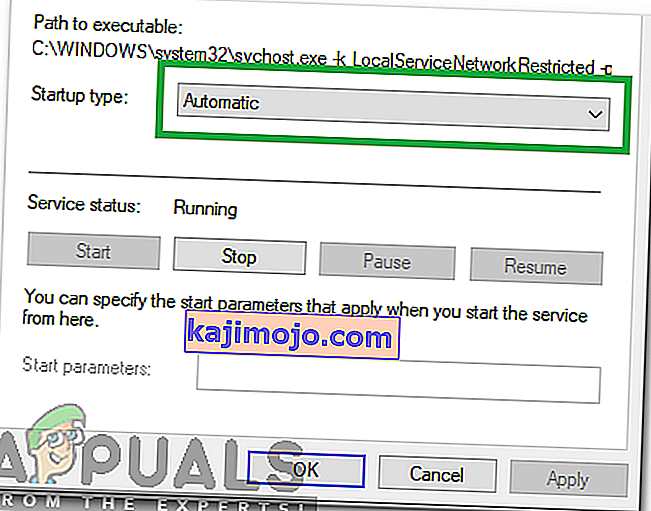
- Click on the “Start” option to trigger the service.
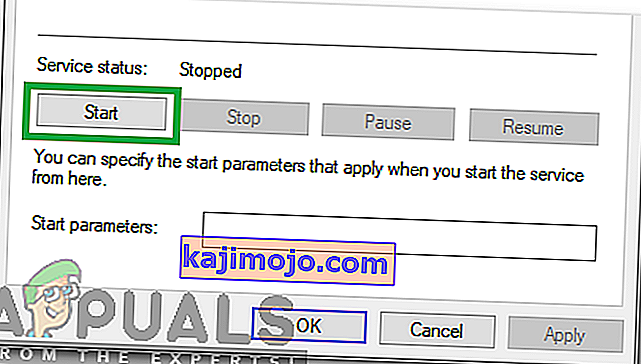
- Now navigate back and “Right–click” on the “DHCPClient” option.
- Select the “Restart-Service” option and select “yes” in the confirmation box.


Disabling Power Management Customizations
In some computers, there are special power-saving features that often disable certain functions to conserve energy. If the power-saving feature for the network adapter is enabled it may be preventing the network adapter from functioning properly. Therefore, in this step, we will be disabling the Power Saving feature on the Network Adapter. For that:
- Right–click on the network icon in the system tray.
- Select the “OpenNetworkand InternetSettings” option.
- Click on the “NetworkandSharingCentre” option and then select the “ChangeAdapterSettings” button.
- Right–click on your internet connection and select the “Disable” option.
- Again, right–click on it and select “Properties“.
- Click on the “Configure” option.
- Click on the “PowerManagement” tab and uncheck the “Allow the computer to turn off this device to save power” option.
- Click on “OK” to apply your changes.
- Right–click on the internet connection again and select “Enable“.
- Check to see if the issue persists.

Renewing IP Configurations
Sometimes, the IP Configurations might be preventing the Ethernet from connecting properly. Therefore, in this step, we will be reinitializing the IP configurations. For that:
- Press “Windows” + “R” buttons simultaneously to open up the RUN prompt.
- Type in “cmd” and press “Enter“.
- Type in the following commands one by one and press “Enter“.
IPconfig /release IPconfig /flushdns IPconfig /renew
- Check to see if the issue persists.
Disabling Antivirus
If there is a Third-Party Antivirus installed on your system it is recommended to temporarily disable it and check to see if the issue persists. If the issue goes away after disabling the Antivirus it means that the Antivirus was blocking the computer from making contact with the internet.
- Right–click on the “Antivirus” icon in the system tray.
- In most antivirus software there is an option to disable the antivirus from there
- If no option is available, search the web for the directions to disable your antivirus
Performing a Check Disk Scan
Sometimes, if certain areas of the Hard Disk are corrupted they might interfere with certain elements of the operating system. They can also interfere with the Ethernet Drivers and prevent them from functioning properly. Therefore, in this step, we will be performing a check disk scan to identify and fix bad sectors of the hard drive. For that:
- Press the “Windows” + “R” keys simultaneously.
- Type in “cmd” in the dialogue box and press “Enter“.
- Type in “ chkdsk c: /f” and press “Enter” to initiate it.
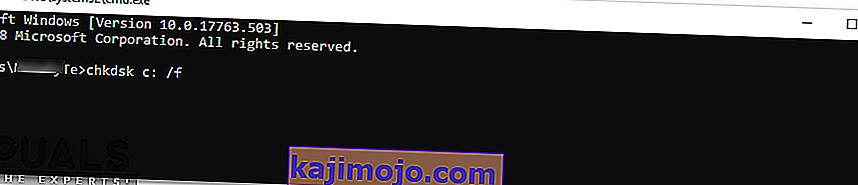
- Press “Y” to confirm the scheduling of a disk check scan.
- Wait for the Disk Check scan to complete and check to see if the issue persists.

Set IP and DNS Manually
If obtaining the IP address and DNS automatically doesn’t fix the problem, you might want to consider setting both your IP address and DNS manually. According to users, it’s not mandatory to change both IP address and DNS, but if setting the IP address manually doesn’t help, be sure to change your DNS as well. To do that, follow these steps:
- Press “Windows’ + “R” to open the Run prompt.
- Type in “Ncpa.cpl” and press “Enter’ to open the network management window.
- Inside the network management window, right-click on the Network connection that you are using and select the “Properties” option.
- Inside the connection properties, select “Internet Protocol Version 4 (TCP/IPv4)” and click on “Properties”.
- Select “Use the following IP address” If the router’s LAN IP address is 192.168.1.1, please type in IP address 192.168.1.x (x is from 2 to 253), subnet mask 255.255.255.0, and default gateway 192.168.1.1.
Note: Your IP Addresses might differ slightly so make sure to connect another computer to the network and check its connection status to obtain the exact information regarding this.
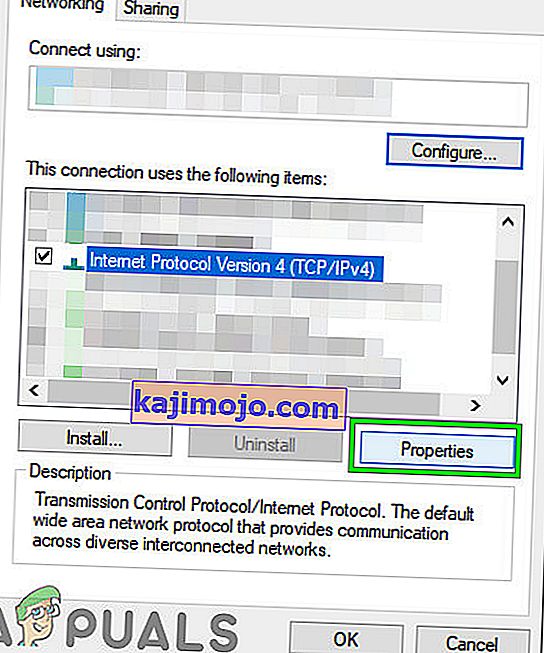
- Select “Use the following DNS server addresses” option and then type the DNS server IP address, which should be provided by your ISP.
Note: As an alternative, try to type in 1.1.1.1 and 1.0.0.1 as the first and the secondary DNS addresses.
- Click on “Apply” to save your settings and then on “OK” to close out of the Window.
- Check to see if doing so has fixed your issue.


Note: In most cases, type your local area DNS server IP addresses into it. The Preferred DNS server is the same to the default gateway. For the Secondary DNS server, you could leave it blank or type in 8.8.8.8.
Disable IPv6 Using Registry Editor
In some cases, the IPV6 setting might not be properly disabled from the settings menu. Therefore, in this step, we will be disabling it from the registry editor. In order to do so, you will require an account that has administrator access andis able to access the registry, keep in mind that some versions of Windows don’t have the registry editor enabled so you might not be able to access it on your computer. Regardless of that, in order to execute this step:
- Press “Windows Key + R” and type in “regedit” and then press “Enter” to launch the registry editor.

- Inside the registry editor, navigate to the following location.
HKEY_LOCAL_MACHINE\SYSTEM\CurrentControlSet\Services\TcpIP6\Parameters.
- After navigating to the folder, right-click the empty space in the right pane and choose “New >DWORD (32-bit) Value” option.
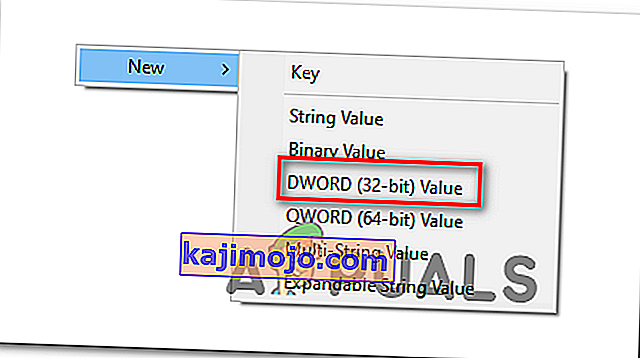
- Type in “Disabled Components” as the name of the new value and save it.
- Double click DisabledComponents to open its properties and set value data to “ffffffff” and click “OK” to save changes.
- After making this registry, you should be disabling the IPV6 setting on your computer entirely, keep in mind that you can get rid of this key anytime and that should get this feature enabled again.
- Restart your computer and check to see if making the registry fixes the issue.


Install Network Driver In Compatibility Mode
In some cases, you might be getting this issue because the driver that you are trying to or have already installed on your computer isn’t fully supported by your operating system or any other hardware that has been installed on your computer. This is a very common scenario and due to this Windows has a Compatibility mode feature.
Basically, the compatibility mode allows the user to be able to run certain programs in accordance with the architecture of the older Windows Operating systems and it sometimes gets the drivers working on your computer. Therefore, in this step, we will be installing these drivers in the compatibility mode.
- Navigate to your manufacturer’s website and download the Ethernet Driver’s setup file for your computer.
- Press the “Windows” + “R’ keys to open the Run prompt and type in “devmgmt.msc” and then press “Enter” to launch the device manager.
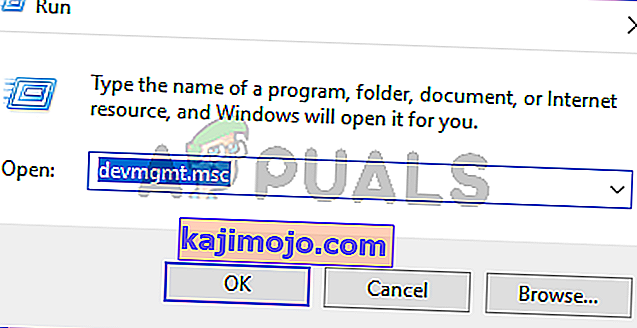
- In the device management window, expand the “Network Adapters” option and then right-click on the driver that your computer is currently using.
- Click on the “Uninstall Device” button and then a new window should pop-up on your screen asking you to confirm your actions.
- Confirm that you want to delete the driver and follow through with the on-screen instructions to completely remove it from your computer.
- Go to the location where you had saved your downloaded setup files of the drivers and right-click, then select “Properties”.
- Select the Compatibility Tab and place a checkmark next to “Run this program in Compatibility mode” and select an older version of the operating system.
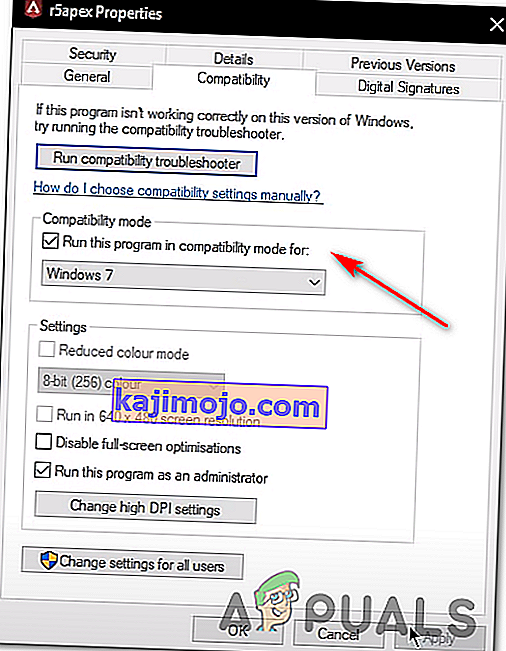
- Wait for the driver to be installed on your computer and check to see if the issue still persists.


Method: Setting Max Performance
In some cases, the wireless adapter installed on your computer might not be the most efficient one and due to that, you might be getting this error message on your screen while trying to connect to an ethernet connection. Basically, in some cases the computer is configured from the power management window to prevent high power usage hardware from working when the computer is idle.
However, this feature doesn’t always work flawlessly because there have been many instances where the feature malfunctions and prevents you from using the ethernet connection entirely. Therefore, in this step, we will be disabling it completely from the Control Panel. In order to do that, follow the steps below.
- Press “Windows” + “R’ to open the Run prompt.
- Type in “control panel” and press “Enter” to open the classical control panel interface.

- In the control panel, click on the “View By:” option and select the “Large Icons” from the list.

- After selecting large icons, click on the “Power Options” button to open the power management screen.
- Click on the “Change Plan Settings” option under the power plan that you have currently selected.
- On the next screen, select the “Change advanced power settings” options.
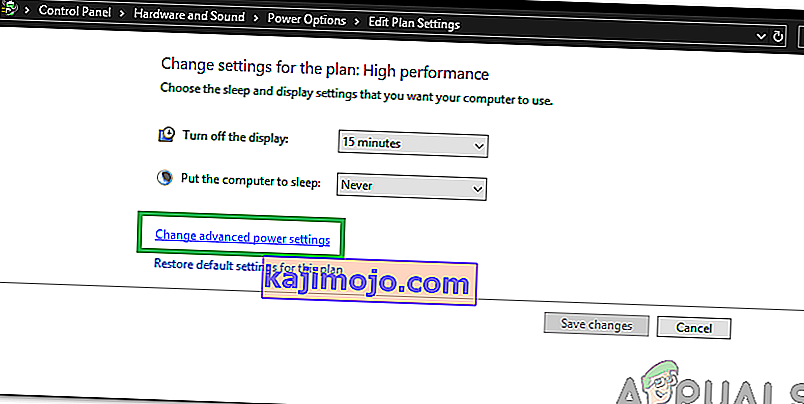
- In the advanced power management window, double-click on the “Wireless Adapter Settings” option to expand it and then double-click on the “Power Saving Mode” dropdown.
- Select the “Maximum Performance” option from the list of available options.
- Click on “Apply” to save your changes and then on “Ok” to exit out of the Window.
- Check to see if making this change fixes the issue.


Disable Virtual Ethernet Devices
If you haven’t found a solution yet and are still receiving IP Configuration error then you should try to remove any virtual Ethernet drivers on your PC as these can cause major issues with how your PC connects to the internet. A virtual Ethernet driver could be anything from a VPN to software designed to improve ping or packet loss. You can find virtual Ethernet devices and disable them by following the steps below.
- Press “Windows” + “R” to open the Run prompt.
- In the Run prompt, type in “ncpa.cpl” and press “Enter” to open the network configuration panel.

- In the network configuration, right-click on any entry that seems to belong to software and is not a physical connection that your computer is connected to.
- Select the “Disable” option to disable the virtual network connection.
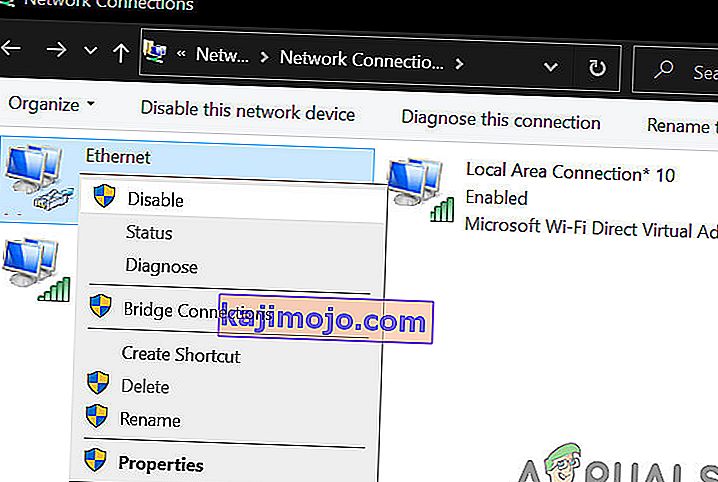
- If you’re unsure, you can Google the name of each network device to learn more before disabling them.
- Check to see if disabling the Virtual Ethernet Devices fixes the ethernet issue.


Reduce Network Power Usage
The network adapter allows the device to communicate over the local area network (LAN), connecting to the internet or to other computers. The adapter of course requires power from the PSU to operate and connect to the network effectively. However, in some cases, if you have set the power output to the maximum value, you might be getting disconnectivity issues or ethernet errors where you are unable to properly work with your network adapter. Therefore, to get around these issues, we will be reducing power usage. For that:
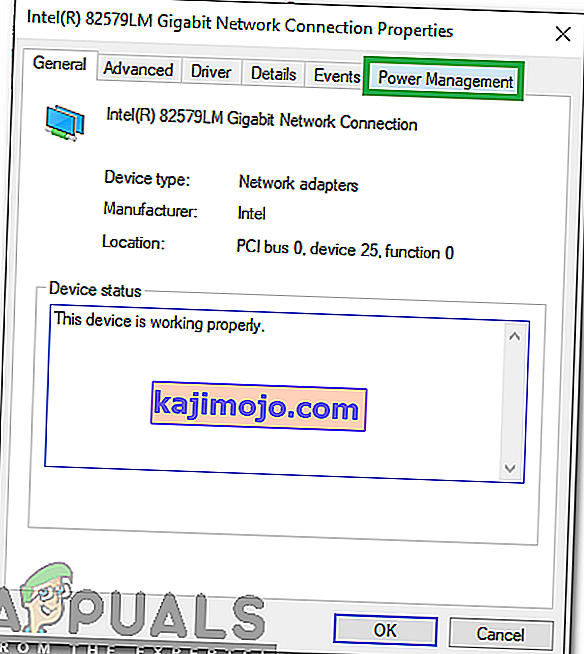
- Press “Windows” + “R” to open the Run prompt, type in “Devmgmt.msc” in the run prompt and press “Enter” to launch the device manager.
- Double click on the “Network Adapters” panel to expand it and right-click on the network adapter that your computer is using.
- Select the “Properties” option to launch the network properties.
- Navigate to the “Advanced” tab.
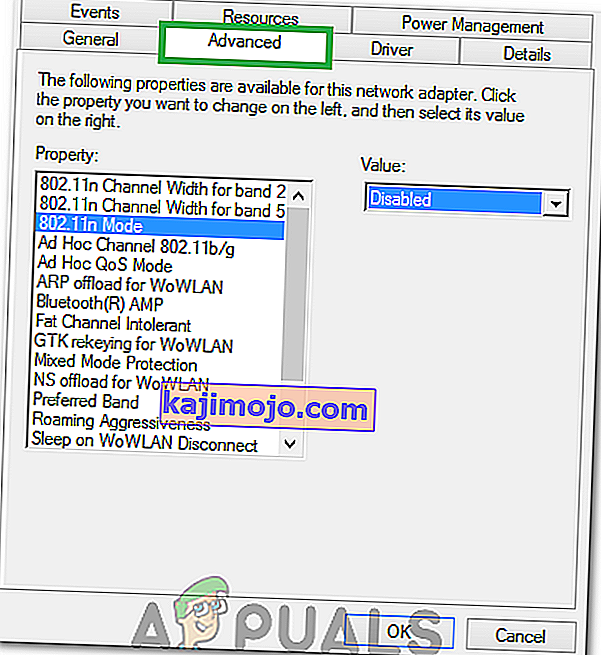
- Under Property, locate the “Power Output property” and click on it to select it.
- Open the dropdown menu under Value and change it from 100% to 75%. If you are also going to be using an external monitor while your laptop is docked, change the value to 50% instead of 75%.
- Click on “OK”, close the Device Manager, and restart your computer. Now check whether or not the issue has been resolved once your computer boots up.

Enable Ethernet Adapter Through BIOS
By default, the Ethernet adapter should already be enabled on your computer. If the Windows operating system is reporting that your Ethernet is not working then you can try re-enabling the adapter from within your computer’s BIOS.
- Make sure to completely shut down your computer and turn it back on after a while.
- While the computer is being started, pay close attention to the “Press “This” button to get into the Bios” message that might appear during the startup.
- Press the indicated key quickly and repeatedly to enter your computer’s BIOS. Once in the BIOS, you can use the arrow keys on your keyboard to navigate through the available options.
- Find “Integrated Peripherals,” “Onboard Devices,” “On-Chip PCI Devices,” or a similar option and press the “Enter” key to access the menu. Depending on the type and year of your BIOS, the exact menu text will vary.
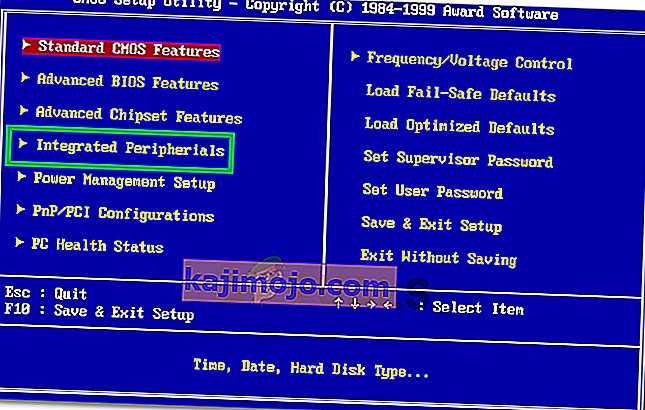
Note: Generally, you should find something that indicates the settings are related to your onboard integrated peripherals.
- Find and select “Integrated LAN,” “Onboard Ethernet,” or a similar option and use the left and right arrow keys to cycle through the available options. In most cases, these are either “Enabled” or “Disabled.”
- Make sure to enable the ethernet adapter.
- Press the “F10” keyboard key, this should display a dialog asking if you would like to save your settings and exit the BIOS. Press the “Y” keyboard button to confirm. This causes the computer to reboot. Windows should now automatically detect your driver and the ethernet should be working normally now.
- Check to see if the issue still persists.

Update Network Drivers Using a Third-party software
You can also use third-party software to update drivers automatically. In this case, we recommend the Snappy Driver Installer (SDI), a powerful free driver updater tool for Windows that can store its entire collection of drivers offline. Having offline drivers gives Snappy Driver Installer the ability to have access to fast driver updates, even if there is no active Internet connection on your computer. Snappy Driver works with both 32-bit and 64-bit versions of Windows 10, Windows 8, Windows 7, Windows Vista, and also works with Windows XP. Drivers are downloaded through Snappy Driver Installer in “driverpacks”, which are simply collections (packs) of drivers for various hardware such as sound devices, video cards, network adapters, etc. It can also show duplicate drivers and invalid drivers. It separates the updates that require you to restart your computer so that they are easier to distinguish. You can download Snappy Driver Installer from here.
Ping the Loopback Address
A loopback address is a special IP address, 127.0. 0.1, reserved by InterNIC for use in testing network cards. This IP address corresponds to the software loopback interface of the network card, which does not have hardware associated with it, and does not require a physical connection to a network. Some users have highlighted that this issue may arise due to system corruption or malware installed that prevents networking from functioning properly, hence perform the ping operation to verify whether your network card is working properly or not:
- Press “Windows” + “R” to open the Run prompt.
- Inside the Run prompt, type in “cmd” and then press “Shift’ + “Ctrl” + “Enter” to provide administrative privileges.Run dialog: cmd, then press Ctrl + Shift + Enter

- Type the command, ping 127.0.0.1. This will send a message to the internal network stack on the machine. A response similar to the following should occur:
Pinging 127.0.0.1 with 32 bytes of data: Reply from 127.0.0.1: bytes=32 time<10ms TTL=128 Reply from 127.0.0.1: bytes=32 time<10ms TTL=128 Reply from 127.0.0.1: bytes=32 time<10ms TTL=128 Reply from 127.0.0.1: bytes=32 time<10ms TTL=128 Ping statistics for 127.0.0.1: Packets: Sent = 4, Received = 4, Lost = 0 (0% loss), Approximate round trip times in milliseconds: Minimum = 0ms, Maximum = 0ms, Average = 0ms
- If the command prompt is successful in pinging the IP Address, it means that networking should be working on your computer and the issue most probably lies within a software misconfiguration and you may continue to implement these fixes on your computer.

Run Windows Network Diagnostic Tool
It is possible in some cases, the ethernet adapter might be using false configurations to establish a connection with your internet service provider through the ethernet cable. If this is the case, then the error message is displayed while attempting to make a connection and in this step, we will be performing a full diagnostics test of our network adapter and then check to see if performing it fixes this issue on our computer. For that:
- Press “Windows” + “R” to open the Run prompt.
- Type in “ncpa.cpl” and press “Enter” to launch the network configuration panel.

- In the network configurations, right-click on the ethernet adapter and select the “Diagnose” option.
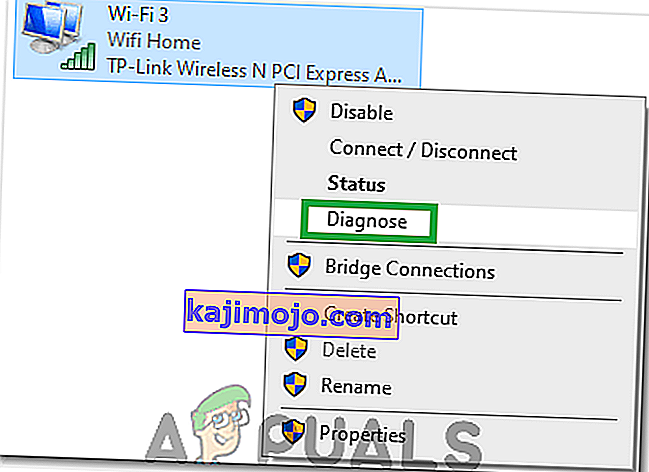
- Let the automatic diagnosing begin and follow the on-screen instructions to fully diagnose issues with the ethernet connection.
- Check to see if running the diagnose window fixes this issue.


Uninstalling Recent Updates
Microsoft is basically known for releasing unfinished updates that often breaking things on the users’ hardware. Therefore, it is quite possible that this issue is being triggered due to a faulty update especially if this issue started happening after applying a recent update. Therefore, in this step, we will be uninstalling the latest update from our computer and then we will check to see if doing so fixes this issue, For that:
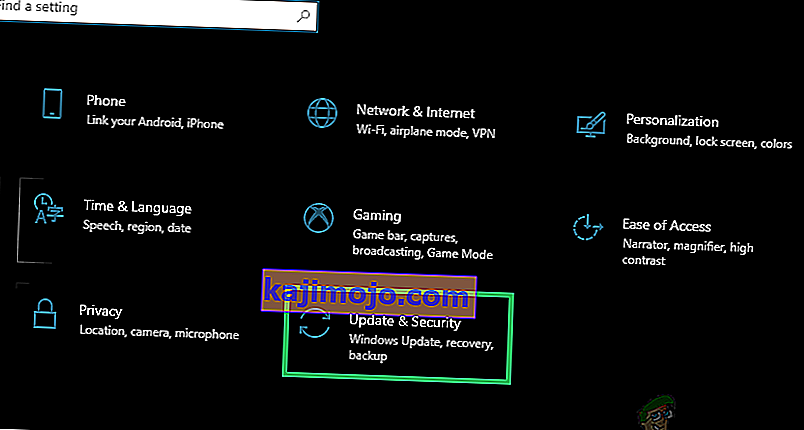
- Press “Windows” + “I” buttons to open the settings.
- In settings, click on the “Update and Security” option and then select the “Windows Update” button from the left pane.
- In the Windows Update, click on the “View Update History” option.
- In the Updates History, click on the “Uninstall Updates” option and it should take you to the uninstallation screen where all the recently installed updates will be listed.
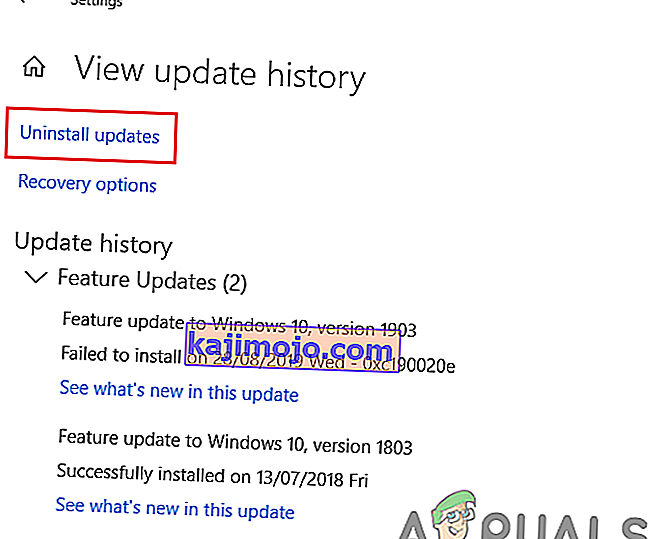
- From the list, right-click on the update that was installed recently and prevented your driver from working properly.
- Right-click on this update and select the “Uninstall” button to remove it completely from the computer.
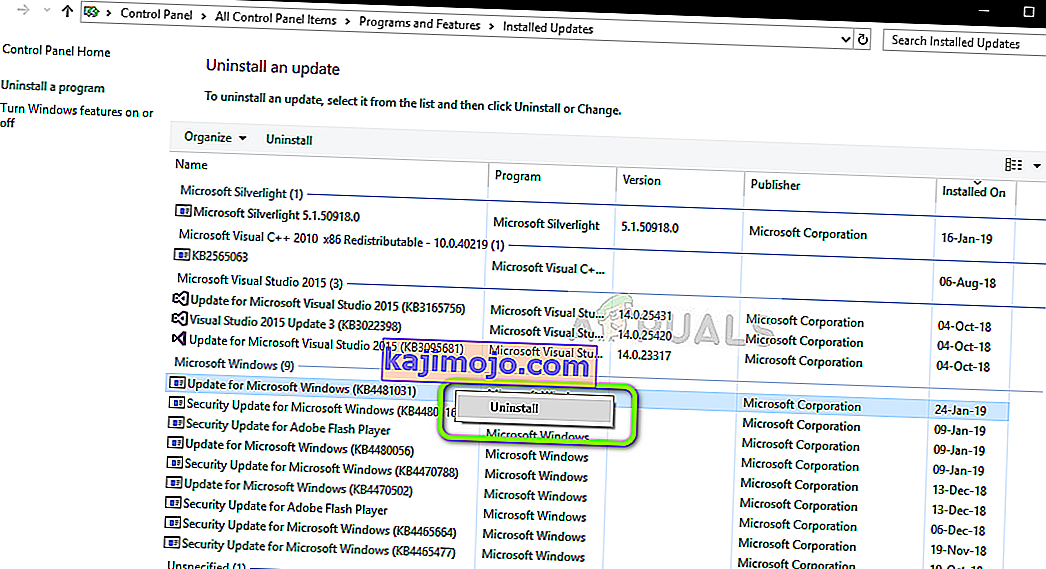
- Follow through with the on-screen instructions and check to see if uninstalling fixes this issue.


Once you complete the steps, Windows 10 will roll back to the previous build when there was no Wi-Fi or Ethernet adapter problem. After uninstalling the update, the system shouldn’t install the same update until the next quality update becomes available through Windows Update.
Enable QoS Feature
You might be able to solve this problem by enabling the QoS feature. The QoS feature is in charge of limiting your network speed, but a couple of users reported that the issue was resolved after enabling QoS on their router. To do this, you need to open your router’s configuration page and enable QoS. We have to mention that QoS is an advanced feature, so it might require some configuration before you can properly use it. It’s also worth noting that this feature might not be available on your router, so be sure to check your router’s instruction manual for more information. In order to enable it:
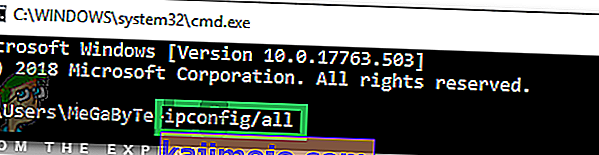
- Launch your browser and type in your IP address in the address bar.
- In order to find our IP address, press “Windows” + ” “R” to launch the run prompt. Type in “CMD” and press “Shift” + “Ctrl” + “Enter” to provide admin permissions. Also, type in “ipconfig/all” in the cmd and press “Enter”. The IP Address that you have to enter should be listed in front of the “Default Gateway” option and should look something like “192.xxx.x.x”.
- After entering the IP Address, press “Enter” to open the Router login page.
- Enter your username and password in the respective categories on the router’s login page both of which should be written on the back of your router. If they aren’t, the default values should be “Admin” and “admin” for both the password and the username.
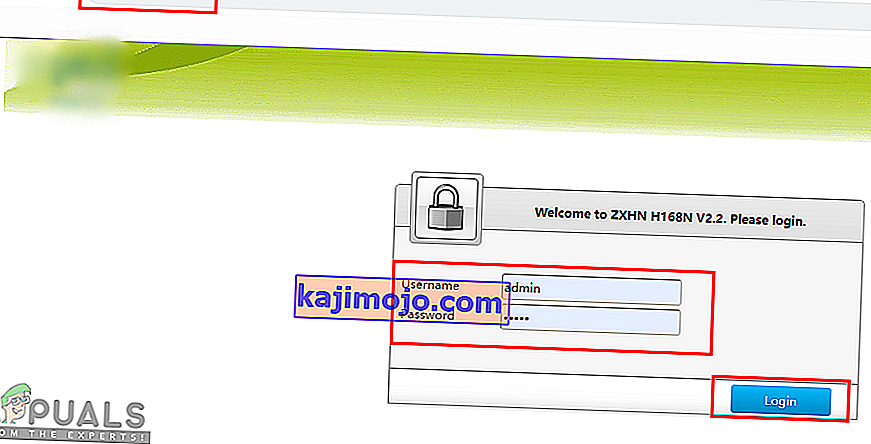
- After logging in to the router, look to configure the QoS settings as mentioned above and check to see if configuring it fixes this issue.

Workaround: If you have a modem, router, or repeaters in the house, find their firmware online, and follow all the provided instructions from the OEM for each device and update their firmware to the newest version. Make sure to get a stable build, and not a nightly build. Some providers will provide beta firmware that isn’t fully functional or may have bugs.
Yukarıdaki çözümlere ek olarak şunları da deneyebilirsiniz:
- Yönlendirici giriş yapın ve etkinleştirmek Powerline'ın . Bağlantıyı tüm evinize genişletmek için elektrik hatları kullanıyorsanız, bu seçenek açılmalıdır.
- Dizüstü bilgisayarınızı / Bilgisayarınızı temizleyin ve her şeyi yeniden takmayı deneyin.