Yakın zamanda Windows 10'a yükseltme yapan bazı Windows kullanıcıları, görev çubuğunun birçok kez tamamen donduğuna dair şikayette bulundu. Bu olduğunda, kullanıcılar görev çubuğundaki herhangi bir öğeyi, yani başlat menüsünü, simgeleri, bildirimleri tıklayamazlar. Ayrıca Windows + R ve Windows + X gibi kısayollar çalışmaz.
Windows'ta çok yaygın olduğu için bu sorunun temel nedeni yoktur. Bununla birlikte, bazıları onu Dropbox ve birkaç arızalı uygulamaya bağladı. Bu yazıda, bu sorunu çözebileceğimiz çeşitli seçenekleri inceleyeceğiz. Bu, diğerlerinin yanı sıra bir SFC taraması çalıştırmayı, belirli uygulamaları kaldırmayı, gezgini başlatmayı içerir.
Yöntem 1: Windows Gezgini'ni Yeniden Başlatma
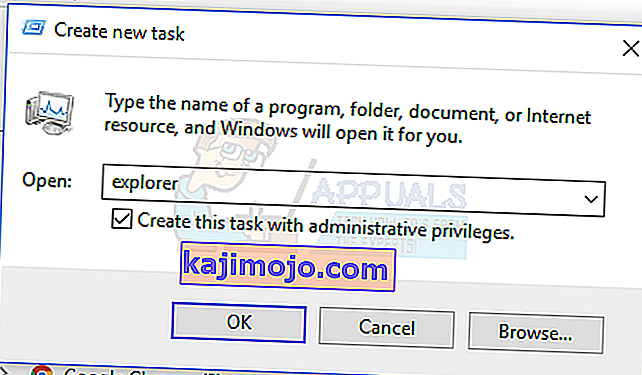
- Windows Görev Yöneticisini başlatmak için Ctrl + Shift + Esc tuşlarına basın.
- Görev Yöneticisi'nde, Dosya > Yeni görevi çalıştır'a tıklayın . Tip kaşif açık kutuda ve sonra kutuyu “yönetici ayrıcalıklarına sahip bu görevi oluştur” ve tıklayın OK .

Alternatif olarak şunları yapabilirsiniz:
- Windows Görev Yöneticisini başlatmak için Ctrl + Shift + Esc tuşlarına basın.
- İşlemler sekmesinde Explorer'ı arayın
- Explorer girişine sağ tıklayın ve Yeniden Başlat'ı seçin .
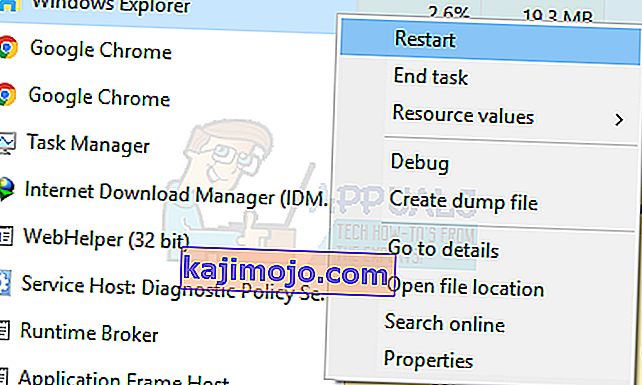
- Explorer yeniden başlatılacak ve görev çubuğu yeniden çalışmaya başlayacaktır

Yöntem 2: SFC Taraması Çalıştırma
- Windows Görev Yöneticisini başlatmak için Ctrl + Shift + Esc tuşlarına basın.
- Görev Yöneticisi'nde, Başlat> Yeni görevi çalıştır'a tıklayın . Tip cmd açık kutuda ve sonra kutuyu “yönetici ayrıcalıklarına sahip bu görevi oluştur” ve tıklayın OK .
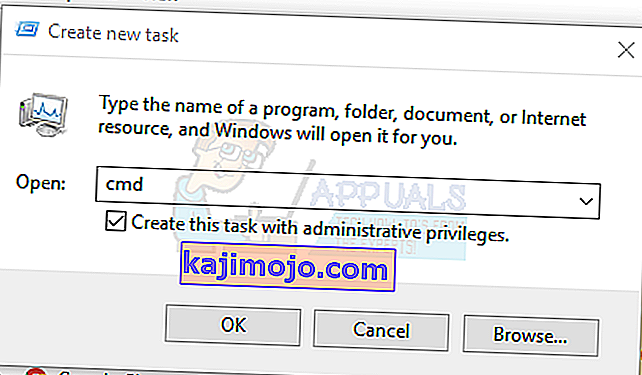
- Komut istemine aşağıdaki komutları yazın ve her komutun ardından Enter tuşuna basın:
sfc / scannow dism / Online / Cleanup-image / Restorehealth
Bu, bir sistem dosyası kontrolü çalıştıracak ve bilgisayarınızdaki tüm bozuk sistem dosyalarını onaracaktır.
- Bilgisayarınızı yeniden başlatın ve donmuş görev çubuğunun durup durmadığını kontrol edin.

Yöntem 3: Powershell Düzeltmesi
Bu adımları kullanarak donmuş görev çubuğunu çözmek için bu Powershell komutunu kullanın.
- Windows Görev Yöneticisini başlatmak için Ctrl + Shift + Esc tuşları.
- Daha fazla ayrıntıya tıklayın , Hizmetler sekmesini seçin ve MpsSvc (Windows Güvenlik Duvarı) 'nın çalıştığından emin olun .
- Çalıştır istemini açmak için Windows + R tuşuna basın . Tip powershell istemi ve Enter tuşuna basın.
Çalıştır istemi açılmazsa, Windows Görev Yöneticisini başlatmak için Ctrl + Shift + Esc tuşlarına basın, Başlat> Yeni görevi çalıştır seçeneğine tıklayın . Tip powershell açık kutuda ve sonra kutuyu “yönetici ayrıcalıklarına sahip bu görevi oluştur” ve tıklayın OK .
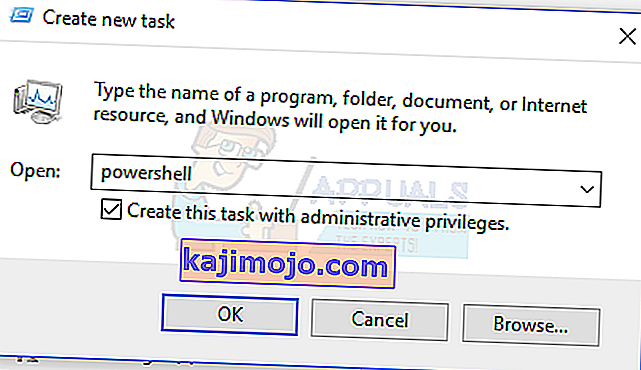
- Powershell penceresinde aşağıdaki komutu yapıştırın ve Enter tuşuna basın:
Get-AppXPackage -AllUsers | Her seferinde {Add-AppxPackage -DisableDevelopmentMode -Register “$ ($ _. InstallLocation) \ AppXManifest.xml”}. - Bundan sonra görev çubuğunuz tam olarak işlevsel olmalıdır.

Yöntem 4: Kullanıcı Yöneticisini etkinleştirin
Devre dışı bırakılmış bir Kullanıcı Yöneticisi, donmuş bir Windows 10 görev çubuğuna neden olabilir. Bu adımlarla Kullanıcı Yöneticisini yeniden etkinleştirmeyi deneyin.
- Windows Tuşu + R'ye basın, services.msc yazın ve Tamam'a tıklayın . Bu, hizmetler konsolunu açar.
- Kullanıcı Yöneticisi'ni arayın ve çift tıklayın.
- Başlangıç türünü ayarlayın Otomatik ve Başlat durdu Girilmişse hizmeti. Tıklayın Tamam .

- Bilgisayarınızı yeniden başlatın ve görev çubuğu şu anda mükemmel şekilde çalışmalıdır.

Yöntem 5: Uygulamaları Kaldırma
Görev çubuğunun düzgün çalışmasına neden olan bazı kullanıcılar tarafından bazı uygulamalar tanımlanmıştır. Bu uygulamalar Dropbox ve Classic Shell'dir . Buna neden olan herhangi bir uygulama olduğundan şüpheleniyorsanız, onu da kaldırabilirsiniz.
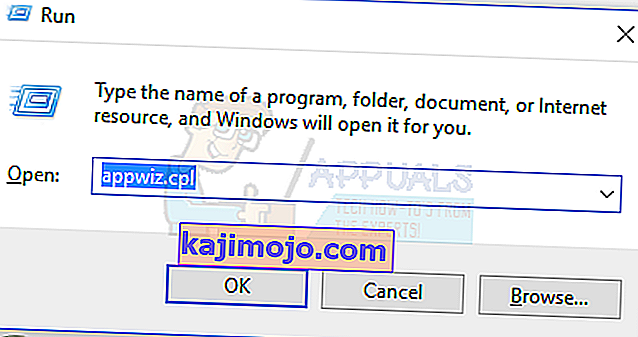
- Çalıştır komut istemini açmak için Windows + R tuşlarına basın . Tip appwiz. cpl yazın ve Enter'a basın .
- Yüklü uygulamalar listesinde uygulamayı bulun ve ardından çift tıklayın. Şimdi, kaldırma işlemini tamamlamak için istemleri izleyin.
- Bilgisayarınızı yeniden başlatın ve ardından görev çubuğunun şimdi düzgün çalışıp çalışmadığını kontrol edin.

Yöntem 6: En Son Açılan Öğeleri Devre Dışı Bırakma
Son açılan öğeler listenin başlamasını yavaşlatabilir. Bunları devre dışı bırakmak, daha hızlı hale getirir ve herhangi bir donmayı önler. En son açılan öğeleri devre dışı bırakmak için bu talimatları izleyin.
- Ayarlar uygulamasını açmak için Win + I tuşlarına basın .
- Kişiselleştirme> Başlat'a gidin
- Kapatmak için Başlangıçta Atlama Listelerinde veya görev çubuğunda son açılan öğeleri göster seçeneğinin yanındaki geçiş düğmesini kaydırın .

- Görev çubuğunuz bir sonraki yeniden başlatmada önyükleme sırasında donmamalıdır

Yöntem 7: Varsayılan Windows 10 Hizmetlerini Sıfırla
Bu noktada yukarıdaki yöntemlerden hiçbiri işe yaramadıysa, bu komut dosyasını sağ tıklayıp Yönetici olarak çalıştır'ı seçerek yönetici olarak çalıştırmayı deneyin . Herhangi bir nedenle WiFi'niz artık çalışmıyorsa, WiFi sorununu düzeltmek için buradaki adımları izleyin (Yöntem 3 - Adım 2: Seçenek 2).
Yöntem 8: Yeni bir Kullanıcı Hesabı Oluşturun
Bazı durumlarda, kullanıcı hesabı ayarlarınız veya yapılandırmalarınız doğru şekilde ayarlanmadıysa ve ayrıca bu yapılandırma verilerinde herhangi bir bozulma varsa, hata tetiklenebilir. Bu nedenle, alternatif olarak, Windows 10 makinenizde yeni bir kullanıcı hesabı oluşturmayı deneyebilir ve ardından sorunu düzeltirse daha sonra eski hesaptan verileri içe aktarabilirsiniz. Bunu yapmak için:
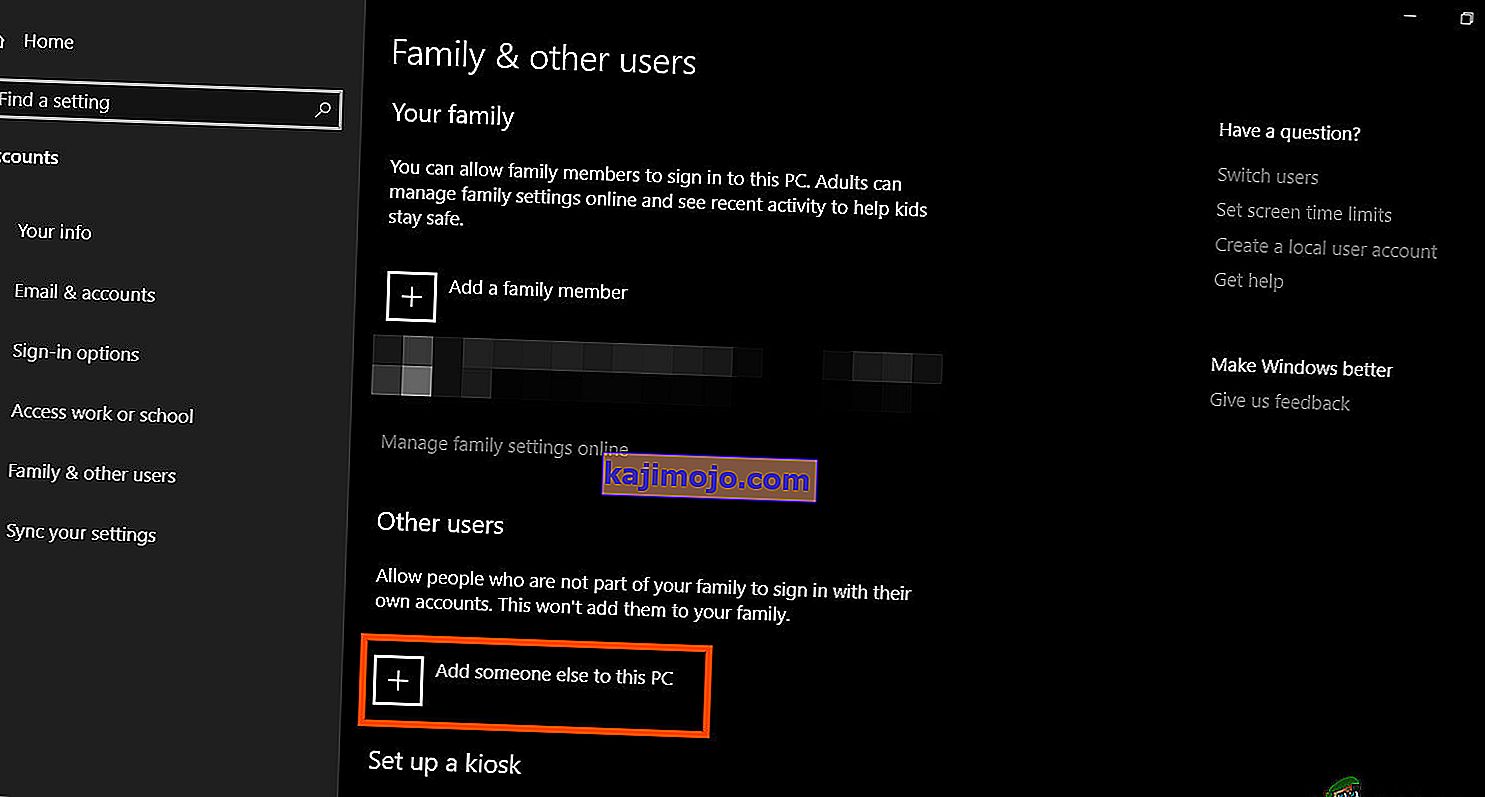
- Ayarları açmak için "Windows" + "I" tuşlarına basın ve "Hesaplar" seçeneğine tıklayın.
- Hesaplar seçeneğinde sol taraftaki “Aile ve Diğer Kullanıcılar” butonuna tıklayın.
- Menüden " Bu PC'ye Başka Birini Ekle " seçeneğini seçin.
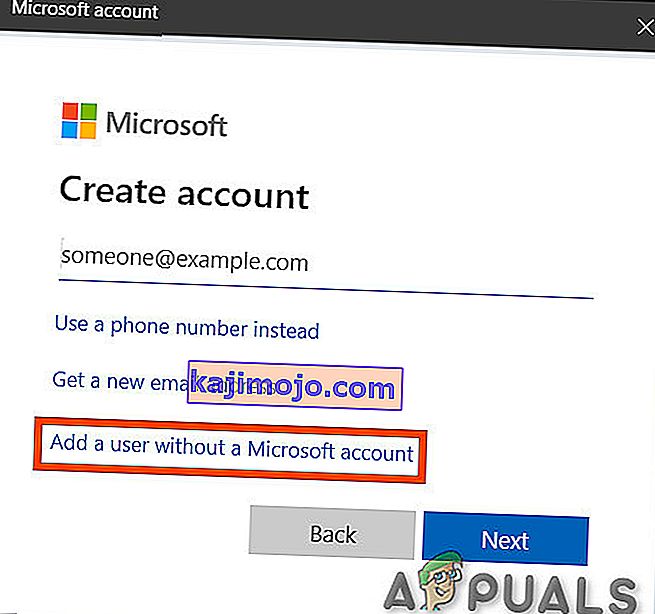
- “Seçeneğini tıklayın bende olmayan bu kişinin oturum açma bilgilerini sonraki pencerede” butonuna.
- Tıklayın “Add olmadan bir kullanıcı , bir Microsoft Hesabı” Açılan yeni pencereden seçeneği.
- Kullanıcı hesabının kullanıcı adını girin ve bir şifre atayın.
- Güvenlik sorularını girin, cevaplayın ve ardından "İleri" seçeneğine tıklayın.
- Bu hesabı oluşturduktan sonra üzerine tıklayın ve ardından "Hesap Türünü Değiştir" seçeneğini seçin.
- Tıklayın “Hesap Türü' açılır ve sonra seçin ‘Yönetici’ seçeneği.
- Değişikliklerinizi kaydedin ve bu hesaba giriş yapın.
- Hesapta oturum açtıktan sonra Steam'i çalıştırın ve oyunun çalışıp çalışmadığını kontrol edin.


Bunu yapmak bilgisayarınızdaki sorunu düzeltirse, önceki hesaptaki kullanıcı hesabı verilerini bu yeni hesaba aktardığınızdan ve normal şekilde kullanmaya devam ettiğinizden emin olun.
Yöntem 9: Güvenli Modda Tanılama
Bazen, bilgisayarınıza görev çubuğunu veya bununla ilişkili hizmetleri düzgün bir şekilde çalıştırmanızı engelleyen bazı üçüncü taraf uygulamaları yüklemiş olabilirsiniz. Buna ek olarak, bir Windows veya Microsoft hizmetinin bile bilgisayarın düzgün çalışmasını engellemesi mümkündür. Bu nedenle, bu adımda, bu sorunu güvenli modda teşhis edeceğiz ve ardından düzeltilip düzeltilemeyeceğini kontrol edeceğiz. Bunun için:
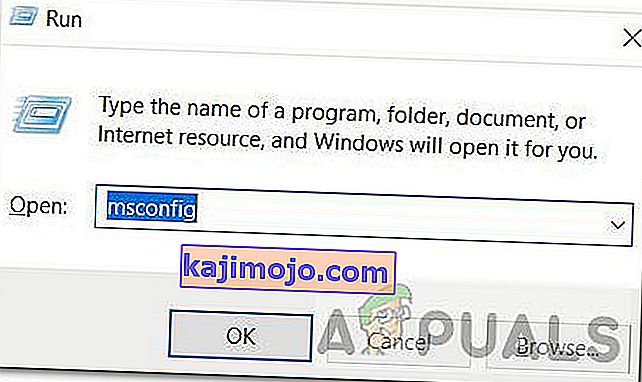
- Çalıştırma istemini başlatmak için " Windows" + " R" tuşlarına basın .
- " MSCONFIG" yazın ve Microsoft yapılandırma penceresini başlatmak için " Enter" tuşuna basın .
- Bu pencerede, "Hizmetler" sekmesine tıklayın ve "Tüm Microsoft Hizmetlerini Gizle " seçeneğinin işaretini kaldırın.
- Bu seçeneğin işaretini kaldırdıktan sonra, "Tümünü Devre Dışı Bırak" düğmesine tıklayın ve değişikliklerinizi kaydetmek için "Uygula" düğmesine tıklayın .
- Bundan sonra, "Başlangıç" sekmesine tıklayın ve ardından görev yöneticisini başlatmak için "Görev Yöneticisini Aç" düğmesine tıklayın.
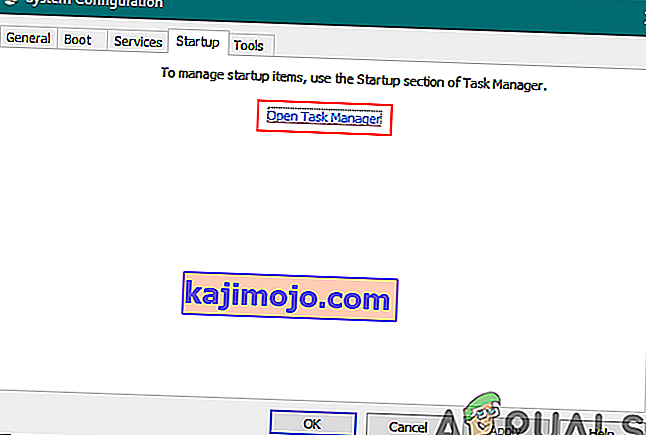
- Görev Yöneticisinde, etkinleştirilen her bir uygulamaya tıklayın ve ardından başlangıçta başlamasını önlemek için "Devre Dışı Bırak" düğmesine tıklayın.
- Şimdi güvenli modda başlatmak için bilgisayarınızı yeniden başlatın.
- Güvenli modda, görev çubuğunuzun bir süre sonra veya hatta başlangıçta donup donmadığını kontrol edin.
- Görev çubuğu bu modda donmazsa, bu soruna üçüncü taraf bir uygulamanın veya hizmetin neden olduğu anlamına gelir.
- Uygulamaları tek tek etkinleştirmeye başlayın ve hangisinin sorunu geri getirdiğini kontrol edin.
- Tüm uygulamalar uygunsa, hizmetleri tek tek etkinleştirmeye başlayın ve hangisinin sorunu geri getirdiğini kontrol edin.
- Sorunlu hizmeti / uygulamayı devre dışı bırakın veya yeniden yüklemeyi / güncellemeyi deneyin.


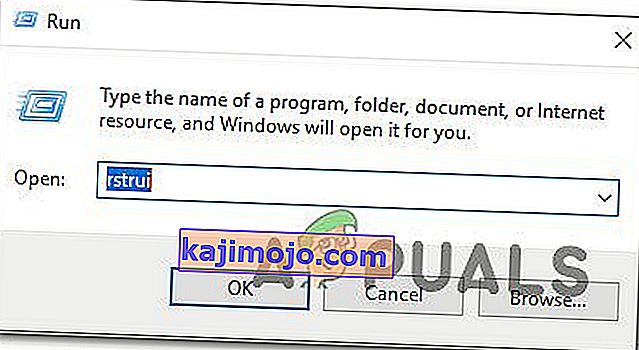
Yöntem 10: Sistem Geri Yükleme İşlemini Gerçekleştirme
Bazı kullanıcılar, daha önceki bir çalışma tarihine basit bir geri yükleme yapmanın sorunlarını çözdüğünü fark etti, ancak geri yükleyeceğiniz geri yükleme noktasını dikkatlice seçmeniz gerekecek. Otomatik geri yüklemeyi kullanmak yerine bu işlemi manuel olarak gerçekleştirmeniz önerilir. Bu adımı gerçekleştirmek için aşağıdaki kılavuzu izleyin.
- Çalıştır istemini açmak için "Windows" + "R" tuşlarına basın .
- İçinde Tip “Rstrui” ve basın “Enter” yönetim penceresini geri açın.
- Tıklayın “İleri” ve check “Geri Yükleme Noktaları fazla göster” seçeneğini.
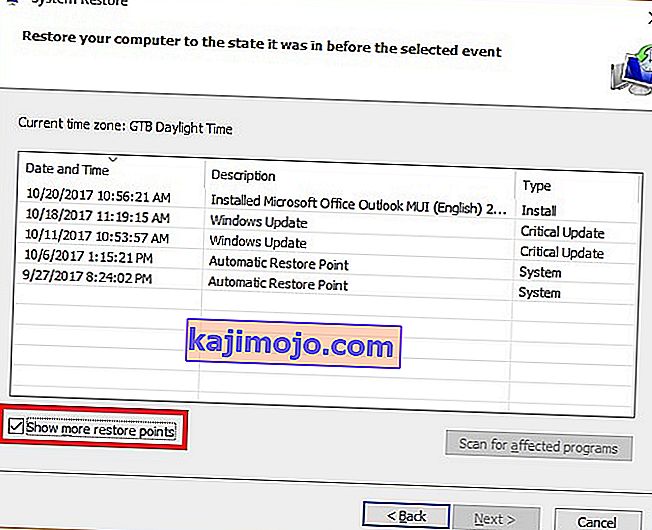
- Listeden, bu sorunun bilgisayarınızda oluşmaya başladığı tarihten daha eski bir geri yükleme noktası seçin.
- Her şeyi geri yükleme penceresinden seçtiğiniz tarihe geri yüklemek için tekrar "İleri" yi tıklayın ve ekrandaki talimatları izleyin.
- Bunu yapmanın donmuş görev çubuğuyla ilgili sorunu çözüp çözmediğini kontrol edin.


Yöntem 11: Sistem Simgelerini Değiştir
Bazı durumlarda, bu sorunun tetiklenmesi nedeniyle bilgisayarınızda sistem simgesi ayarının arızalanması mümkündür. Bu nedenle, bu adımda, bu simgeleri değiştireceğiz ve ardından bunu yapmanın sorunu çözüp çözmediğini kontrol edeceğiz. Bunun için:
- Ayarları açmak için "Windows" + "I" tuşlarına basın ve "Kişiselleştirme" seçeneğine tıklayın.
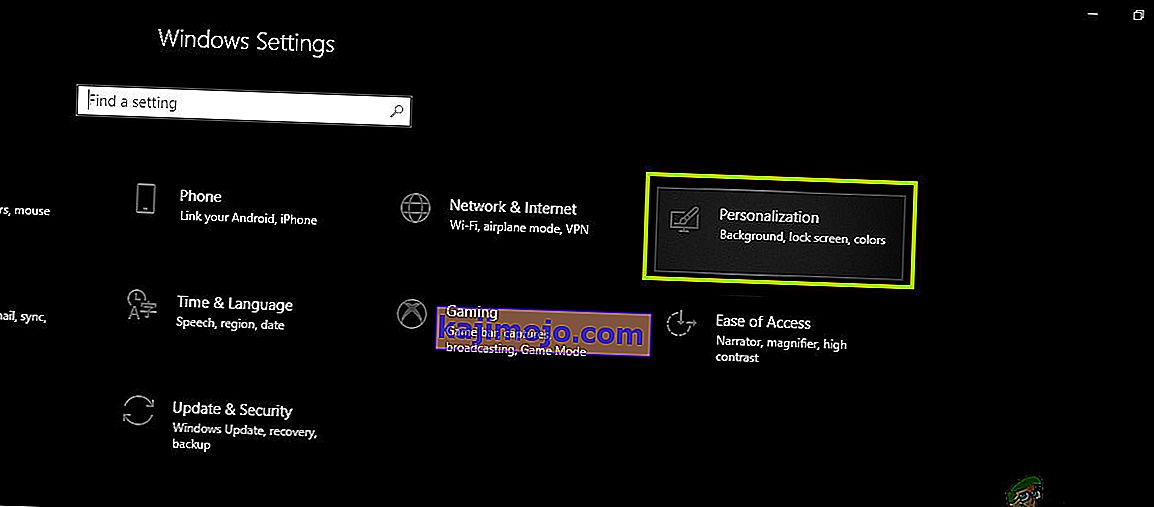
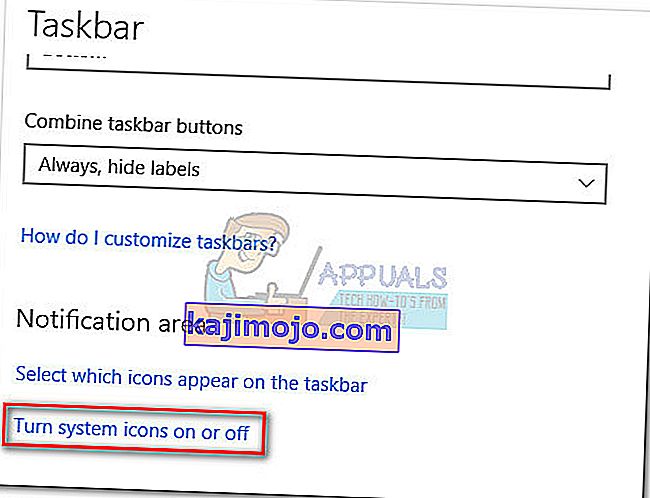
- Sol taraftan, "Görev Çubuğu" düğmesine tıklayın.
- "Bildirimler Alanı" başlığı altında, " Sistem Simgelerini Aç veya Kapat" düğmesini tıklayın.
- Bir sonraki penceredeki tüm simgeleri birkaç saniye kapatıp tekrar açarak birer birer değiştirin.
- Bu işlemi tamamladıktan sonra, bu pencereyi kapatarak masaüstüne geri dönün.
- Bunu yapmanın sorunu çözüp çözmediğini kontrol edin.


Yöntem 12: Windows Bakım Sorun Gidericisini Çalıştırın
Bilgisayarınızda sistem sayfalama belleği yetersizliği nedeniyle veya belirli uygulamalardan kalan kısayollar varsa, bu da görev çubuğunun düzgün çalışmasını engelleyebilecek bazı artık dosyalar olabilir. Bu nedenle, bu adımda, Windows Bakım Sorun Gidericisini çalıştıracağız ve ardından bunu yapmanın bu sorunu çözüp çözmediğini kontrol edeceğiz. Bunun için:
- Press “Windows’ + “R” to open the Run prompt.
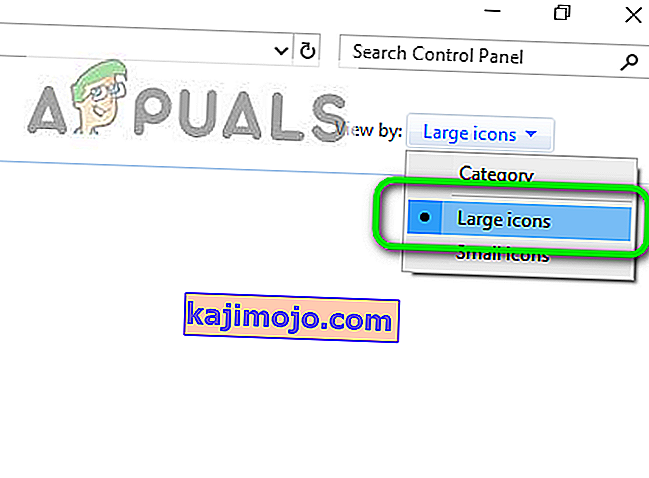
- Type in “Control Panel” and press “Enter” to launch the classical control panel interface.

- Click on the “View By:” option from the top and select the “Large Icons” option from the menu.
- In the next window, click on the “Troubleshooting” option and then click on the “Run Maintenance Tasks” button.
- In the window that pops up, click on the Next button, and provide administrative privileges to successfully run this task.
- Wait for the Maintenance to be completed and check to see if doing so has fixed the issue with the frozen taskbar.


Method 13: Use DDU to Perform a Clean Install
In some cases, it is possible that the Graphics Card installed on the system might have a faulty driver installed due to which this issue is being triggered. Therefore, in this step, we will be performing a Clean install of the Graphics Driver by uninstalling the Driver using DDU and then we will check to see if doing so has fixed the issue with the Taskbar. For that:
- Make sure to back up any important data before performing this step in case something goes unexpected.
- Download the DDU software from this website.
- After downloading the software, extract the zip file and open the folder where it has been extracted.
- Run the “.exe” file inside the folder and it will automatically further extract inside the same folder.
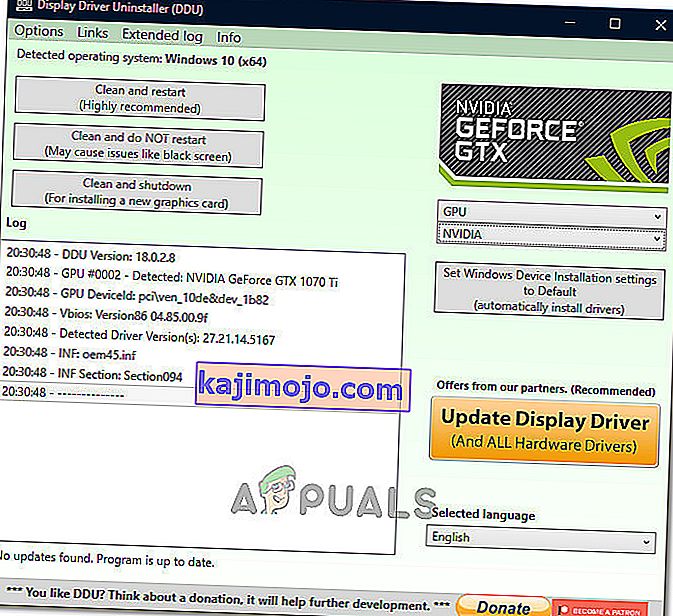
- Open the newly extracted folder and click on the “Display Driver Uninstaller.exe”.
- Click on the “Select Device Type” dropdown and select “GPU”.
- In the other dropdown, select the manufacturer of your GPU and then click on the “Clean and do not Restart” option.
- This will uninstall the device driver for your GPU and it should automatically shift to the Microsoft Basic Visual Adapter.
- After uninstalling this software, download the GPU driver from your manufacturer’s website by specifying your exact make and model.
- Install this software on your computer and then check to see if doing so fixes the taskbar freezing issue on your computer.

Method 14: Stopping Windows Service
In some situations, it is possible that a certain Windows service might need to be stopped from the task manager. Therefore, in this step, we will be preventing it from running in the background as it has likely hanged due to which the taskbar is being frozen. In order to stop this service:
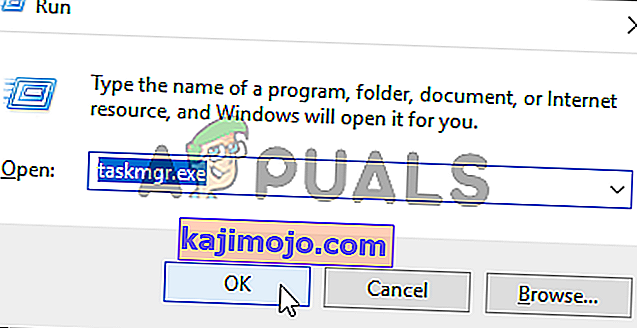
- Press “Windows’ + “R” to open the Run prompt.
- Type in “taskmgr” and press “Enter” to open the Task Manager.
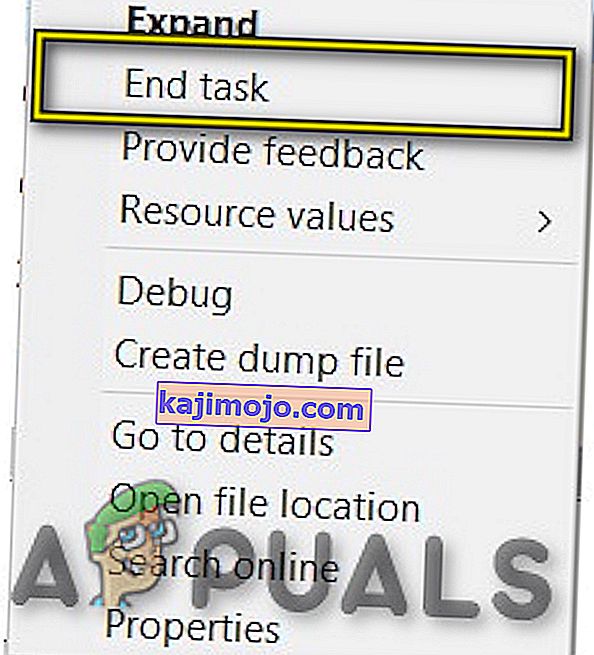
- Click on the “Processes” tab and from the list, click on the “Service Host: DCOM Server Process Launcher” service.
- Click on the “End Task” button and close out of the task manager.
- After closing out of the task manager, check to see if doing so has fixed the frozen taskbar situation.

Method 15: Stop Microsoft Edge and Remove it from Taskbar
In some situations, the default browser that comes installed with Microsoft Windows might just be the culprit behind this whole issue. If you are using another browser as your go-to default browser, you might see that using the Microsoft Edge browser causes issues with the taskbar. Therefore, in this step, we will be stopping Microsoft Edge from the Task Manager and then we will remove it from the taskbar. For that:
- Press “Windows’ + “R” to lauch the Run prompt.
- Type in “taskmgr” and press “Enter” to open the Task Manager.
- Click on the “Processes” tab and from the list, click on the “Microsoft Edge” browser.
- Click on the “End Task” button and close the task manager.
- If the Taskbar is still frozen, restart your computer and repeat this process.
- After doing so, right-click on the Microsoft Edge icon in the taskbar.
- Select the “Unpin from Taskbar” option to remove Microsoft Edge from your taskbar.
- Check to see if doing so fixes the issue.

Method 16: Remove Outdated References
It is possible that your Registry might be plagued with outdated references to an old operating system that you might’ve upgraded from. Even if you have removed the Windows.old folder from your computer, some driver and registry files might still be associated with the “Windows.old” folder which practically doesn’t exist on your computer and this misconfiguration might prevent your computer from working properly. Therefore, in this step, we will be removing it from the registry editor. For that:
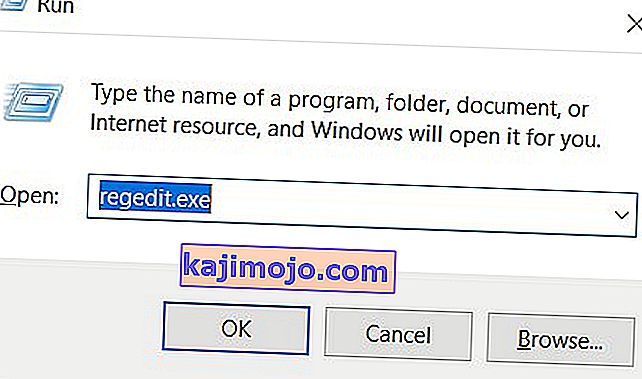
- Press “Windows’ + “R’ to open the Run prompt.
- Type in “regedit” and press “Enter” to open the registry editor.
- Press “Ctrl” + “F” to open the finder and type in the “c:\windows.old” line and press “Enter” to find any registry related entries.
- Delete or remove any such entries that refer to this and run an SFC scan to check for any missing files.
- Make sure to install any missing drivers using Driver Easy and then check to see if the Frozen Taskbar issue has been fixed.

Method 17: Rollback Updates
In some situations, Windows might’ve acquired some updates that are preventing your computer from functioning properly and due to this, the taskbar feature has been broken. Therefore, in this step, we will be rolling back some recently installed updates and then we will check to see if doing so fixes the frozen taskbar issue. In order to do that:
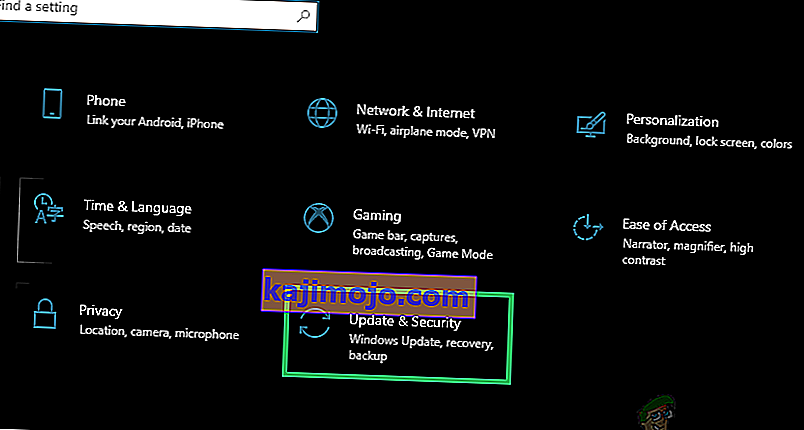
- Press “Windows’ + “I” buttons on your keyboard to open the Windows settings.
- In the Windows Settings, click on the “Update and Security” button and from the left pane, select “Windows Update”.
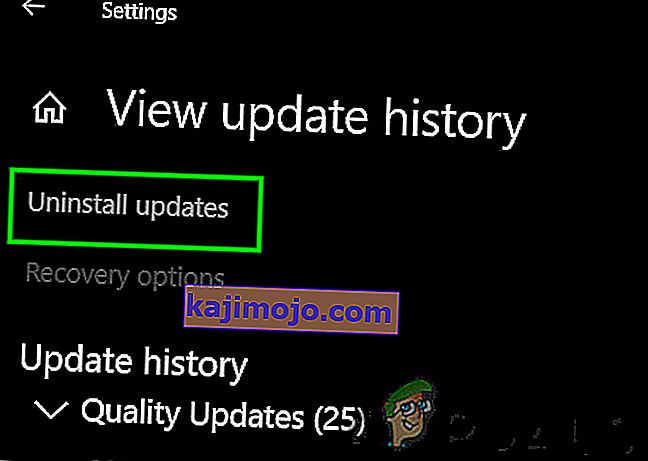
- On the next screen, select the “Update History” button and it should lead to a new window.
- In the new window, there should be an “Uninstall Updates” button and by clicking on it, a prompt should open that should enable you to be able to uninstall an update.
- Follow the on-screen instructions to be able to fully remove the update and check to see if the issue persists after doing so.


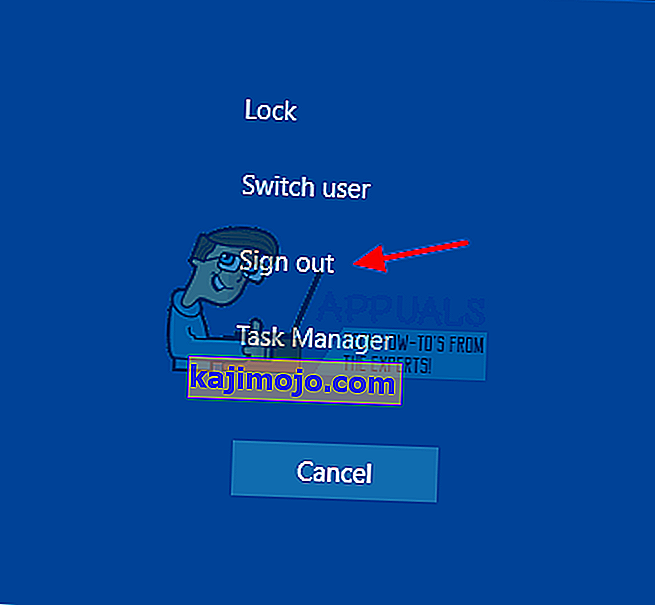
Method 18: Signing out of Account
It is possible that the Windows Taskbar is getting frozen due to a glitch during the account login. Therefore, we can test this out by simply signing out of our account and then signing back in to ensure that the account is logged in properly and that it is properly registered with the Microsoft Servers. In order to do so:
- Press “Ctrl” + “Alt” + “Del” buttons on your keyboard to open up the account options.
- Click on the “Sign out” option from the screen to log out of your account.
- Wait for Windows to completely sign you out of your account and confirm any prompts on your screen to complete the sign-out process.
- Select your account and sign back into your account from the next screen by entering your login details.
- Check to see if doing so has fixed the frozen taskbar issue on your account.

Method 19: Creating Batch File
Most people found that restarting the Windows Explorer fixed their issue but for some of them, it kept coming back after a while. Therefore, in this step, we figured out a way for the people that can solve it by restarting but all they will have to do is click on a batch file present on their desktops. For that:
- Right-click anywhere on your desktop and select the “New>” option.
- Click on the “Text Document” option and a new text document will be created on your desktop.
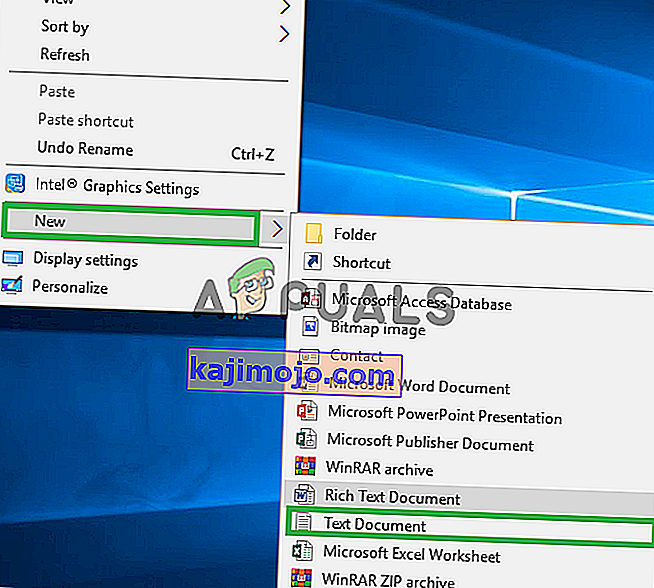
- Open this text document and paste the following lines inside of the text document.
taskkill /f /IM explorer.exe start explorer.exe exit
- Click on the “File” option at the top left of the window and select the “Save As” option.
- Enter the “TaskMRestart.bat” as the file name and select “All Files” from the “File Type” dropdown.
- Save this file on your desktop and exit out of the document.
- Now, double-clicking on this newly saved file should automatically restart File Explorer which should fix the Frozen taskbar issue within a second.
- You can just click on the file whenever the taskbar freezes and it should fix itself.

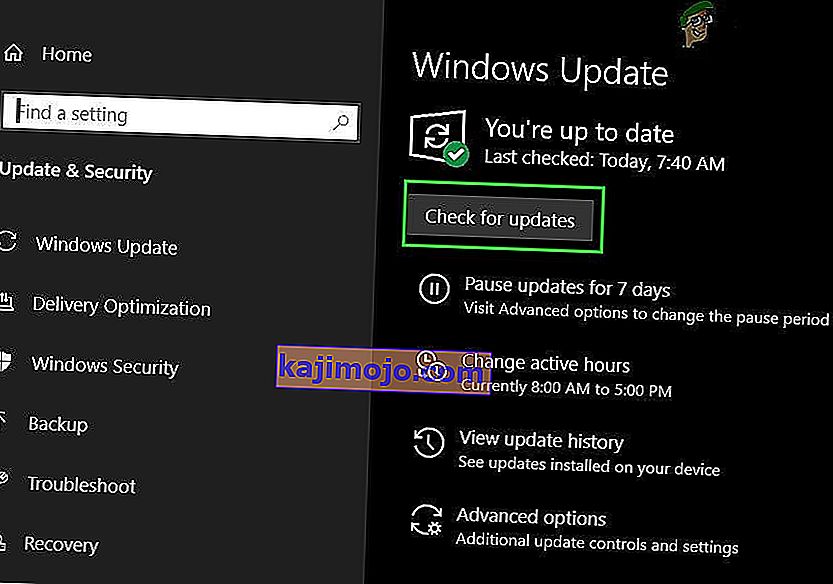
Method 20: Perform an Update
The frozen taskbar issue was a very famous topic on most Microsoft forums and apparently a lot of Microsoft officials took note of it. Therefore, it is possible that this issue might’ve been fixed for some people in recent updates released by Microsoft. Therefore, in this step, we will be checking for any available updates from Microsoft and installing them on our devices. For that:
- Press “Windows” + “I” to open the settings.
- In the settings, click on the “Update and Security” option and then select the “WindowsUpdate” button from the left side.
- In the Windows Update, click on the “Check for Updates” button and a prompt will be registered that will automatically check for any newly available updates.
- Install these updates on your computer by following the on-screen instructions and restart your computer.
- Check to see if installing these updates fixes the issue on your computer.

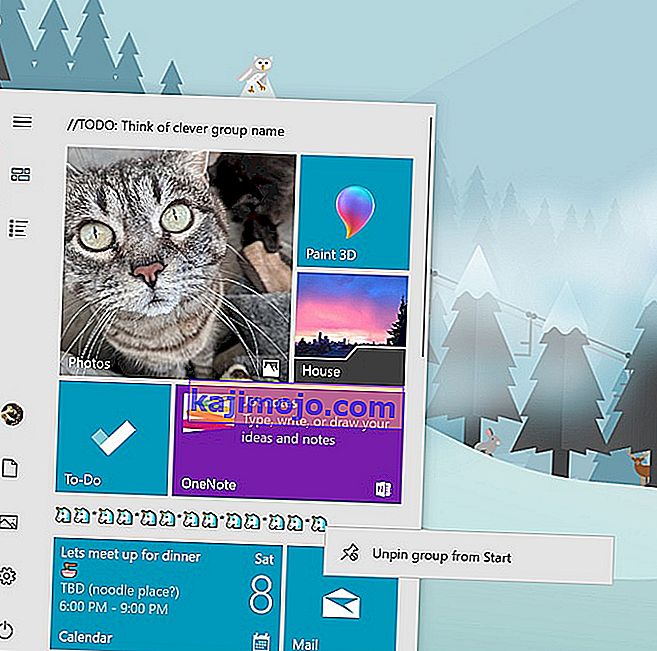
Method 21: Unpinning Items from Start Menu
Some people like to pin important items to the start menu for ease of access and increased productivity. However, as it stands, some Windows users have been facing the frozen taskbar issue due to these pinned items. Therefore, in this step, we will be unpinning some items from the start menu and the taskbar and then we will check to see if doing so fixes the frozen taskbar bug.
- Press the “Windows” button on your keyboard to launch the start menu.
- Inside the start menu, right-click on a tile on the right side of the start menu.
- Select the “Unpin from Start Menu” button to remove the item from the Start menu tiles.
- After removing some items, check to see if the bug is fixed.
- Try removing all the items that can be removed if the bug comes back and check again.
- For a more accurate removal, try removing all the programs from the taskbar and the Start menu that try to connect to the internet, for example, Microsoft Edge, Cortana, News, etc.

Method 22: Disable Items from Bios
It is possible in some cases that the computer’s Bios has been improperly configured due to which the Windows Taskbar is getting frozen time and time again. Therefore, in this step, we will first be booting inside the Bios from which we will disable an option that should get rid of this problem if it was based around the Bios. In order to do so:
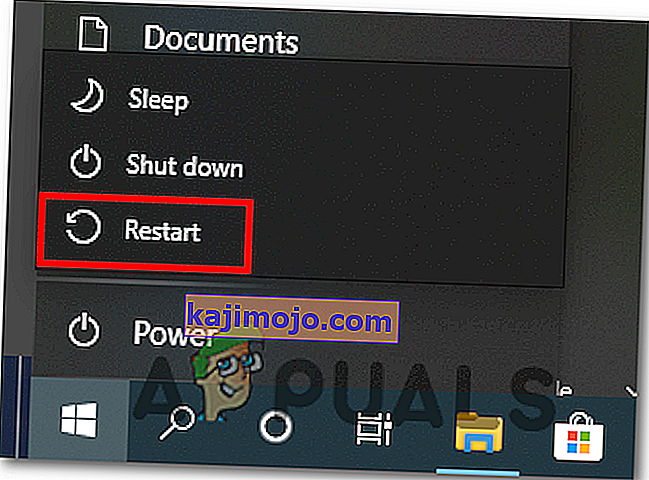
- Klavyenizdeki "Windows" düğmesine basın ve " Güç Düğmesi" simgesine tıklayın.
- Listeden "Yeniden Başlat" seçeneğini seçin ve bilgisayarınızın yeniden başlatma istemini bekleyin.
- Bilgisayar kapanıp açılmaya başladığında, bilgisayarın bios içinde başlatmak için ana kartınıza bağlı olarak "Del", "F12" veya "F11" tuşuna basmaya başlayın .
- Gönderen biyografilerine farklı ayarlar arasında gezinmek bulana kadar “iGPU Çok Monitör” özelliğini.
- Bios içindeki bu özelliği devre dışı bırakın ve Windows'u yeniden başlatın.
- Bu özelliği devre dışı bırakmanın çalışıp çalışmadığını ve donmuş görev çubuğu hatasını düzelttiğini kontrol edin.
