Windows 10 , Microsoft tarafından Windows'un en çok beklenen sürümlerinden biridir. Windows 8, Masaüstü İşletim Sistemi dünyasında yeni bir trend oluştursa da, Windows 10'da Microsoft için ana odak noktası olan tasarım ve performans açısından bazı sorunlar vardı. Bu nedenle, Windows 10 Final Build, 29 Temmuz 2015'te Masaüstü için ve Akıllı Telefonlar.
Windows 8'in kusurlarını göz önünde bulundurarak birçok değişiklik içeriyordu. Aslında, Windows'un gelişmiş bir sürümüdür, ancak yine de, her gün farklı kullanıcılarla ortaya çıkan bir takım sonuçlar vardır .
Bu sonuçların önemli bir kısmı, belirli bir görevi yapmaya çalışırken ortaya çıkan hatalardır. Windows 10 içinde farklı yazılım ve tarayıcıları açmaya çalışırken bir dizi kişi bir hata mesajı aldı. Bu hata, uygulamanın düzgün başlatılamadığını belirten bir hata mesajıyla birlikte gelir (0xc0000005). Uygulamayı kapatmak için Tamam'ı tıklayın . Bu hata genellikle internet tarayıcılarında görülür, ancak bunlarla sınırlı değildir. Windows içindeki herhangi bir uygulama bu hata nedeniyle yanıt vermeyi durdurabilir. Bu nedenle, bu temel yazılımları tekrar çalışmaya döndürmek için düzeltilmesi gerekiyor.

11/12/2016: Kullanıcılar aşağıda listelenen yöntemlerin Windows 7'de de çalışacağını bildirdi.
Windows 10 Hatasının Arkasındaki Neden 0xc0000005:
Bu hatanın Windows 10'daki çeşitli yazılımların işlemlerini bozmasına neden olduğu bilinen birkaç neden vardır. Ana neden olarak kabul edilen bu nedenlerden biri, yürütülebilir dosyalarla çakışmalara neden olan ve işlemlerini etkileyen bir üçüncü taraf virüsten koruma programıdır . Öte yandan, programların anormal şekilde davranmasına neden olan kötü amaçlı yazılımlar ve virüsler nedeniyle kayıtlar bozulabilir . Bazen, kötü donanım sürücüleri de bu hataya neden olan suçlu olabilir.
Windows 10 Hatasını Düzeltmek İçin Çözümler 0xc0000005:
Yukarıda belirtilen nedenlere bağlı olarak, çözümler basittir. Öyleyse, bu sinir bozucu hata mesajından kurtulmak için aşağıdaki yöntemleri uygulayın.
Bozuk Sistem Dosyalarını Onarın
Bozuk ve eksik dosyaları buradan taramak ve geri yüklemek için Restoro'yu indirin ve çalıştırın , tamamlandıktan sonra aşağıdaki çözümlere devam edin. Aşağıdaki çözümlere geçmeden önce tüm sistem dosyalarının sağlam olduğundan ve bozuk olmadığından emin olmak önemlidir.
Yöntem 1: Antivirüs Programını Düzeltme
Virüsten koruma programları, bir dizi programın yürütülebilir dosyalarını etkileyebilir. Bu nedenle, bu sorunu çözmek için, suçlu olup olmadığını kontrol etmek için üçüncü taraf virüsten koruma programını devre dışı bırakmanız gerekir. Lütfen antivirüs programlarını devre dışı bırakmanın, internete bağlanıldığında bilgisayarınızda bazı ciddi tehditlere neden olabileceğini unutmayın.
Ayrıca Windows'un kendi güvenlik yazılımına, yani Windows Defender'a da güvenebilirsiniz . Diğer antivirüslerle aynı işlevselliğe sahiptir. Ayarlarına gidip kalkanı kapatarak antivirüs'ü devre dışı bırakabilirsiniz .

Devre dışı bırakıldıktan sonra, hatayı tekrar kontrol edin. Hala devam ederse, sonraki yönteme geçin.
Yöntem # 2: Kayıtları Düzeltme
Kayıt sürekli olarak çalıştırmak için ihtiyaç duyduğu birçok farklı dosya ve ayarlarını oku yardımına PC'nize tarafından kullanılıyor Windows'un merkezi veri tabanıdır. Kayıtlar, her şeyi yerinde biriktirmek için gereken bazı dosyaların zarar görmesi nedeniyle bozulabilir. Bu nedenle, çoğu uzman, Kayıt Defterinizi yedeklediğinizden ve bu yedeği geleneksel bir USB bellekte sakladığınızdan emin olmanızı tavsiye eder, böylece bozulma durumunda Kayıt Defterinizi önceki durumda yeniden canlandırabilirsiniz. Ancak, Kayıt Defterinizi yedeklemediyseniz, 0xc0000005 hatasını çözmek için kayıt defterlerini düzeltmek için aşağıdaki adımları izleyin .
1. Bu bağlantıdan kayıt defteri temizleme yazılımını indirin .
2. İndirildikten sonra, önerilen ayarları kullanarak kurun. Kurulum işlemi bittikten sonra yazılımı açın.
3. Arayüzde, sol bölmede bulunan Kayıt Defteri sekmesine tıklayın ve Sorunları Tara etiketli düğmeyi tıklayın . Kayıt defterindeki hataları aramaya başlayacak ve arama bittiğinde, Seçili Sorunu Düzelt düğmesi etkinleştirilecektir. Bu düğmeye tıklayın ve her şey düzeltilecektir.

Yöntem 3: Hatalı Sürücüleri Düzeltme
Sürücüler , bilgisayarın kendisine bağlı donanımla iletişim kurmasına yardımcı olan yazılım programlarıdır. Bunlar zarar Yani, donanım neden eğilimindedir glitches . Bu hatalı dalgıçları düzeltmek size çeşitli şekillerde yardımcı olabilir. Aşağıdaki adımları takip et.
1. Açık Aygıt Yöneticisi tarafından basılarak Win + X ve listeden seçerek.
2. Aygıt Yöneticisi'nin içinde, sarı işaretli herhangi bir donanım olup olmadığını görmek için aşağı kaydırın. Varsa, oraya sağ tıklayın ve Sürücü Yazılımını Güncelle'yi seçin . Yakın zamanda sürücüleri yüklediyseniz, bu sürücüleri de yeniden yükleyin.

3. Ardından görünen pencerede, sürücüleri otomatik olarak arayıp yüklemesine izin vermek için güncellenmiş sürücü yazılımını otomatik olarak ara seçeneğine tıklayın . Sürücüleri manuel olarak indirdiyseniz, göz atmak ve yüklemek için aşağıdaki seçeneğe tıklayın. İşlem tamamlandıktan sonra hatayı kontrol edin.

Yöntem 4: BCD'yi Düzeltin
Bu yöntem, riski kendisine ait olmak üzere kullanıcılar tarafından gerçekleştirilecektir. Bu bazıları için işe yaradı ve bazıları için işe yaramadı. Bu kılavuzdaki adımları uyguladıktan sonra Windows'u yeniden etkinleştirmeniz de gerekecektir.
- Windows Tuşunu basılı tutun ve X'e basın . Komut İstemi'ni seçin (Yönetici)
- “ Bcdedit” yazın ve ENTER'a basın. Windows Önyükleme Yükleyici Yolunuz xOsload.exe ise, bazı dosyaları kaldırmanız ve BCD'nizi onarmanız gerekir. Bunu “ bcdedit” komutunu çalıştırdıktan sonra PATH alanında görebilirsiniz .
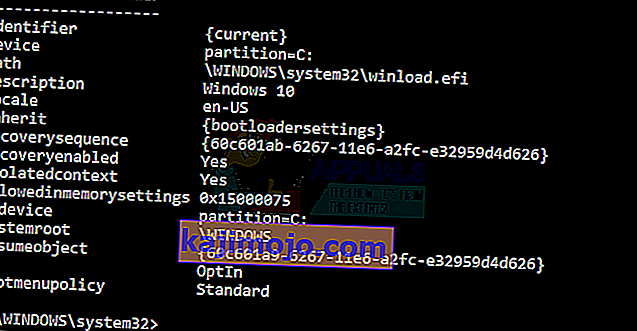
- Bir kez yapıldığında, aşağıdaki komutları yürütün, bazıları bulunamadı dönebilir, ancak hataları görmezden gelebilir ve sonuncuya kadar devam edebilir. Her komuttan sonra ENTER tuşuna bastığınızdan emin olun.

Del D: \ Windows \ System32 \ xOsload.exe Del D: \ Windows \ System32 \ xNtKrnl.exe Del D: \ Windows \ System32 \ Drivers \ oem-drv64.sys özelliği c: \ boot \ bcd -h -r -s ren c: \ boot \ bcd bcd.old bootrec / rebuildbcd
Yöntem 5: Windows Güncellemelerini Denetleme
Windows Güncellemeleri genellikle bazı hatalar ve aksaklıklar için düzeltmeler içerir, ancak aynı zamanda insanların bilgisayarlarında yeni sorunlara yol açmasıyla da ünlüdür. Ancak, bu adımda, İşletim sisteminiz için herhangi bir güncelleme olup olmadığını kontrol edeceğiz çünkü Microsoft, güncellemelerinden gelen sorunları sık sık düzeltiyor. Bunu yapmak için aşağıdaki kılavuzu izleyin.
- Windows ayarlarını açmak için "Windows" + "I" tuşlarına basın .
- Ayarlarda, "Güncellemeler ve Güvenlik" seçeneğine tıklayın ve sol taraftan "Windows Güncelleme" seçeneğini seçin.

- Sonraki ekranda, "Güncellemeleri Kontrol Et" seçeneğine tıklayın ve otomatik olarak Windows'tan mevcut güncellemeleri kontrol etmesini isteyecektir.
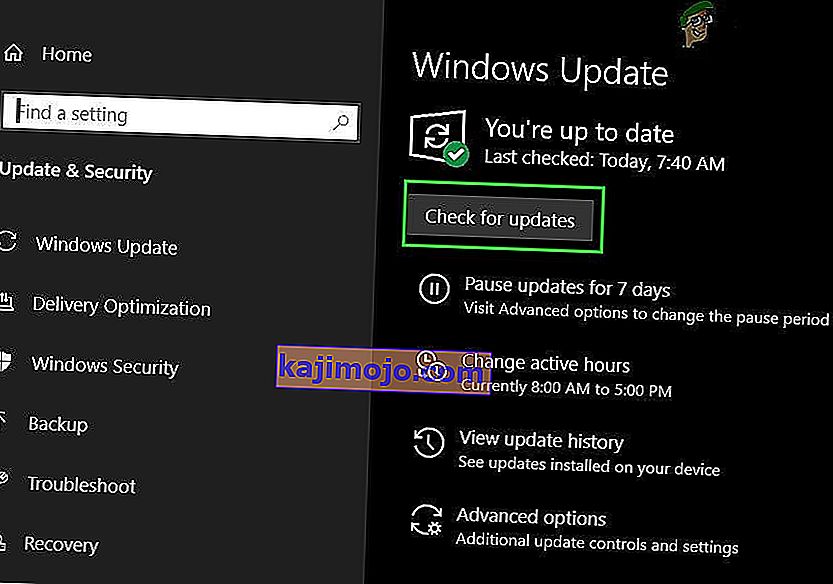
- Güncelleme kontrolü tamamlandıktan sonra, yeni güncellemelerin bilgisayarınıza indirilmesini ve kurulmasını tetiklemek için "İndir" düğmesine tıklayın.
- Bu güncellemeler yüklendikten sonra, bunu yapmanın bilgisayarınızdaki sorunu çözüp çözmediğini kontrol edin.


Yöntem 6: Bilgisayarı Geri Yükleme
Bu sorunu yeni almaya başladıysanız, hatalı bir sürücü yüklemesi veya yakın zamanda bilgisayarınıza yüklemiş olabileceğiniz sahte bir uygulama nedeniyle tetikleniyor olabilir. Bu nedenle, bu adımda, bilgisayarın durumunu daha önceki bir tarihe geri döndüreceğiz ve umarım, yukarıda belirtilen nedenlerden kaynaklanıyorsa bu sorunumuzun düzeltilmesi gerekir. Bunu yapmak için:
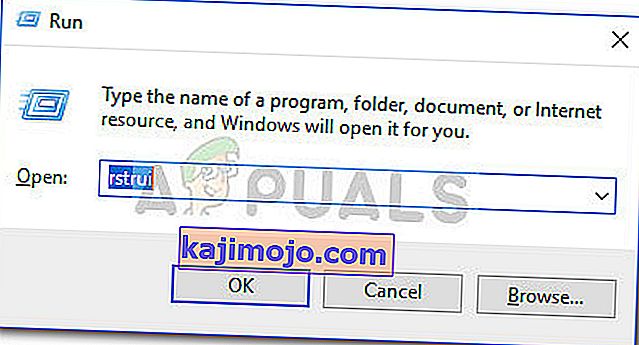
- Çalıştır istemini açmak için "Windows" + "R" tuşlarına basın .
- İçinde Tip “Rstrui” ve basın “Enter” yönetim penceresini geri açın.
- Tıklayın “İleri” ve check “Geri Yükleme Noktaları fazla göster” seçeneğini.
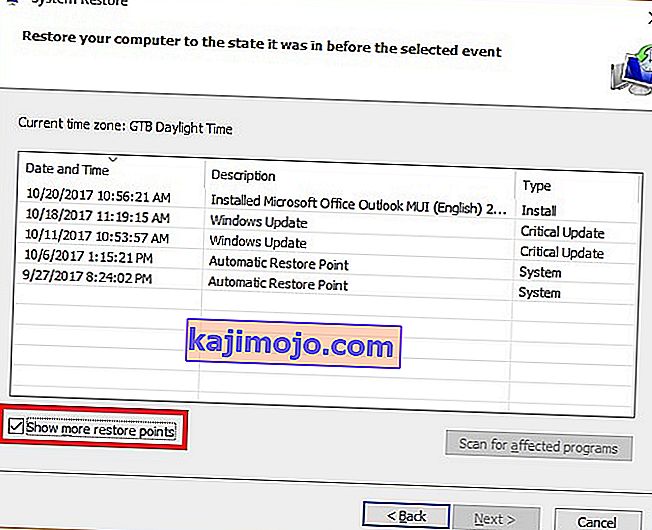
- Listeden bu sorunun oluşmaya başladığı tarihten önceki bir geri yükleme noktası seçin.
- Tekrar "İleri" ye tıklayın ve her şeyi seçilen tarihe geri döndürmek için ekrandaki talimatları izleyin.
- Geri yükleme tamamlandıktan sonra, sorunun devam edip etmediğini kontrol edin.


Yöntem 7: Güvenlik Duvarını Etkinleştir
Bazı durumlarda, uygulamanın şüpheli olması veya en azından şüpheli olarak işaretlenmiş olması ve bu şüpheli durumu doğrulamak için bilgisayarınızda Windows Güvenlik Duvarı'nın çalışmaması nedeniyle hatanın tetiklenmesi mümkündür. Bu nedenle, bu adımda, bu hatadan kurtulmak için Windows Güvenlik Duvarının etkinleştirildiğinden emin olacağız. Bunun için:
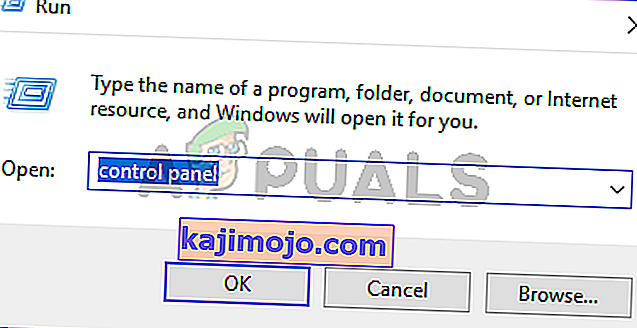
- Çalıştır istemini açmak için "Windows" + "R" tuşlarına basın .
- İçinde Tip “Kontrol Paneli” ve basın “Enter” klasik Kontrol Paneli arayüzünü başlatmak için.
- In the Control Panel, click on the “ViewBy:” option and select the “Large Icons” button.
- After making this selection, click on the “Windows Defender Firewall” option to launch the Firewall and then select the “Turn Windows Defender Firewall On or Off”.
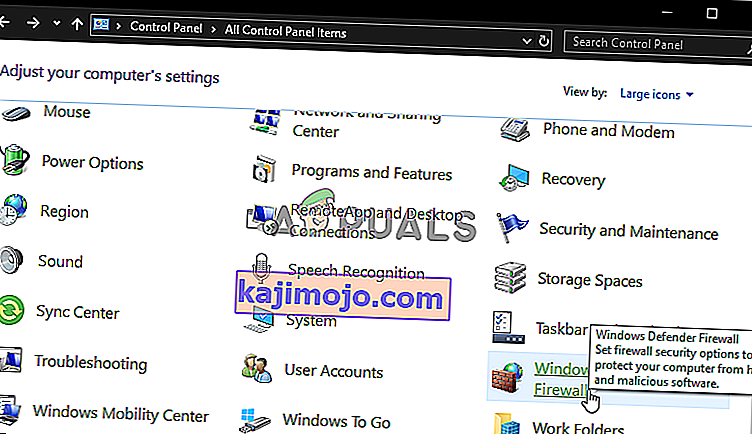
- Make sure to check the “Turn on Windows Defender Firewall” for both the available options to turn the Firewall on.
- After making this selection, save your changes and close out of the Window.
- After doing so, check to see if the issue still persists.


Method 8: Run SFC Scan
In some situations, you might’ve installed a bad driver on your computer or at some point, due to a storage failure, some system files or drivers might’ve been corrupted. Therefore, in this step, we will be running a complete system scan to identify any drivers that are missing signatures or to fix any abnormalities in the system files. For that:
- Press “Windows’ + “R’ to open the Run prompt.
- Type in “cmd” and then press “Shift’ + “Ctrl” + “Enter” to provide admin permissions.Running the Command Prompt
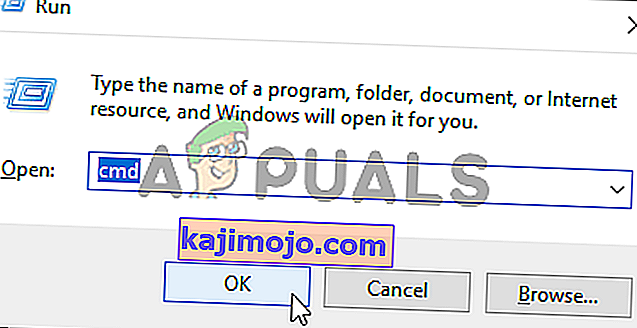
- Type in the following command inside the command prompt and press “Enter” to execute it.
sfc /scannow
- Let the computer scan for any broken or corrupted items and it should automatically replace them with working ones.
- Check to see if doing so fixes the error message.

Method 9: Disabling Data Execution Prevention
Data Execution Prevention is a program that prevents certain programs or executables from being able to run on your computer because it suspects that they might be viruses. Due to this prevention, sometimes, as a false alarm, legit applications might also face issues while trying to run on your computer. Therefore, in this step, we will be disabling this setting from the system configuration panel. For that:
- Press ‘Windows’ + “R’ to open the Run prompt.
- Type in “Control Panel” and press “Enter” to launch the classical control panel interface.

- Inside the Control Panel, click on the “View By:” icon and then select the “Large Icons” option.
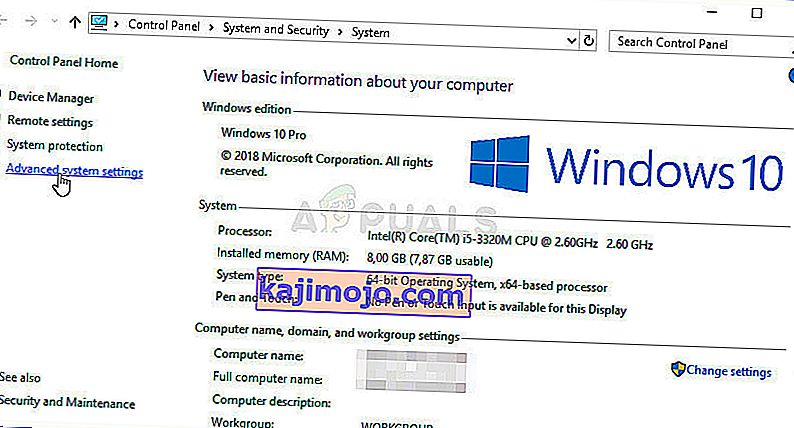
- After selecting Large Icons, select the “System” option.
- Click on the “Advanced System Settings” option on the left side of the screen.
- In the advanced System Settings, click on the “Advanced” tab from the top.
- In the advanced tab, click on the “Settings” option under the “Performance” heading.
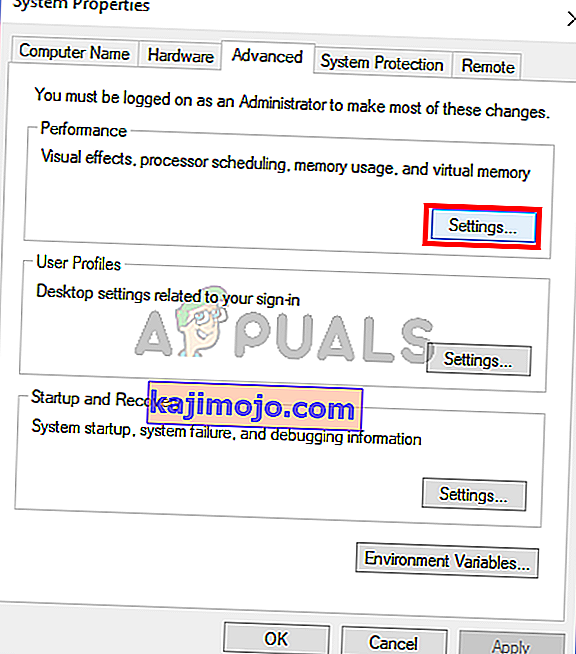
- On the next window that opens up, click on the “Data Execution Prevention” tab, and then select the “Turnon DEP for all programs except thoseI Select” option.
- After that, click on the “Add” option and point to the executable of the application that you are facing issues with.
- This way, that application will no longer come under the jurisdiction of the DEP program.
- Check to see if doing so has fixed the issue.


If the above process is unable to fix the issue, it might be because the executable isn’t the only one being affected by the DEP program. Sometimes the DEP might actually be preventing a herd of executables from being run on the computer and to counter this we will be disabling DEP completely.
Disabling DEP completely cannot be done through any Windows setting and it needs to be done manually through the command prompt. Remember to take this step as a last resort because this can in some cases makes your computer more vulnerable to viruses and malware attacks. In order to disable DEP through the command prompt:
- Press “Windows” + “R’ to open the Run prompt.
- Inside the Run prompt, type in “cmd” and then press “Shift” + “Ctrl” + “Enter” to launch in admin mode.
- Inside the command prompt, type in the following command and press “Enter” to execute it on your computer.
bcdedit.exe /set {current} nx AlwaysOff - Once the command has been executed, run the application that you want to and check to see if the error message still persists.
Method 10: Disable Firewall and Windows Defender
In some situations, the executable that you want to run on the computer might actually be blocked by the Firewall and it would not be able to make contact with its servers this way. Therefore, we will have to allow the executable in our Firewall for both public and private networks which should get it working if the Firewall is preventing it.
In addition to that, sometimes the Windows Defender might prevent the application from running on your computer because its local files might be suspicious and not properly signed. This can be due to a false alarm as well so we will be disabling the Windows Defender for the application as well by adding an exclusion. In order to do that:
- Press “Windows” + “R” to launch the Run prompt.
- Type in “ControlPanel” and press “Enter” to launch the classical control panel interface.
- Click on the “View by:” button, select “Large Icons” and then click on the Windows Defender Firewall option.
- Select the “Allow an app orfeature through the Firewall” button on the left pane and then click on the “Change Settings” button and accept the prompt.
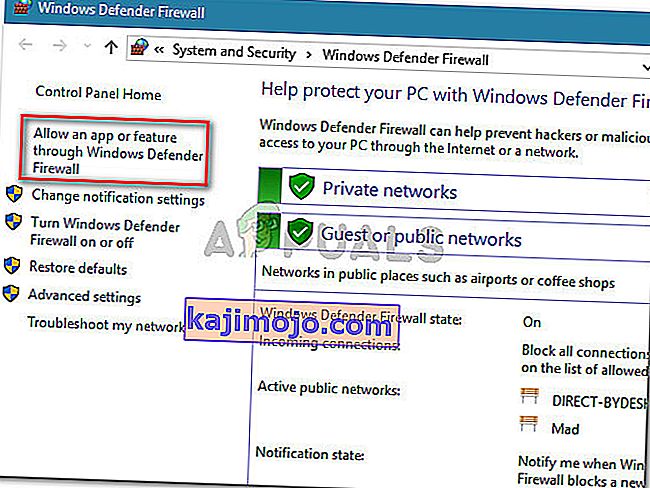
- From here, make sure that you check both the “Public” and the “Private” options for the application and its entries.
- Save your changes and exit out of the window.
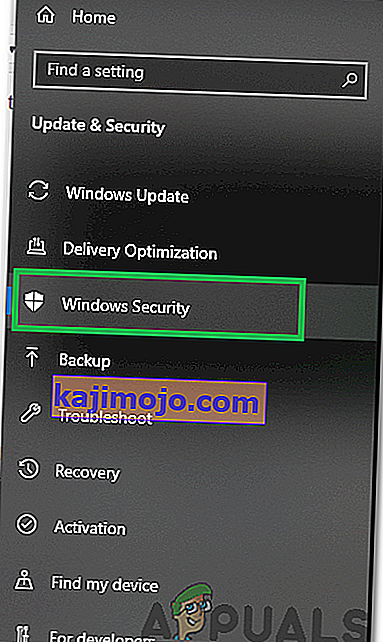
- After that, press “Windows” + “I” to launch the settings and click on the “Updateand Security” option.
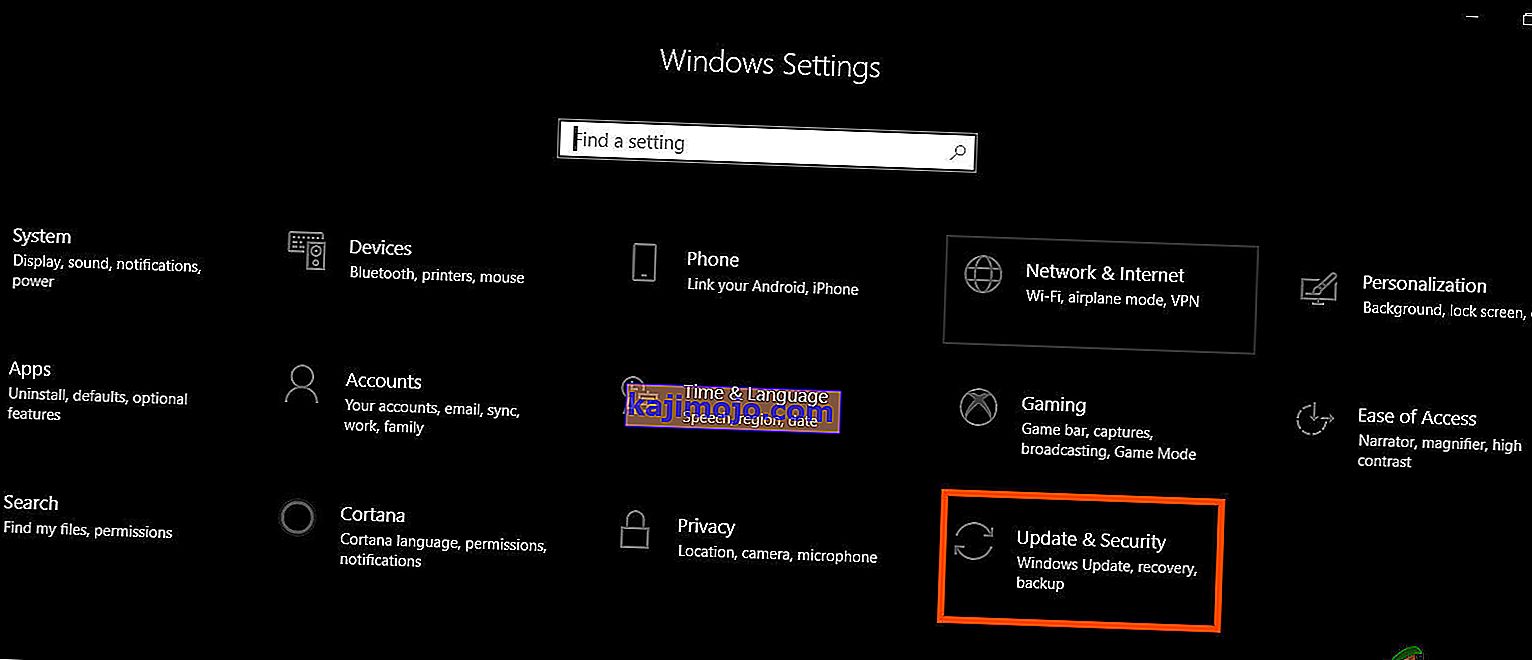
- From the left pane, click on the “Windows Security” button and then click on the “Virus and Threat Protection” button.
- Select the “Manage Settings” button under the Virus and Threat Protection Settings heading.
- Scroll down and click on the “Add or Remove Exclusions” button in the next window.
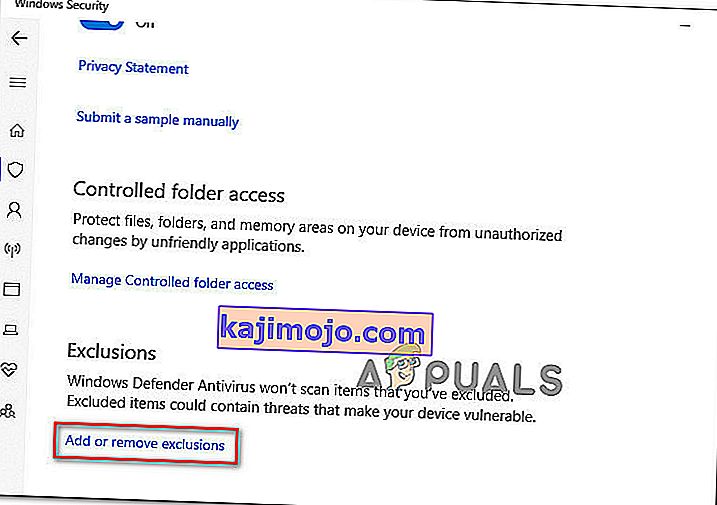
- Click on the “Add an Exclusion” option and select “Folder’ from the File type.
- Make sure to specify the application’s folder with which the issue is occurring and exit out of this window after saving your changes
- Check and see if doing so has fixed the error message.


Method 11: Reinstall Firefox
If you are getting this error while trying to launch Firefox, it might be occurring because the applications haven’t been installed properly on your computer. Therefore, in this step, we will be launching the app management window and uninstalling Firefox after which we will reinstall it completely by downloading it from the Firefox website. For that:
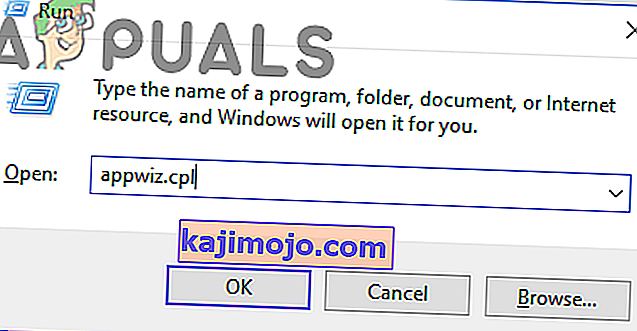
- Press “Windows” + “R” to open the Run prompt.
- Type in “appwiz.cpl” and press “Enter” to open the app management window.
- In the app management window, scroll down and right-click on the “Firefox” application.
- Select “Uninstall” from the list and then follow the on-screen instructions to remove the software from your computer.
- Repeat this step for all instances and bundled applications of the software installed on your computer.
- Make sure to disable any third-party antiviruses at this point to make sure that the software is installed smoothly.
- Head on over to the Mozilla website and click on the download button.

- Click on the downloaded executable and install it on your computer following the on-screen instructions.
- Check to see if doing so has fixed the error message on your computer.


Method 12: Scanning for Malware
It is possible in some cases that the computer has acquired malware that is preventing the user from being able to run all the system functions on their computer. Therefore, in this step, we will be using the default Windows Defender to scan our computer thoroughly for any viruses or malware that might’ve found its way on our computer. For that:
- Press the “Windows” + “I” keys simultaneously on your PC to open the Settings tab.
- Navigate to the Update& Security option and then click on the “Windows Security” button on the left tab.
- After that, click on the “Open Windows Security” and select the “Virus and Threat Protection” option.
- After that, click on the “Scan Options” button below the “Quick Scan” window.
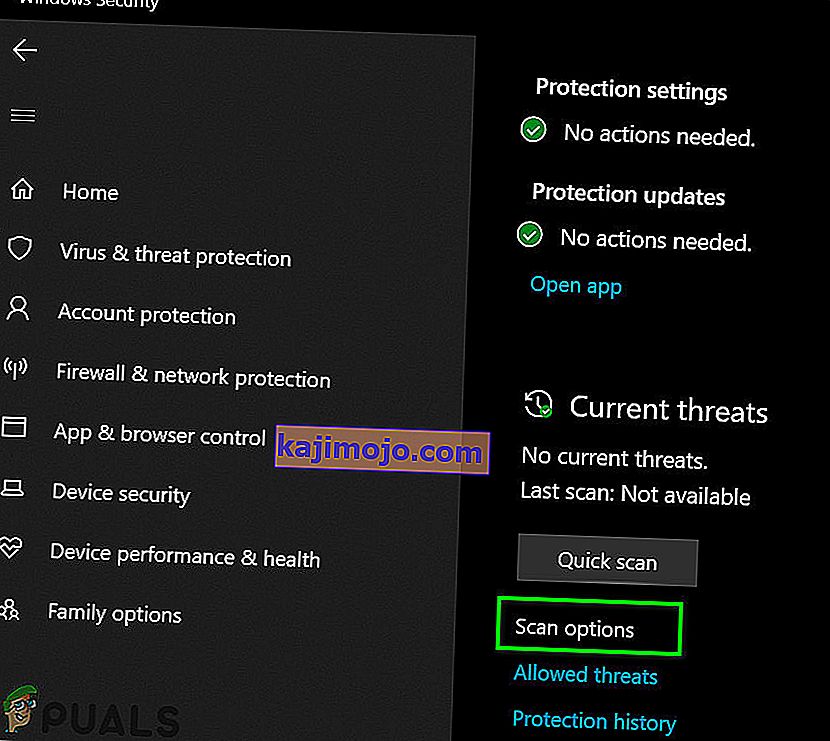
- Click on the “Full Scan” option and then hit the button of “Scan Now”.
- Wait for a few seconds while this process gets completed and then finally check if the error gets resolved now.


Microsoft Security Scanner is an additional tool that you can use to test the system for any further viruses and malware because sometimes the default tool isn’t able to perform the scan properly. Therefore, in this step, if the issue still hasn’t been resolved, we will be using the Microsoft Security Scanner to further make sure for any issues.
- Launch your browser and download the Microsoft Security Scanner from here.
- After downloading the executable, run it on your computer and let it install.
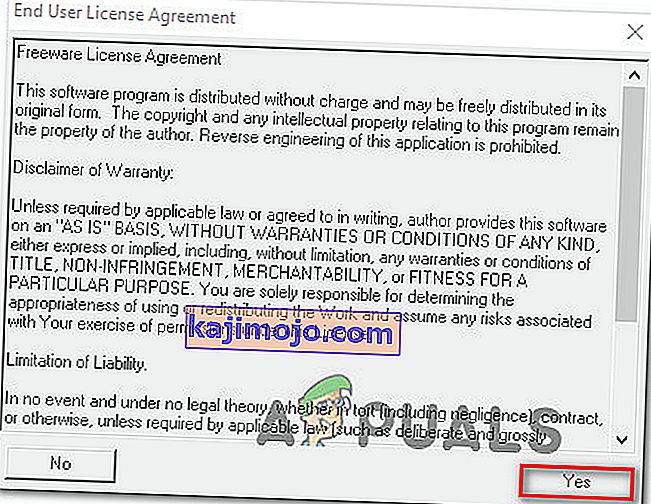
- Accept the License Agreement terms and click on “Next”.
- Select “Full Scan” and click on “Next”.
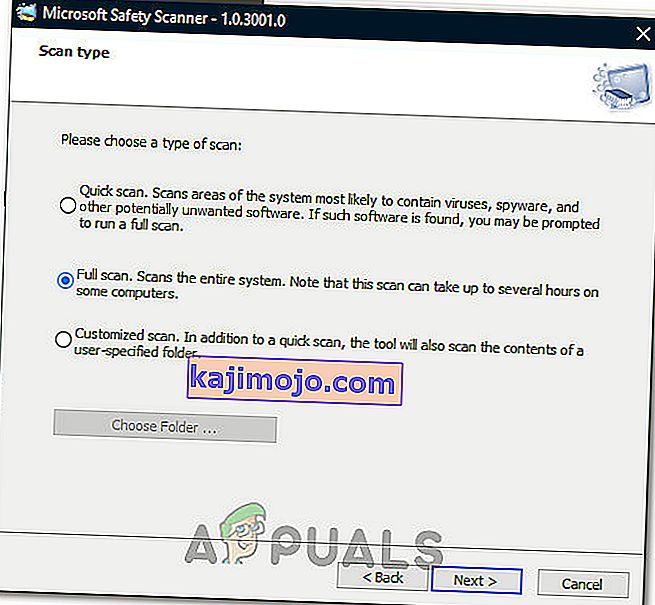
- After you opt for a full scan, the software will start scanning your entire computer to look for any malware or viruses that might’ve disguised themselves as normal executables or applications.
- After this scan has been finished, check to see if the error message still persists.


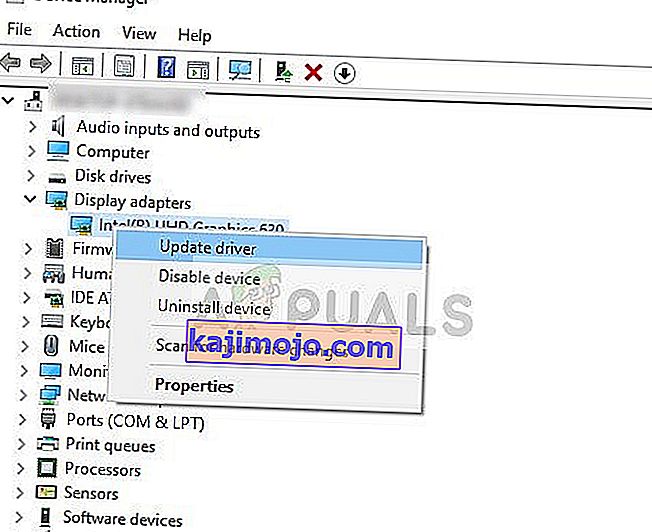
Method 13: Install Missing Drivers
It is possible in some situations that your device is missing certain drivers due to which this particular issue is being triggered on your computer. Therefore, we will be checking for any missing drivers and then we will check to see if the error is fixed. In order to do this, follow the guide below.
- Download Driver Easy on your computer.

- Run the downloaded executable and install the software on your computer.
- Run the check and see if there are any missing drivers on your computer.
- Install these missing drivers and then install them either manually or automatically using the Software.
- After installing all the missing drivers, check to see if the issue still persists.

Method 14: Reconfigure Registry
It is possible that in some cases, you haven’t properly configured all the registry settings or that you unknowingly configured something incorrectly. Therefore, in this step, we will be reconfiguring our Registry to fix a certain key that sometimes, if misconfigured, causes this particular error on Windows. In order to do this, follow the guide below.
- Press “Windows” + “R” to open the Run prompt.
- Type in “regedit” and press “enter” to launch the registry editor.

- Inside the registry editor, navigate to the following location.
HKLM\SOFTWARE\Microsoft\Windows NT\CurrentVersion\Windows\AppInit_Dlls
- Double click on the “LoadAppInit_DLLs” entry on the right side of the screen.
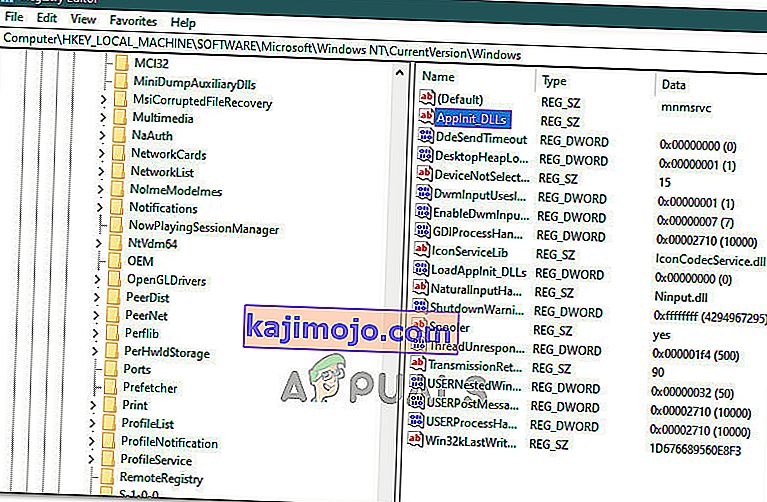
- Change the value of this registry from “1” to “0”.
- Save your changes and exit the registry editor.
- Check to see if doing so has fixed the error.


Method 15: Update Disk Drivers
In some cases, the Disk Drivers that are being used to control your Storage and other Disks installed on the computer might have been outdated due to which the error is being triggered. Therefore, in this step, we will first be opening the Device Management Window and from there, we will be updating these drivers. In order to do so, follow the steps mentioned below.
- Press “Windows’ + “R” to open the Run prompt.
- Type in “Devmgmt.msc” and press “Enter” to launch the device management window.
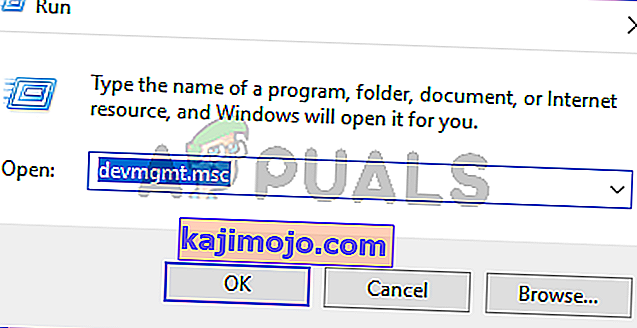
- In the Device Manager, double click on the “DiskDrives” option to expand it.
- Right-click on the storage device listed and select the “Update Driver” option.
- Select the “Search Automatically for Drivers” option and let the setup search.
- If there are any drivers available, Windows will automatically check for them and install them on your computer.
- Check to see if doing so has fixed the issue.


Method 16: Disabling Automatic Updates and Uninstalling Updates
It is possible in some cases, that this error is stemming from a faulty update install. Microsoft is notorious for pushing out updates that aren’t properly customized to work for all hardware combinations and often go on to break things instead of making them better. Therefore we will make sure that the recent update isn’t installed on our computer.
In order to do this, we will have to first disable automatic updates on our computer and then we will be uninstalling the recently installed updates. Make sure to back up any important data that you don’t want to lose just in case this goes bad.
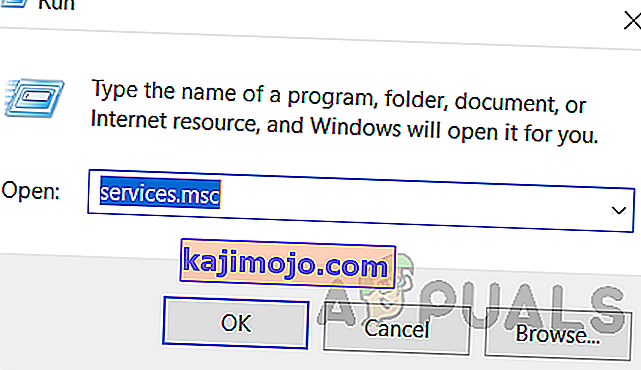
- Press “Windows” + “R’ to open the Run prompt.
- Type in “service.msc” and press “Enter”.
- Scroll through the list and double click on the “Windows Update” service.
- Click on the “Stop” button and then click on the “Startup Type” dropdown.
- Select “Disabled” from the list and select the “Apply” button from the window.
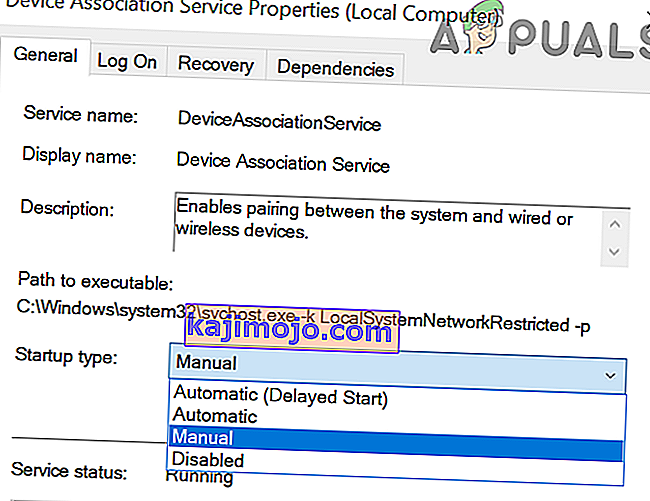
- Click on “OK” to close out of this window.
- Check to see if doing so has stopped your computer from updating.


After stopping the computer from updating, we will now be uninstalling the recent updates that have been installed on your computer. For that:
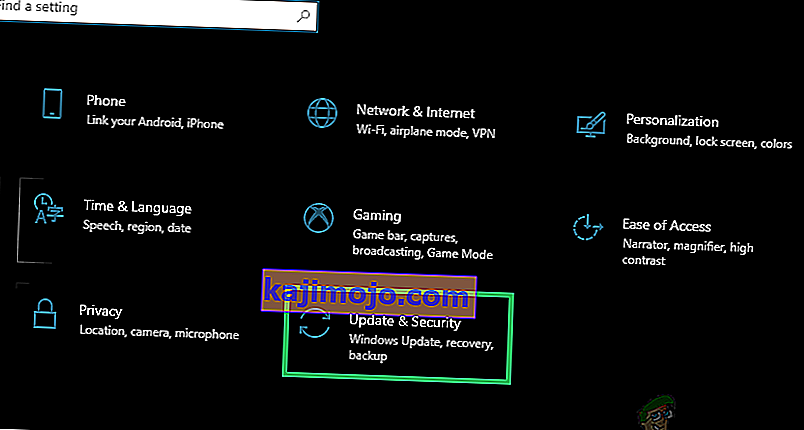
- Press “Windows” + “I” buttons to open the settings.
- In settings, click on the “Update and Security” option and then select the “Windows Update” button from the left pane.
- In the Windows Update, click on the “View Update History” option.
- In the Update History, click on the “Uninstall Updates” option and it should take you to the uninstallation screen where all the recently installed updates will be listed.
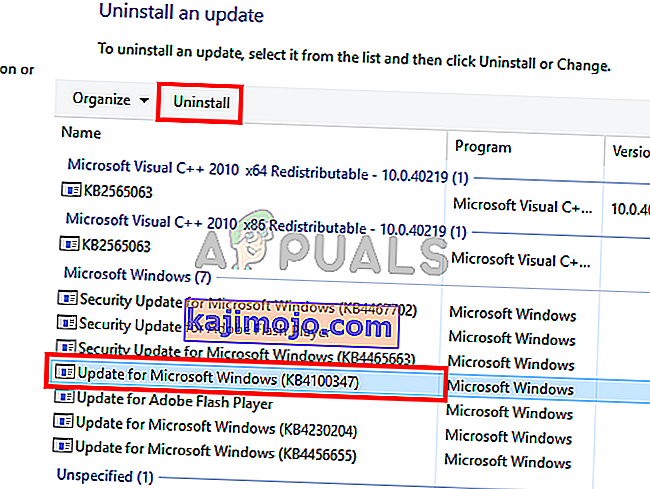
- From the list, right-click on the update that was installed recently and caused this error on your computer.
- Right-click on this update and select the “Uninstall” button to remove it completely from the computer.
- Follow through with the on-screen instructions.
- Check to see if uninstalling has fixed this issue.


Additional Fixes:
- In addition to some of the recommendations given above, you should try to check if there are any bad memory modules (RAM) installed on your computer which can be a cause of this.
- Ayrıca, RAM'inizi önerilen sınırın ötesinde bir seviyeye hız aşırtmadığınızdan emin olun. Bunu yaptıysanız, fabrika varsayılanlarına geri getirmeyi deneyin ve bunun sorununuzu çözüp çözmediğini kontrol edin.