Çalışma alanınıza bağlı olarak, e-postaları müşterilerinizle birincil iletişim aracı olarak kullanabilirsiniz. Ancak tüm teknolojilerde olduğu gibi,% 100 güvenilir değildir ve tekleme yapabilir.
Microsoft Outlook, en popüler e-posta ve uygulama yöneticisidir, çünkü yaratıcıları etrafında dikkatli bir şekilde bir güvenilirlik ve güvenlik havası inşa etmiştir. Ancak gerçek şu ki, Outlook tam güvenimize layık olmaktan çok uzak. Bunu söylüyorum çünkü Outlook en uygun olmayan zamanlarda önemli e-postalar göndermeme alışkanlığına sahip görünüyor. En azından benim durumumda oldu.
Ancak ortaya çıktığı gibi, web, Outlook'un Gelen Kutusunda sıkışmış e-postaları olan insanlarla dolu ve nedenleri birden fazla. Sorun genellikle şu şekildedir - E-postayı yazarsınız ve Gönder düğmesine basarsınız. Bir süre sonra, e-postanın hala Giden kutusu klasöründe olduğunu ve hiç ayrılmaya niyetiniz olmadığını öğrenirsiniz.
Ne yazık ki, Outlook'un e-posta göndermemesinin birçok nedeni vardır, bu nedenle bazı kapsamlı sorun giderme işlemleri için hazırlanın. Şanslısınız ki, en etkili sorun giderme talimatlarını topladık ve Outlook'ta normal olarak e-posta göndermenize yardımcı olacak bir dizi yöntemi bir araya getirdik.
Ancak asıl kılavuzlara geçmeden önce, Outlook programınızın e-posta gönderememesine neden olacak en yaygın nedenleri gözden geçirmeme izin verin:
- E-postanın, gönderme sürecini yavaşlatan veya durduran büyük bir eki vardır.
- E-posta , farklı bir giden sunucunun Comcast hesabı kullanılarak gönderildi.
- Giden Kutusu'nu görüntülediğinizde bir eklenti öğeyi okundu olarak işaretler.
- Hesap şifresi kısa süre önce değiştirildi.
- Hesap, posta sunucusuyla doğru şekilde kimlik doğrulaması yapmıyor .
- Outlook sunucusu veya posta sunucusu çevrimdışı.
- Outlook'un varsayılan e-posta hesabı yoktur.
- Bozuk Gönderme ve Alma ayarları.
- Başka bir program PST veya OST verilerine (Masaüstü Araması, Lync vb.) Erişiyor.
- Bir virüsten koruma programı şu anda giden e-postayı tarıyor.
- Outlook, e-posta sunucusuna bağlanamıyor.
Artık suçluları bildiğimize göre, meşgul olalım. Aşağıda, birçok kullanıcının Outlook'ta tekrar e-posta göndermesine yardımcı olan bir yöntem koleksiyonunuz var. Size uygun bir düzeltme bulana kadar her kılavuzu takip edin. Hadi başlayalım.
Yöntem 1: Sunucuların çevrimiçi olduğundan emin olun
Devam etmeden ve Outlook'unuzun çalışma şeklini potansiyel olarak etkileyebilecek değişiklikler yapmadan önce, ulaşamayacağımız nedenleri ortadan kaldıralım. Kontrol etmeniz gereken ilk şey, posta sunucusunun durumudur.
Posta sunucunuz şu anda çevrimdışıysa, sorun çözülene kadar e-postanız Giden Kutusu klasöründe tutulacaktır. Posta sunucunuzun durumunu kontrol etmenin hızlı bir yolu, Outlook penceresinin sağ alt köşesine bakmaktır. İfadesinin bulunduğundan Eğer “Bağlı” ya “Microsoft Exchange Bağlı” , hata sunucu durumu ile ilgili değil.

O derse “Çalışma Offline” , açmak için gereken Gönder / Receive sekmesini ve tıklayın Çevrimdışı Çalış devre dışı bırakmak için düğmeye. Ancak, düzgün bir şekilde gönderilmesi için e-postayı açıp yeniden göndermeniz gerekebileceğini unutmayın.

"Bağlantı Kesildi" mesajının görüntülenmesi durumunda, internet bağlantınızın düzgün çalıştığından emin olun. Bunu yapmanın en hızlı yolu tarayıcınızı açmak ve internette gezinmektir. Tarayıcıya herhangi bir web sayfası yükleyemediyseniz, bir internet bağlantısı sorununuz olduğu açıktır.
Yöntem 2: E-posta mesajını yeniden gönderin
Aşağıdaki yöntemlerle teknik bilgi edinmeden önce, e-postayı tekrar göndermeye ve Outlook klasöründen çıkıp çıkmadığına bakmaya değer. E-postayı gönderilirken Giden Kutusu klasöründen açarsanız, e-posta başarıyla gönderilmiş olsa bile Outlook onu bu klasörden kaldırmaz.
E-postanın önceden gönderilip gönderilmediğini kontrol etmenin hızlı bir yolu, e-postayı açmak ve manuel olarak yeniden göndermeyi denemektir. Bunu, görünüm klasörüne erişip tekrar Gönder düğmesine tıklayarak kolayca yapabilirsiniz .

Yöntem 3: Büyük ekleri silme
Çoğu e-posta sağlayıcısı (özellikle ücretsiz sağlayıcılar), maksimum ek boyutu için bir sınır koyar. Bu, e-postalarınıza resim, video ve diğer büyük ekler eklemenin bu mesajı ve büyük bir mesajdan sonra gönderilen herhangi bir mesajı göndermenizi engelleyebileceği anlamına gelir.
E-posta sağlayıcılarının büyük çoğunluğu 20-25 MB'den büyük eklere izin vermez. Boyut, e-posta sağlayıcınızın eşiğinin altında olsa bile, zayıf bir internet bağlantınız varsa göndermek çok zaman alabilir. Bu, mesajın Giden kutusu klasöründe sıkıştığına inanmanıza yol açabilir.
Outlook klasörünüzde bir ek içeren en az bir e-postanız varsa, onu silin ve herhangi bir ek olmadan bir test e-postası göndermeyi deneyin. Bunu, Outlook klasörünü açarak, göndermeyi reddeden e-postaya sağ tıklayarak ve Sil'e tıklayarak kolayca yapabilirsiniz .

Genel bir kural olarak, her zaman 10 MB'den büyük ekler için indirme bağlantılarını kullanın. Bu şekilde birçok rahatsızlıktan kaçınacaksınız.
Yöntem 4: Hesap parolasını eşitleme
İnternet postası, son birkaç yıldır güvenliğini artırmıştır. Bir veya iki faktörlü kimlik doğrulamanın yanı sıra, bir kullanıcının postasına genellikle eriştiği genel konumu da izlerler. Birisi dünyanın diğer kısmından tekrar tekrar hesap bilgilerinizi girmeye çalışırsa, posta hesabınızı otomatik olarak kilitler. Ya parolanızı değiştirmeniz istenir ya da bazı kimlik doğrulama adımlarını gözden geçirmeniz gerekir.
E-posta parolanızı yakın zamanda değiştirdiyseniz, parolanızı Outlook'tan da değiştirmeyi unutmuş olabilirsiniz. İşte bunun nasıl yapılacağına dair hızlı bir kılavuz:
- Outlook'ta Dosya> Hesap Ayarları> Hesap Ayarları'na gidin.
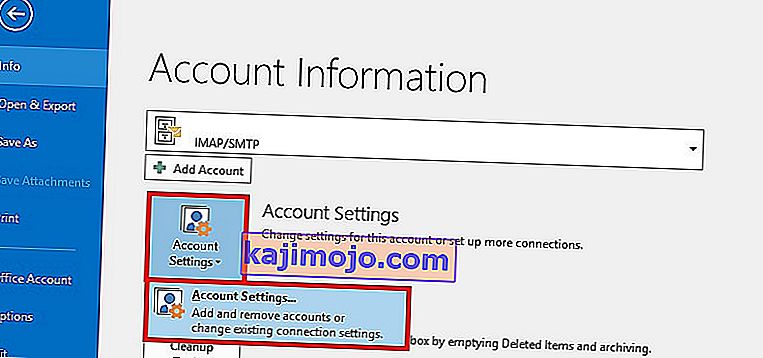
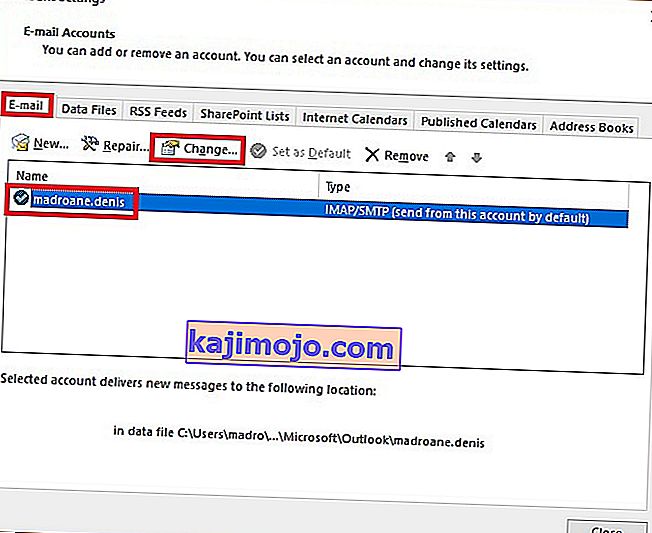
- Genişletmek için E-posta sekmesine tıklayın, e-posta hesabınızı seçin ve Değiştir'e tıklayın .
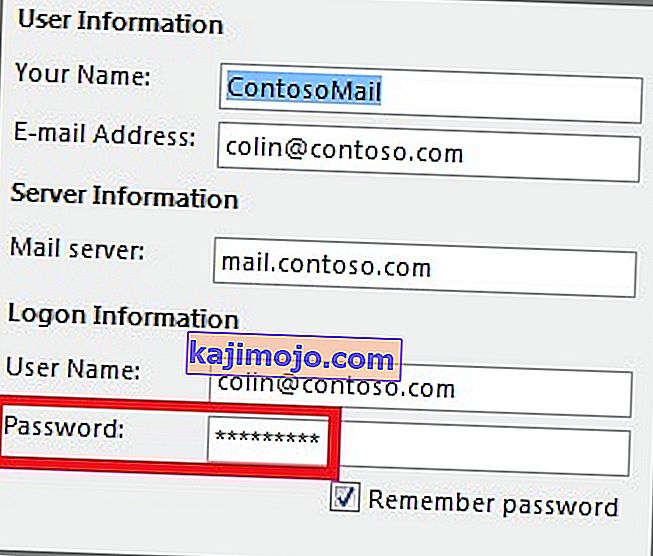
- Şimdi Parola kutusuna yeni parolanızı girin, "Parolayı hatırla" nın yanındaki kutuyu işaretleyin ve İleri'ye ve ardından Bitir'e basın .


Yöntem 5: Giden e-postalarda virüsten koruma taramalarınızı kontrol edin
Çoğu antivirüs paketi günlük e-posta tarama işlerini gerçekleştirir. Giden e-postalarınızda bir virüs bulunursa, virüsten koruma yazılımı siz virüsü temizleyene kadar onun giden kutusundan çıkmasını engelleyebilir. Yakın zamanda bir tedavi uyarısı aldıysanız, virüsten koruma yazılımınızı ziyaret edin ve e-postayı tekrar göndermeyi denemeden önce herhangi bir virüs tedavisiyle öldürün.
Also, a lot of antiviruses have the potential to conflict with various versions of Outlook. Generally, antispam plugins of various antiviruses interfere with some Outlook add-ins and may cause the emails to never leave the Outbox folder. Norton and AVG plugins are known to cause problems, but there are definitely others.

If you think there’s a conflict caused by one of the antispam plugins, disable email scanning from your antivirus software.
Method 6: Repairing your Outlook program
If you get to this message without a result, your Outlook program might indeed be damaged. Microsoft Outlook is a highly complex program, so you can imagine there can be a lot of problems in a lot of different places. Luckily, Microsoft has an efficient auto-repair method that can be applied to every Office product. The process might take over an hour to complete, so make sure you have enough time on your hands. Here’s what you need to do:
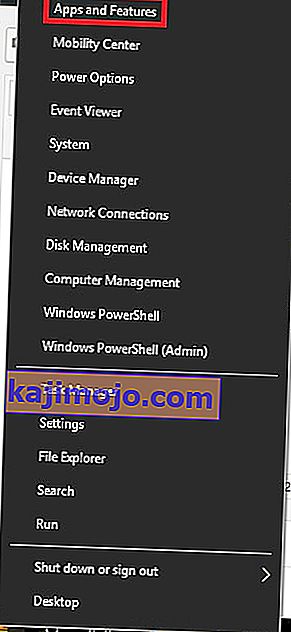
- Close Outlook completely and right-click on the Start button (lower-left corner). From there, select Apps and Features.
- Now scroll down and click on the Outlook entry. Additionally, you can use the search bar to find it more quickly. Once you find it, click on Modify.
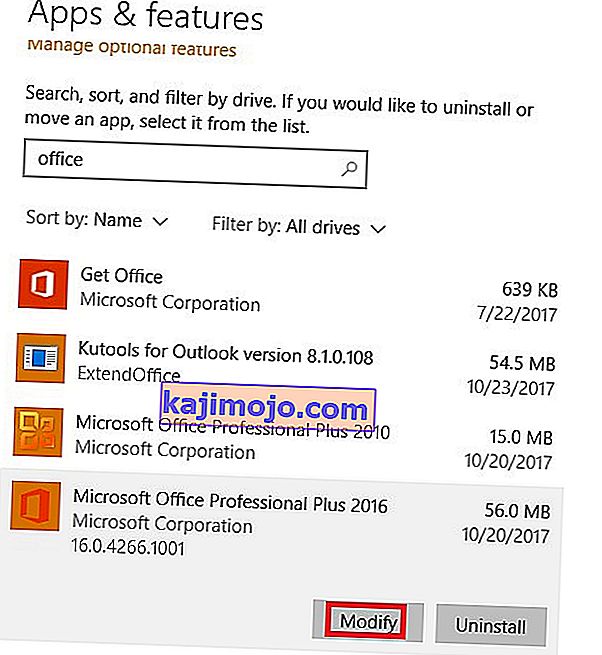 Note: You might have Outlook bundled with other Office products. If that’s the case, search for Office and expand the suite.
 - Now select Repair and click Continue. Follow up with the next instructions to start the repair process.
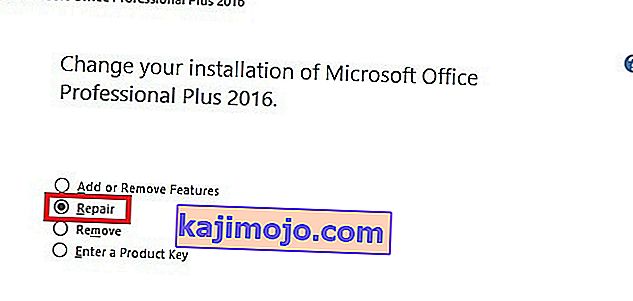
- Wait for the process to complete and restart your PC.
- Open Outlook again, delete the mail stuck inside the Outbox folder and send another one.

 Note: You might have Outlook bundled with other Office products. If that’s the case, search for Office and expand the suite.
Method 7: Repairing your Outlook profile
In Outlook, a profile holds together a group of settings that govern how the program performs. Among other settings, it includes a listing of all your accounts, auto-complete information, and personal details. If your email messages never leave the outlook folder, repairing your Outlook profile might just fix the issue. Here’s what you need to do:
- Go to File > Account Settings > Account Settings.
 Note: In Outlook 2007, go to Tools > Account Settings.
 - Tap the Email tab to expand it and click on your account profile to select it. Once your profile is selected, choose Repair.
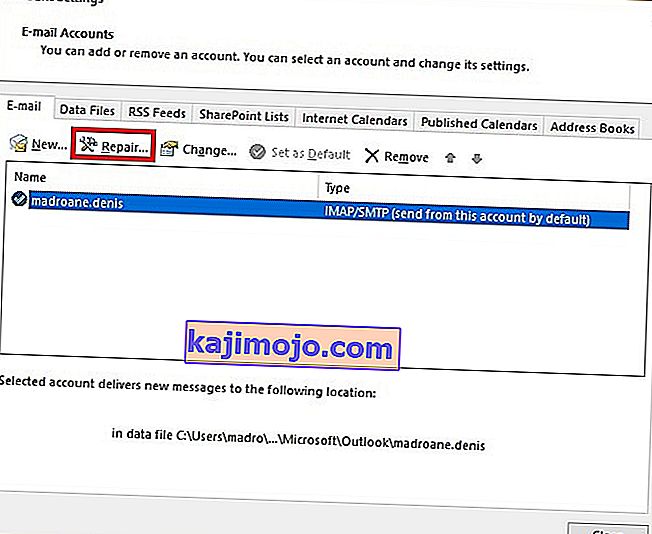
- Follow the next prompts to complete the repair wizard and restart Outlook at the end of it.
 Note: In Outlook 2007, go to Tools > Account Settings.
Method 8: Sending an email in Safe Mode
Now it’s time to find out if anyone of Outlook’s add-ins is crashing, thus preventing your email messages from leaving your outbox. The quickest way to disable all add-ins is to launch Outlook in Safe Mode. If you are able to send emails normally while in Safe mode, it’s clear that one of the add-ins is preventing that from happening. Here’s a quick guide on how to do it:
- Make sure Outlook is completely closed.
- Open a Run window, type outlook /safe and hit Enter.
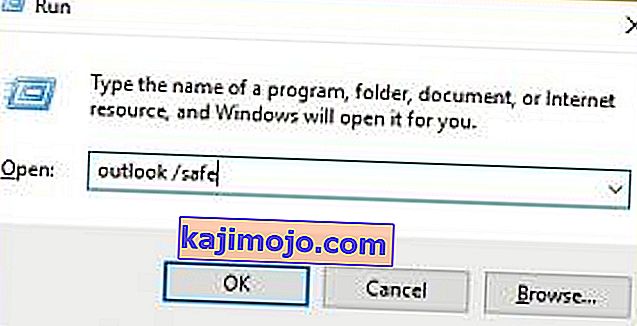
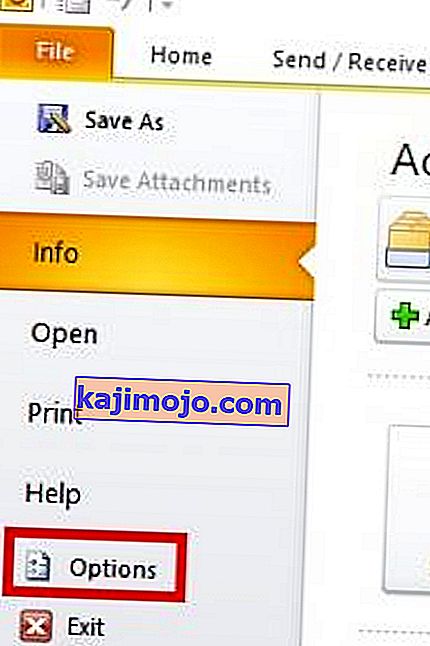
- If Outlook fully starts in Safe Mode, click on the File tab and navigate to Options.
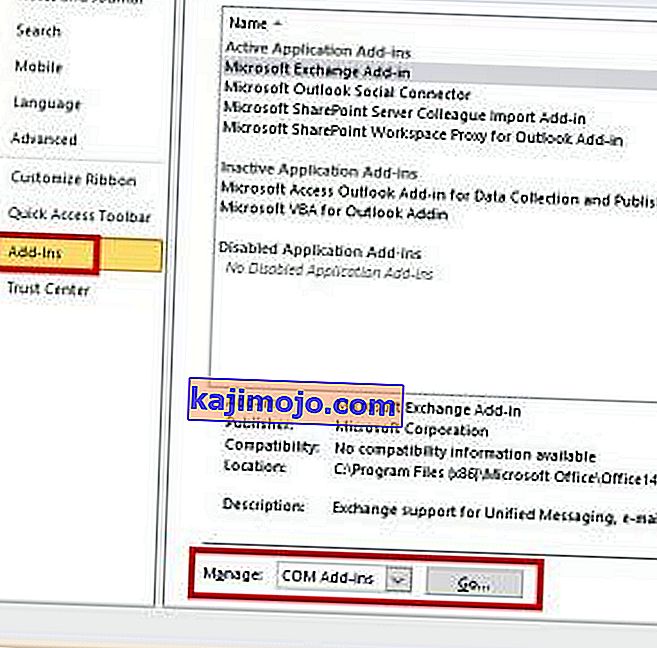
- Now click on the Add-ins tab to expand it. Expand the drop-drop down menu next to Manage (lower-side of the screen) and select COM Add-ins from the list.
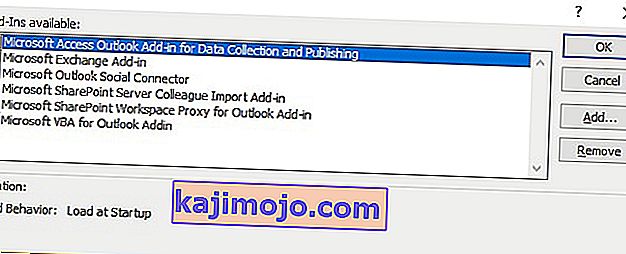
- Now take a screenshot with the add-in list and save it somewhere so you’ll know how to restore the normal configuration afterward.
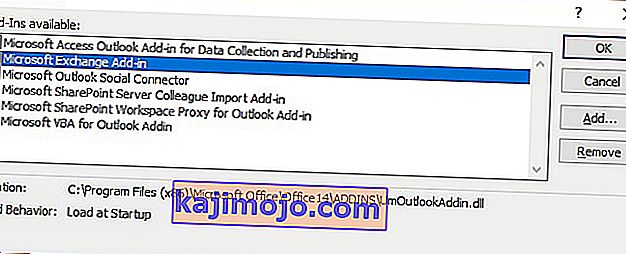
- Clear each selected checkbox and hit OK.
- Close Outlook and try to open it again in normal mode.
- After you start Outlook back in normal mode, try sending an email again and see if it leaves your Outbox. If the message gets sent, proceed to the next step. If it doesn’t send, move over to the next method.
- Return to File > Option> Add-ins and systematically re-enable each add-in again and restart until you pinpoint the addon that creates the conflict.
- Continue operating Outlook with that add-in disabled.
Note: Additionally, you can create a new Outlook profile. This should allow you to send emails normally again.


Method 9: Running the Inbox Repair Tool
Outlook stores your messages and other types of information in a Personal Folders File (PST file). If some information on it becomes corrupted, it might damage some of Outlook functionalities, including the ability to expedite emails from the Outbox folder. However, Microsoft has provided its users with an Inbox Repair Tool capable of repairing PST files. Here’s a quick guide on how to use it:
- Close Outlook completely and go to C:\ Program Files or C:\ Program Files (x86) / (x64).
- Once you’re there, use the search box to find SCANPST.exe.
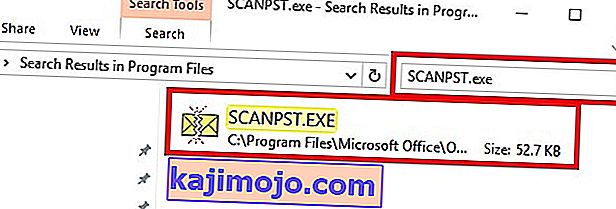 Note: If you can’t find SCANPST via the search bar, navigate to one of the locations below according to your Outlook version:
Outlook 2016: C:\ Program Files (x86) or (x64) \Microsoft Office \ root \ Office16 Outlook 2013: C:\ Program Files (x86) or (x64) \Microsoft Office \ Office15 Outlook 2010: C:\ Program Files (x86) or (x64) \Microsoft Office \ Office14 Outlook 2007: C:\ Program Files (x86) or (x64) \Microsoft Office \ Office12
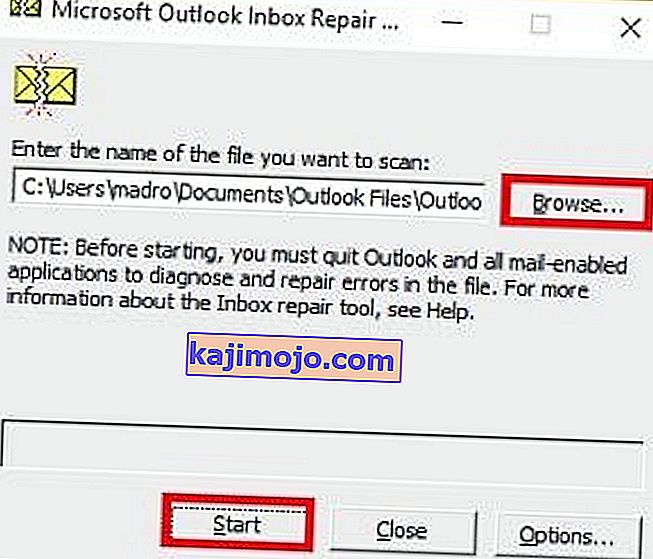
- Open SCANPST.exe and hit the Browse button. Navigate to Documents\Outlook Files to find your PST file. Hit Start to begin scanning your PST file.
- If you have errors or inconsistencies at the end of the scanning process, click the Repair button to fix them.
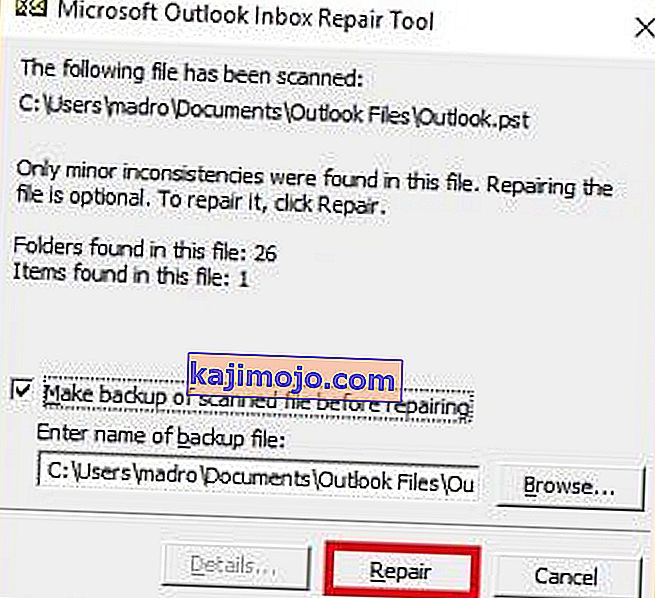
- Start Outlook again and see if your emails manage to leave the Outbox.
 Note: If you can’t find SCANPST via the search bar, navigate to one of the locations below according to your Outlook version:
