Nord VPN, VPN dünyasındaki eski oyunculardan biridir ve Windows uygulaması PC dünyasının en iyileri arasında kabul edilir. Nord VPN, işlevsellik ve esneklik açısından konuşulduğunda çok çeşitlidir. Çapraz platform desteğine ek olarak, aralarından seçim yapabileceğiniz farklı ülkelerde bulunan farklı sunuculara da sahiptir.

Uygulamanın uzun süredir piyasada olmasına rağmen, kullanıcılar Nord VPN'e bağlanamadıklarını bildiriyorlar. Olası bir güncellemeden sonra bağlanmayı durdurur veya DNS sunucularına yapılan istek ya 'zaman aşımına uğradı' yanıtı verir.
Nord VPN'in Bağlanmamasına ne sebep olur?
Bir VPN, bir bilgisayar sisteminin tüm internet mimarisini kullandığından, Nord VPN'inizin düzgün bir şekilde bağlanamamasının birkaç nedeni vardır. Bunlardan bazıları aşağıda listelenmiştir.
- IPv6: Görünüşe göre Nord VPN, iletişimlerinin hiçbirinde IPv6 protokolünü desteklemiyor. Yani bu etkinleştirilirse, bağlanamayabilirsiniz.
- Üçüncü taraf programları: Üçüncü taraf programlarının yazılım sistemiyle çakıştığı ve kaynaklar için rekabet ettiği bilinmektedir; dolayısıyla düzgün bağlanmamasına neden olur.
- Ağ bağdaştırıcısı: Nord, internet ile iletişim kurmak için ayrı bir ağ bağdaştırıcısı kullandığından, ağ bağdaştırıcısı düzgün çalışmıyor olabilir ve yeniden başlatmanız gerekebilir.
- Ağda Hata: Bazen bilgisayarınızdaki ağ yapılandırmaları bir hata durumunda olabilir ve hiçbir bağlantıya neden olmaz. Bu durumda tüm değişkenleri yenilemeyi deneyebiliriz.
Çözümlere başlamadan önce, internetinizin gerçekten çalıştığından emin olmanız gerekir . İnternetiniz düzgün çalışmıyorsa, Nord düzgün bir bağlantı kuramaz ve size tünelli bir ağa erişim izni veremez.
Özel bir ağ kullandığınızdan (okul, iş yeri veya hastaneler gibi halka açık yerler değil) ve vekillerin dahil olmadığından emin olun. İnternetinizin düzgün çalıştığını iki kez kontrol ettikten sonra devam edin.
1.Çözüm: IPv6'yı Devre Dışı Bırakma
IPv6 (İnternet Sürümü Protokolü 6), bir bilgisayarın ağ mimarisindeki en son IP sürümüdür. Varsayılan olarak, hala IPv4 kullanıyoruz ve hala kalıcı olarak IPv6'ya geçiş yapmadık. Bununla birlikte, internet bağlantısı için IPv6 kullanmaya başlamış olanlarınız olabilir. Görünüşe göre IPv6 Nord VPN ile düzgün çalışmıyor. Dolayısıyla onu devre dışı bırakıp tekrar kontrol edeceğiz.
- Görev çubuğunuzda bulunan ağ simgesine sağ tıklayın ve Ağ ve İnternet Ayarlarını Aç'ı seçin . Şimdi ayarlardan Adaptör seçeneklerini değiştir seçeneğini tıklayın .

- Adaptör ayarlarına girdikten sonra, kullandığınız adaptöre sağ tıklayın ve Özellikler'i seçin .
- Adaptör özelliklerine girdikten sonra , IPv6 seçeneğinin işaretini kaldırın ve IPv4'ün etkinleştirildiğinden emin olun. Değişiklikleri Kaydet ve Çık. Şimdi bilgisayarınızı yeniden başlatın ve hatanın çözülüp çözülmediğini ve Nord VPN'e bağlanıp bağlanamadığınızı kontrol edin.

2.Çözüm: Üçüncü Taraf Uygulamalarını Kontrol Etme
Çalışması sırasında Nord VPN ile çelişen çok sayıda başka uygulama ve program vardır. Bir kaynağa erişmeye çalışan birden fazla uygulama varsa, bir yarış koşulu olacaktır ve beklendiği gibi çalışmayacaktır.

Görev yöneticisini (Windows + R ve 'taskmgr') açmalı ve arka planda çalışan tüm uygulamaları kontrol etmelisiniz. Sorunlara neden olduğu bilinen böyle bir uygulama Glasswire Elite idi . Nord VPN ile bağlanmaya çalıştığınızda ya kaldırdığınızdan ya da devre dışı bırakıldığından emin olun.
Not: Bilgisayarınızı önyüklemeyi temizlemeyi de deneyebilirsiniz. Bu, tüm harici üçüncü taraf uygulamalarını devre dışı bırakır ve yalnızca gerekli olanları başlatır. Şimdi bir bağlantı kurmayı deneyebilirsiniz. Başarılıysanız, soruna neden olan bazı uygulamalar olduğu anlamına gelir. Her uygulamayı etkinleştirip tekrar kontrol ederek geri dönebilirsiniz.
3. Çözüm: Sunucu Konumunu Değiştirme
Nord VPN, kullanıcılara sunucu konumlarını seçme seçeneği sunar. Bu sunucular dünyanın dört bir yanına dağılmış durumdadır ve coğrafi konumlarına göre bağlantı sağlar, yani size daha yakın bir sunucunun daha hızlı olması beklenir. Bağlanmaya çalıştığınız sunucu konumunu değiştirmeye çalışacağız ve bunun bağlanmama sorununu çözüp çözmediğini göreceğiz.
- Nord VPN'i başlatın ve uygulamanın üstünde bulunan Sunucular başlığına tıklayın .

- Şimdi öncekinden farklı bir sunucu seçin ve seçtikten sonra VPN'i tekrar çalıştırmayı deneyin. Aynı davranışı yaşıyorsanız, başka bir sunucu seçmeyi deneyin ve ağı başka bir web sitesinde test edin.
4.Çözüm: Ağı / TAP Adaptörünü Yeniden Başlatma
Nord VPN, bilgisayarınızda bilgileri iletmek için kullanabileceği bir sanal ağ adaptörü oluşturur. Nord VPN'in ayarları değiştirdiği bir köprü görevi görür, böylece bir VPN bağlantısı başlatabilir ve sürdürebilir. Bazen bu, VPN sunucunuzla bağlantı kurmamanıza neden olan bir hata durumuna gider. Bağdaştırıcıyı düzgün bir şekilde yeniden başlatacağız, böylece tüm yapılandırmalarının yeniden başlatıldığından emin olacağız.
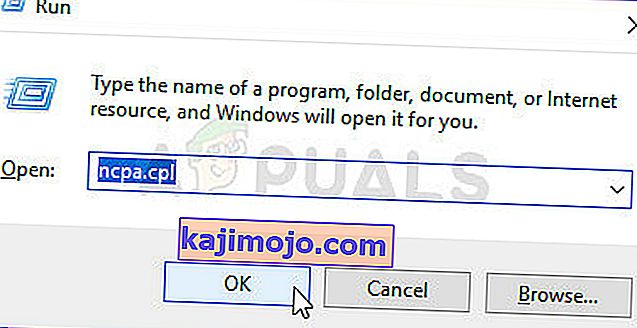
- Windows + R tuşlarına basın, “ ncpa yazın. diyalog kutusunda cpl ”yazın ve Enter tuşuna basın.
- Tüm ağ bağdaştırıcıları önünüzde listelenecektir. TAP adaptörünü seçin, sağ tıklayın ve Devre Dışı Bırak'ı seçin .

- Devre dışı bıraktıktan sonra bir dakika bekleyin. Ardından tekrar sağ tıklayın ve Etkinleştir'i seçin . Şimdi Nord VPN'i bağlamayı deneyin ve bunun işe yarayıp yaramadığını görün.
5.Çözüm: Ağ Yığını Temizleme
Bilgisayarınızdaki ağ yığınını temizlemenin (yenilemenin) VPN ile ilgili çeşitli sorunları (Nord dahil) çözdüğü sayısız örnek vardır. Bu işlem, DNS ve IP ayarlarınızı temizleyecek ve uygulamayla çakışabilecek uygunsuz ayarların bulunmadığından emin olacaktır.
- Windows + S tuşlarına basın, diyalog kutusuna "komut istemi" yazın, uygulamaya sağ tıklayın ve Yönetici olarak çalıştır'ı seçin .
- Yükseltilmiş bir komut istemine girdikten sonra, aşağıdaki komutları birer birer yürütün ve ardından her komutun ardından Enter tuşuna basın:
ipconfig / release ipconfig / flushdns ipconfig / netsh winsock sıfırlama netsh arabirimini ipv4 sıfırlama netsh arabirimini ipv6 sıfırlama netsh winsock sıfırlama kataloğu netsh int ipv4 sıfırlama sıfırlama.log netsh int ipv6 sıfırlama reset.log

- Now close the command prompt and try launching Nord VPN again. Check if you can connect with it properly.
Solution 6: Reinstalling Nord VPN (along with the TAP adapter)
If all the above methods don’t work, you need to make sure that your Nord installation is proper and there is nothing wrong with the installation files. The TAP adapter will also be reinstalled in the process because Nord VPN manages the adapter and it is only for its use. Make sure that you are logged in as an administrator. If reinstalling doesn’t work, make sure that your credentials are correct which you are entering the services have not expired.
- Press Windows + R, type “appwiz.cpl” in the dialogue box and press Enter.
- Once in the application manager, search for the entry Nord VPN from the list, right-click on it and select Uninstall.

- Now restart your computer and download the application again from Nord VPN’s official website. Now after entering your credentials, try connecting again and check if you can establish the VPN connection correctly.
Solution 7: Using an Alternative VPN Service
There are numerous VPN clients out there in the Windows market. However, we recommend or readers to try CyberGhost. This VPN service is as simple as it gets and also provides you with servers located at different countries. It even has separate VPN servers for streaming Netflix and BBC with ease. Follow the steps below to download the application and get your connection secure in no time.
- Download CyberGhost from (here).

- After downloading the VPN, install it on your computer. You might be asked for proper permissions. Make sure that you are logged in as an administrator and press Yes to all the permissions asked.
- After CyberGhost is installed on your computer, launch it. Here you will see a list of different servers available along with the distance from your actual location (more distance means slower internet).

- After selecting the server, click on the power button present at the right-hand side of the application. You can also select dedicated servers for torrenting and streaming (present at the left navigation pane).
Solution 8: Disable Firewall
In some cases, the default Windows Firewall might be preventing the application from working properly. Therefore, in this step, we will first be allowing it through the Firewall and make sure that it isn’t blocked by the Firewall and then we will also make sure that Windows Defender has it added as an exception. For that:
- Press “Windows” + “R” to launch the Run prompt.
- Type in “ControlPanel” and press “Enter” to launch the classical control panel interface.

- Click on the “View by:” button, select “Large Icons” and then click on the Windows Defender Firewall option.
- Select the “Allow an app orfeature through the Firewall” button on the left pane and then click on the “Change Settings” button and accept the prompt.
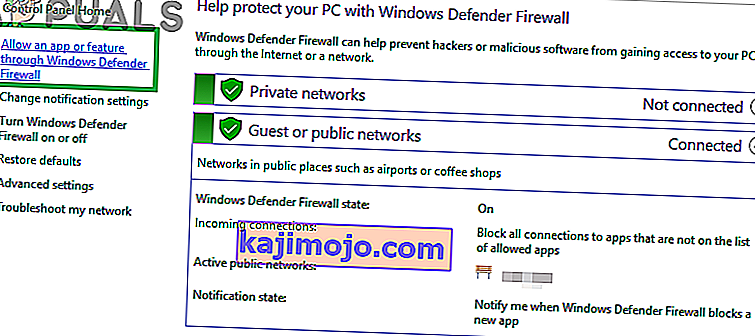
- From here, make sure that you check both the “Public” and the “Private” options for Nord VPN and its related applications/drivers.
- Save your changes and exit out of the window.
- After that, press “Windows” + “I” to launch the settings and click on the “Updateand Security” option.
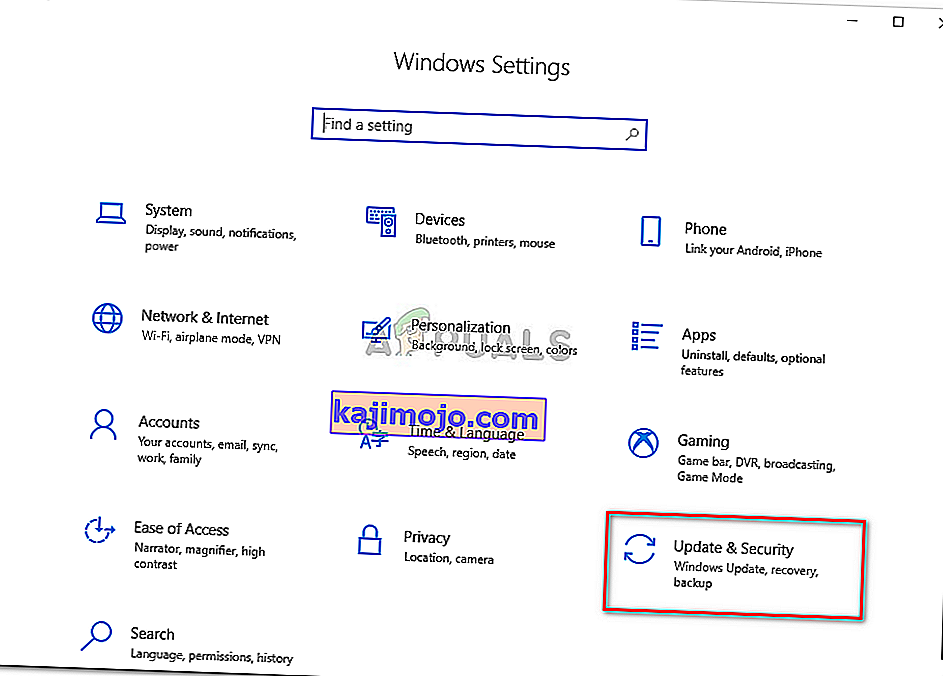
- From the left pane, click on the “Windows Security” button and then click on the “Virus and Threat Protection” button.
- Select the “Manage Settings” button under the Virus and Threat Protection Settings heading.
- Scroll down and click on the “Add or Remove Exclusions” button in the next window.
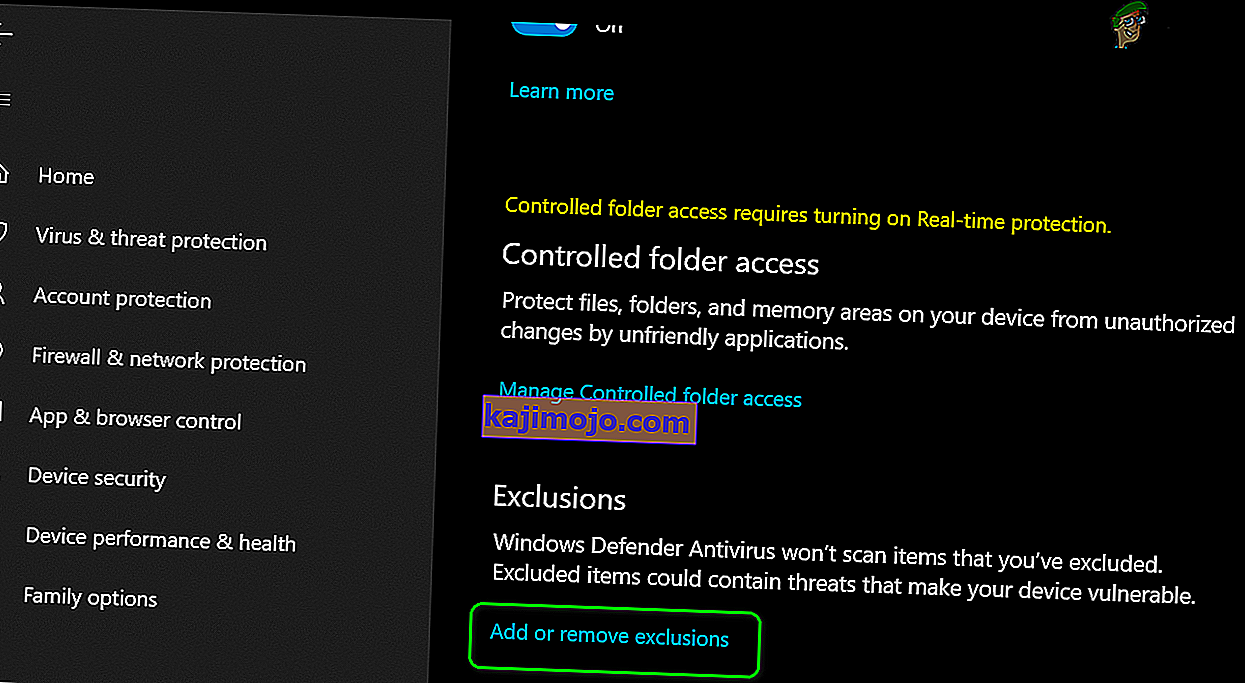
- Click on the “Add an Exclusion” option and select “Folder’ from the File type.
- Make sure to specify the Nord VPN folder and exit out of this window after saving your changes
- Check and see if doing so has fixed the issue with Nord VPN not connecting.


Solution 9: Change NordVPN Protocol
It is possible that Nord VPN might be running into issues while trying to connect to its servers due to the protocol configuration in its settings. If one type of protocol isn’t working for you, it is always recommended to try and switch to the other protocol to make sure that the issue isn’t tied to the wrong selection of the protocol type automatically or manually. For that:
- Launch NordVPN and make sure to disconnect from any currently active sessions.
- Click on the “Gear” icon on the top right corner and go into the settings.
- Click on the “Advanced” option from the left-hand side menu.
- Click on the “Protocol” dropdown and check on “TCP”.
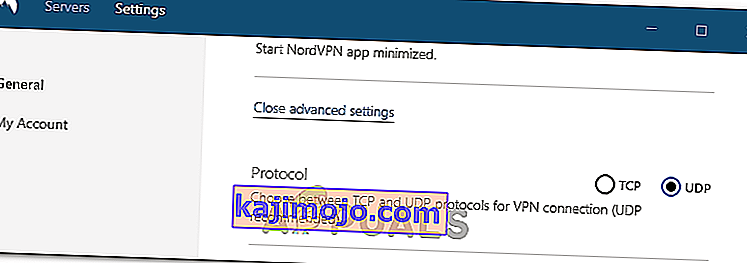
- This should change your protocol from TCP to UDP.
- Check to see if doing so fixes the issue for your computer.
- To Verify that none of the protocols work, make sure to repeat the steps and select “UDP” instead of TCP and then check again.
- If none of the selected protocols are able to make a connection with the server, move on to the other fixes.

Solution 10: Changing DNS Server Configuration
DNS Servers are used by the computer to establish a stable and secure internet connection with other sites on the internet, however, if the computer is unable to detect the DNS settings properly, or if the selected DNS server is facing outage, Nord VPN might not connect properly. Therefore, in this step, we will be changing the DNS configuration to ensure that DNS isn’t an issue. For that:
- Press “Windows” + “R” to launch the Run prompt.
- Type in “ncpa.cpl” and press “Enter” on the keyboard to launch the network configuration panel.
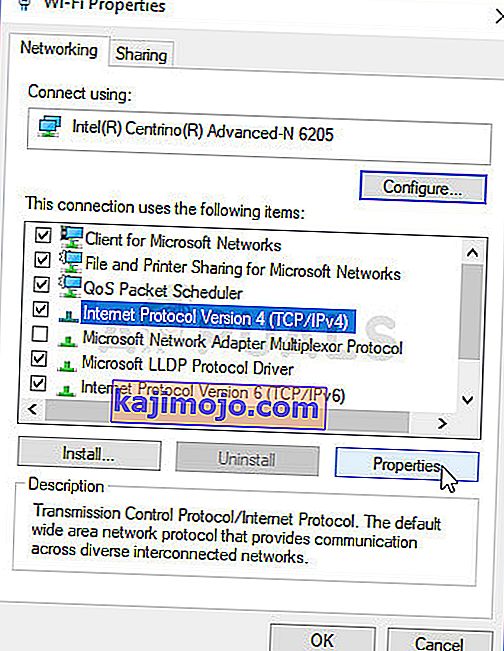
- Right-click on your internet connection and select the “Properties” option.
- Double click on the “Internet Protocol Version4 (TCP/IPV4)” option and check on the “Use the following DNS addresses” button.
- At first, type in “8.8.8.8” and “8.8.4.4” in the primary and the secondary DNS addresses field respectively and click on “OK”. After that, check to see if NordVPN is connecting, if it isn’t, try to use “103.86.96.100” and “103.86.99.100” in the primary and the secondary fields respectively.
- Check to see if you are able to make a connection by selecting those DNS servers.


Solution 11: Opening Ports
For some people, the issue might arise if the ports that NordVPN uses to communicate with its servers are being blocked by your router. For security reasons most routers often block ports used by VPN/Network Tools to prevent any alterations to your connections and if that is the case, we will have to open the ports by logging in to the router’s control panel. For that:
- Press “Windows” + “R” to launch the Run prompt and type in “cmd” and then press “Ctrl” + “Shift’ + “Enter” keys on your keyboard to provide admin permissions.

- Type in the following command in the command prompt to list the IP information.
ipconfig /all
- The computer will list all the information of the network adapters connected to your computer.
- Under the default gateway option, after the mac address, there should be an IP address that should look something like “192.168.x.x”.
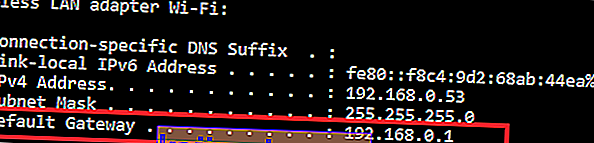
- Copy this IP address and launch your browser.
- Paste the IP address within a new tab on the browser and press “Enter” to navigate to the browser’s login page.
- Once on the login page, log into the control panel with your credentials, both of which, i.e the username and password should be written on the back of your internet router. If not, then the username should be admin and the password should be the Wifi password that you use to connect your devices.
- After logging into the Control panel, look around for a “NAT” or “Port” option that allows you to forward ports.
- Type in “500” and select “UDP” from the list.
- Click on “Save” to forward the 500 UDP port and exit out of the control panel after the change has been made.
- Try connecting with Nord VPN and check to see if the issue persists.


Solution 12: Use Hotspot
Mostly, this error can be fixed simply by employing your mobile’s hotspot connection instead of the Wifi or the Wired connection that you are already using on your computer. This does seem an inconvenience for Data conscious people but it seems to be the only way some people are able to connect through Nord VPN as some routers block it completely.
Note: In addition to this, you can try to change the firmware on your router to avoid any permanent blocks put from the router or to eliminate any bugs with the connection.