Windows 10'da siyah ekran sorunu genellikle bir yükseltmeden sonra veya otomatik bir Windows Güncelleme sisteminize güncellemeleri yüklediğinde ortaya çıkar. Bu siyah ekran büyük olasılıkla bir donanım (GPU) sorunu olduğundan, onu teşhis etmek ve düzeltmek için çeşitli ayarları değerlendirmemiz ve gidermemiz gerekecek.

Günümüzde bilgisayarlar, yoğun kullanım için birden fazla grafik kartıyla gittikçe daha gelişmiş hale geliyor. Dolayısıyla, Intel'in yerleşik Grafik denetleyicisinden başka bir grafik kartınız varsa, muhtemelen bu önyüklemeyi siyah ekran sorunuyla yaşıyor olacaksınız . Bazen, Windows bunu sisteme bağlı iki monitör varmış gibi alır. Bu nedenle, Windows çıkış sinyalini Siyah Ekrana yükler .
Kapsamlı sorun giderme işlemlerine geçmeden önce; bazı temel ayarları kontrol etmemiz gerekiyor. Birden fazla monitör kullanıyorsanız, bağlantıyı kesin / yeniden bağlayın ve birincil ekranınızla test edin. Bu sorunu çözerse; şanslısın. Aşağıdaki adımlara devam etmiyorsanız:
Yöntem 1: Körü körüne düzeltin
Bu yöntem, siyah ekranda hiçbir şey göremediğiniz için sorunu körü körüne çözmekle ilgilidir.
- Windows siyah ekrana sıkıştığında, beyaz fare imlecinin ekranda görünmesini bekleyin . Fare pedini hareket ettirerek varlığını kontrol edebilirsiniz.
- İmleç ekranda göründükten sonra klavyenizdeki boşluk çubuğuna basın ve klavyede ctrl tuşuna bir kez basın . Oturum açma parolasını veya pin kodunu körü körüne girin (Siyah ekranda göremezsiniz) . Kimlik bilgilerinizi kullanarak Windows'ta oturum açacaktır.
Hesabınızda oturum açtıktan sonra masaüstünü göremezseniz ve siyah ekrana takılırsanız, klavyede Win + P + Aşağı Ok Tuşuna (İki Kez) basın ve ayrıntıları tekrar girin.
Yöntem 2: Güç Döngüsü
Kullanıcı tarafından çıkarılabilen pili olan bir dizüstü bilgisayar ise;
- Pili çıkarın.
- Güç adaptörünü çıkarın.

- Güç düğmesini 10 saniye basılı tutun
- Güç düğmesini bırakın.
- Şarj cihazını tekrar bağlayın ve açmayı deneyin.

Test edin ve sorunun çözülüp çözülmediğine bakın; değilse o zaman Yöntem 4'e geçin
Yöntem 3: Hızlı Başlatma'yı kapatın
Windows 10, Hızlı Başlangıç özelliği ile piyasaya sürüldü. Adından da anlaşılacağı gibi, işletim sisteminin hızlı bir şekilde başlatılmasına izin verir, böylece işinize veya oyununuza hızlı bir şekilde devam edebilirsiniz.
NOT: Eğer bir gerçekleştirdiğinizde Hızlı Başlatma özelliği yalnızca çalışır Kapatma ve sonra Aç sisteminizi bir gerçekleştirdiğinizde bu geçerli değildir, Yeniden Başlat .
Hızlı başlatma seçeneğini kapatmak için; bu adımları takip etWindows 10 Kurulum Ortamınızı kullanarak önyükleme yapın. Önyükleme sırasını bios'tan değiştirmeniz gerekebilir.
bkz: önyüklenebilir bir Windows 10 medyası nasıl oluşturulur
- En alttaki Bilgisayarınızı Onarın seçeneğine tıklayın
- Sorun Gider'e tıklayın
- Gelişmiş seçeneklere tıklayın
Not: Bu yöntem işe yaramazsa, "Önceki Sürümlere Geri Dön" seçeneğine tıklamayı deneyin ve ekrandaki komut istemlerini izleyin.
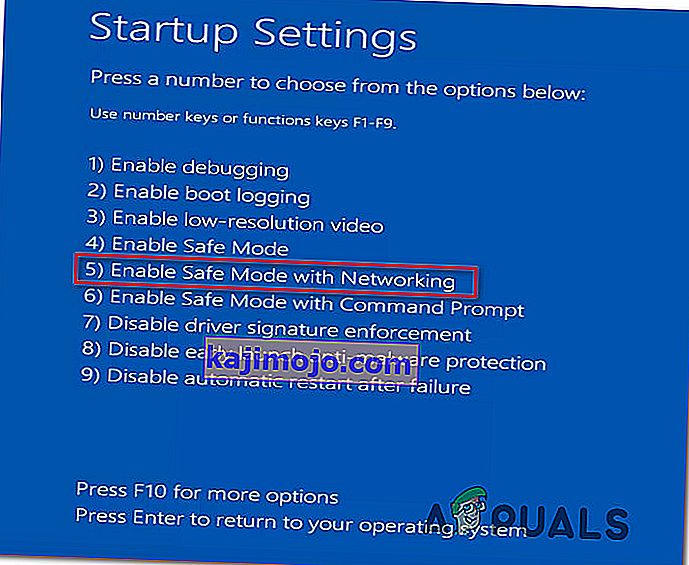
- Başlangıç Ayarlarına tıklayın
- Yeniden Başlat'a tıklayın
- Ağ ile Güvenli modu seçin
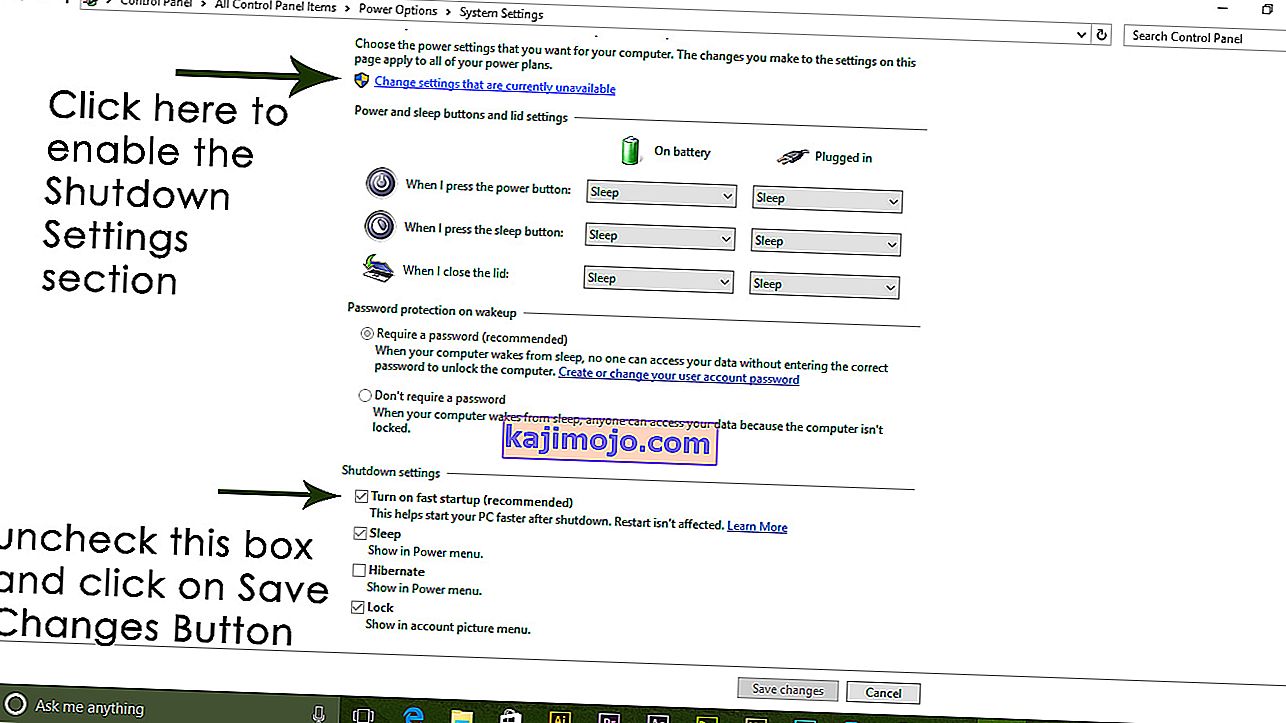
- PC Kontrol paneline gitmeye başladığında ;
- Güç Seçeneklerini Seçin ; Solunuzdaki Güç Düğmelerinin Ne Yapacağını Seçin'i seçin .


Burada aşağı kaydırın ve Hızlı Başlangıç seçeneğini bulun ve işaretini kaldırın .
Yöntem 4: Görüntü Bağdaştırıcısını Kaldırma
Siyah ekranı gördüğünüzde:
- Görev Yöneticisi'nin açılıp açılmadığını görmek için CTRL + ALT + DEL tuşlarını bir arada tutun . Varsa, Dosya -> Yeni -> öğesini tıklayın ve explorer.exe yazın
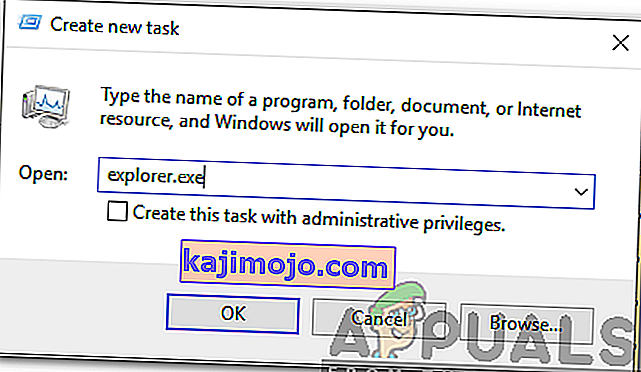
- Explorer penceresini açarsa; oturum açın ve antivirüs yazılımı / grafik kartını kaldırın ve ardından yeniden yükleyin.
Not: Antivirüs'ü kaldırmak yerine geçici olarak devre dışı bırakmayı da seçebilirsiniz.
- Grafik / Ekran adaptörünü kaldırmak için; CTRL + ALT + DEL başarılıysa ve gezgin penceresini görürseniz, kazan tuşunu basılı tutun ve R'ye basın
- Tip hdwwiz.cpl yazın ve Tamam tıklayın
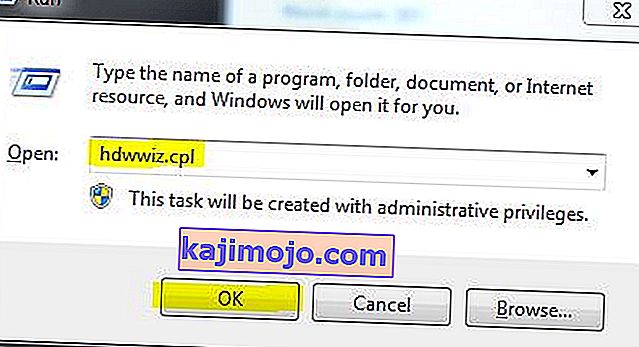
- Görüntü bağdaştırıcınızın adını not edin;
- Ekran Bağdaştırıcılarını Genişletin -> Kaldır'ı seçin


Kaldırıldıktan sonra, en son sürücüyü indirmek için üreticinin sitesine gidin. Yeniden Başlatma ve TEST
Yöntem 5: Sisteminizi fabrika varsayılanlarına geri yükleyin.
Bu yöntem tüm verilerinizi siler ve bilgisayarınızla birlikte gelen orijinal işletim sistemini yükler / yükler. Yolsuzluk olduğu için; ve veriler önemli değilse, verileri fabrika varsayılanlarına geri yükleyebiliriz ve ardından temiz bir Windows yüklemesi yapabiliriz. Bundan sonra yükseltme seçeneği artık orada olmayabilir.
Fabrika geri yükleme talimatları için sistem kılavuzunuza bakın.
Yöntem 6: Bilgisayarınızı yeniden başlatmanız yeterlidir.
Geçmişte siyah ekran sorunundan muzdarip olan bazı Windows 10 kullanıcıları, Güç düğmesini kullanarak bilgisayarlarını kapatmanın ve ardından yeniden başlatmanın hile yaptığını ve sorunu onlar için çözdüğünü bildirdi . Kulağa tuhaf gelse de, bu çözüm kesinlikle denemeye değer.
Yöntem 7: GPU'nuzun sürücülerini en son sürümlerine güncelleyin
Windows 10 is a big step up from the previous versions of Windows, which is why all GPU manufacturers had to create entirely new drivers designed specifically for the new Operating System. Not having the updated Windows 10-compatible drivers on your computer is another thing that can cause your computer to be affected by the black screen issue. If outdated drivers are behind the black screen problem in your case, all you need to do is go to the official website of your computer manufacturer or your GPU’s manufacturer and download the latest drivers for your GPU (they should be available in both locations). Make sure that the drivers you download are specifically designed for Windows 10 to ensure the success of this solution.
Method 8: Change your laptop’s plugged in brightness to anything but 100%
On laptops that had high-end graphics cards and were updated to Windows 8, the black screen issue often presents itself when they are plugged into an AC power outlet. If that is the case, simply opening the Start Menu, searching for Advanced power settings, opening Advanced power settings and changing your laptop’s screen brightness when plugged into anything except for 100% (even 99% will do) will get rid of the black screen problem.
Method 9: If you have two graphics cards, disable the onboard one
A decent fix for the black screen issue for people whose computers have tow graphics cards – the onboard graphics card that came with the computer and the graphics card that they have added to it (such as an Nvidia or AMD graphic card) – is to simply disable the onboard graphics card. Apparently, having two graphics cards on a Windows 10 computer can result in a clash that consequently gives birth to the black screen issue. If that is the case, simply going into Device Manager, expanding the Display adapters section, right-clicking on the onboard graphics card and clicking on Disable should fix the issue.
If you do not see your onboard graphics card in the Display adapters section, click on View in the top left of the Device Manager dialog and click on Show hidden devices. This will make your onboard graphics card (or, in some cases, cards) visible, and you can then right-click on it and click on Disable.
Method 10: Refresh your computer
The infamous black screen issue on Windows 10 can also be fixed by simply refreshing your computer. Refreshing your computer has almost entirely the same effect as resetting it to factory settings, with the exception of the fact that a refresh only deletes installed programs and applications and keeps your personal data whereas a reset gets rid of everything on your computer. To refresh a Windows 10 computer, you need to:
- Open the Start Menu.
- Click on Settings.
- Out of the array of different options provided, click on Update & Security.
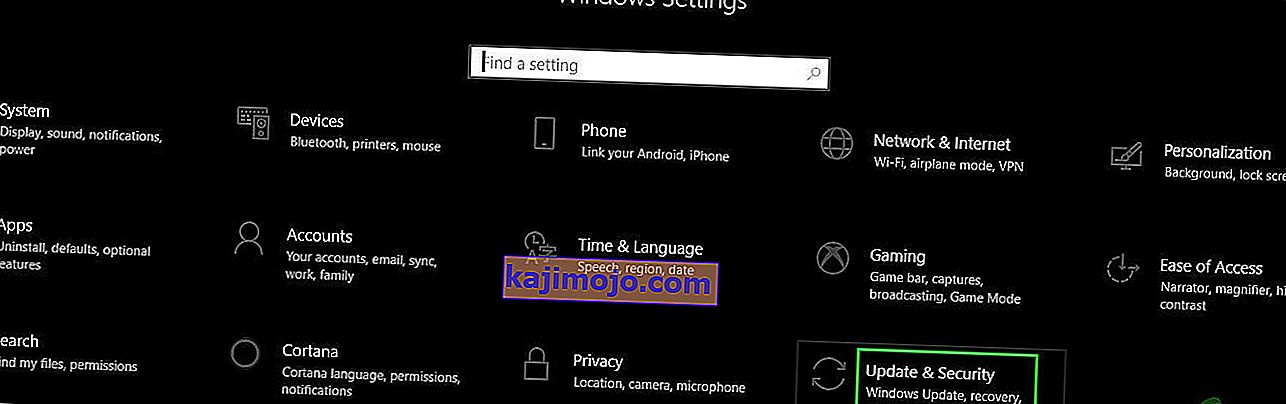
- Click on Recovery in the left pane.
- In the right pane, click on the Get started button under the Reset this PC
- When provided with a choice to either keep your files or remove everything, click on Keep my files.

Method 11: Correcting User Shell
In some cases, the User shell might be preventing the user from being able to boot safely into their computer. In certain situations, the user shell configuration inside the registry might get corrupted due to which this black screen issue can occur. Therefore, in this step, we will be correcting this user shell entry. In order to do that, follow the steps below.
- Boot your computer and wait for the black screen to appear.
- Press “Ctrl” + “Alt” + “Del” and select the “Task Manager” option.
- Click on the “File” option on the top left of the task manager and select “Run New Task” from the list.
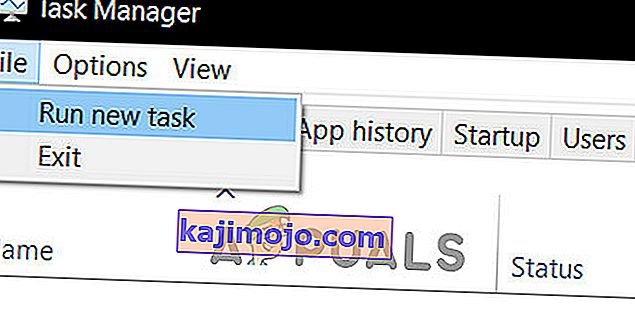
- Type in “regedit” and press “Enter” to open it.
Computer\HKEY_LOCAL_MACHINE\SOFTWARE\Microsoft\Windows NT\CurrentVersion\Winlogon
- Double click on the “Shell” entry on the right pane.
- Type in “Explorer.exe” in the Value data field and save your changes.
- Press “Ctrl” + “Alt” + “Del” again and click on the “Power Options” icon on the lower right side.

- Select “Restart” from the menu and wait for your computer to be restarted.
- Check to see if the issue persists after restarting the computer.


Method 12: Stopping Service
There is a specific service that prevents the computer from being able to function properly in some cases and stopping it can prevent the black screen issue from occurring. Therefore, in this step, we will be stopping this service. For that:
- Press “Ctrl” + “Alt” + “Del” and select the “Task Manager” option.
- Click on the “File” option on the top left of the task manager and select “Run New Task” from the list.
- Type in “services.msc” and press “Enter” to open it.
- Scroll through this list and look for the “RunOnce32.exe” or the “RunOnce.exe” entry. Also, do this same process for the “App Readiness” Service.
- Right-click on it and select “Stop”.
- Double click on it and change its startup type to “Disabled”.
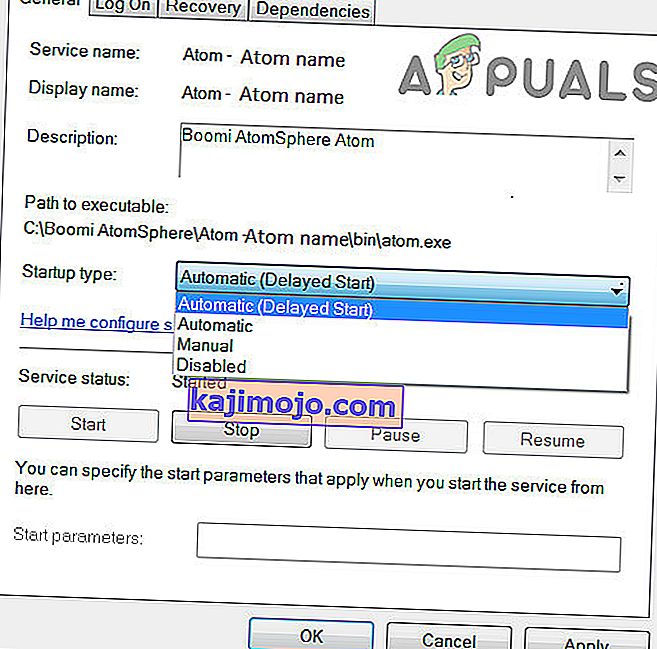
- Wait for the service to be stopped completely and restart your computer.
- Check to see if the issue persists after stopping it completely.

Method 13: Renaming Files
In certain cases, the files in some Windows’ folders might have gotten corrupted due to which this black screen issue is being triggered. Therefore, in this step, we will be renaming these files and then check to see if the issue still persists.
- Press “Ctrl” + “Alt” + “Del” on the black screen.
- Click on the “Task Manager” option and then select “File”.
- Select the “Run New Task” option and then type in “cmd”.
- Type in the following command one by one for each file to rename it.
rename “(File Path) (File Name)” “(New Name)”
- Rename the following files to anything except their original names.
C:\ProgramData\Microsoft\Windows\AppRepository\StateRepository-Deployment C:\ProgramData\Microsoft\Windows\AppRepository\StateRepository-Deployment C:\ProgramData\Microsoft\Windows\AppRepository\StateRepository-Deployment C:\ProgramData\Microsoft\Windows\AppRepository\StateRepository-Machine C:\ProgramData\Microsoft\Windows\AppRepository\StateRepository-Machine C:\ProgramData\Microsoft\Windows\AppRepository\StateRepository-Machine
- Check to see if the issue persists after making these changes.
- If it still does, try the following code to just fix it.
cd "ProgramData\Microsoft\Windows\AppRepository" ren "StateRepository-Deployment.srd" "StateRepository-Deployment-Corrupted.srd" ren "StateRepository-Deployment.srd-shm" "StateRepository-Deployment-Corrupted.srd-shm" ren "StateRepository-Deployment.srd-wal" "StateRepository-Deployment-Corrupted.srd-wal" ren "StateRepository-Machine.srd" "StateRepository-Machine-Corrupted.srd" ren "StateRepository-Machine.srd-shm" "StateRepository-Machine-Corrupted.srd-shm" ren "StateRepository-Machine.srd-wal" "StateRepository-Machine-Corrupted.srd-wal"
- Check to see if the issue persists.
Method 14: Replacing Profile Cache
It is possible the Profile cache for your current user account has either gone missing from some locations or it has been corrupted in certain locations due to which this issue is being triggered. Therefore, in this step, we will be replacing this profile cache after copying it from a location. For that:
- Create a new user account before doing so and log into that.
- Restart your computer in safe mode.
- Log in to your new profile.
- Navigate to the following location and copy the folder named “caches”.
C:\Users\{working-user-profile-name}\AppData\Local\Microsoft\Windows\Caches - Paste this folder in the following location.
C:\Users\{broken-user-profile-name}\AppData\Local\Microsoft\Windows\Caches. - Check to see if the issue persists.
Follow the onscreen instructions and dialogs, and once you are done, your computer will have been refreshed and the black screen issue will be no more.
You can further try to:
- Boot your computer in safe mode and check if the issue persists over there. This will help you to isolate these issues from a specific app that is causing it.
- Press “Windows” + “P” to switch displays that might fix this.
- Update your Bios
- Disconnect the Second monitor
- Try to use an HDMI cable for connection instead of a DVI or VGA one.
- When in the black screen, press the “Windows’ + “Ctrl” + “Shift” + “B” keys to refresh the Graphics Driver.
- You can also try to perform a Startup Repair.
- Try to create a new user account using the last methods listed in this article.
- SFC ve DISM taraması yapın.